In the middle of a new project that I was working on, I realized that I had a problem. I needed to transfer a very large design (think 4 feet by 4 feet!) than I want to paint onto a primed piece of wood, and I couldn’t figure out how to do it.
I laid the printed design out on the wood and thought I could just trace the design on the paper with firm pressure and a little impression line would be left on the wood that I could just go back and trace. Um, nope.
Then, I tried a ballpoint pen. Nada. How about the tip of a butter knife? Nah. A bamboo skewer? No way.
I was getting pretty desperate at this point. I knew I could run out to the store to buy transfer paper, but my son was napping and that’s prime crafting time as any of you other moms know. I had to use something I had on hand.
Then a light bulb went off in my head: Newsprint! It always rubs off on my hands, so maybe it would rub off on the primed wood. Egads! I was right!
This technique will be especially helpful if you have a very intricate design, a very large design, or you just don’t want to take the time to cut out your design and trace like a stencil. I think this is going to be my go-to tracing technique from now on. It is so easy.
The Easiest Way to Transfer a Design Onto Wood
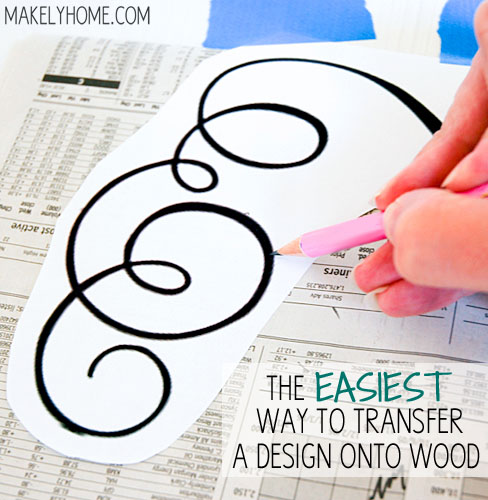
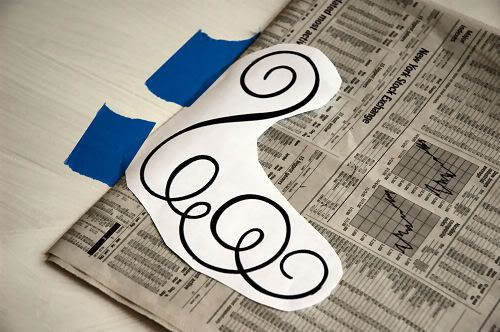
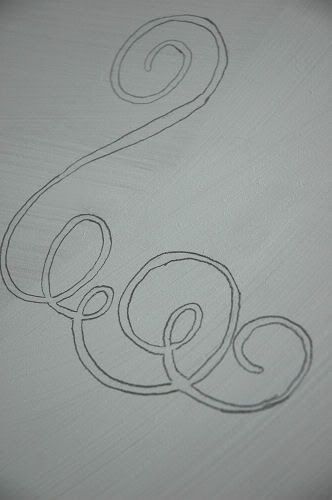
1. Print out your design and cut away the excess white space. Tape the top of your design to the painted or primed wood in the location you want to transfer the design.

2. Lift up the design and slide a page of newsprint underneath it. The classified pages and stock market pages work best, as there is a lot of small newsprint all over the page. Make sure that the entire design is underneath the newsprint.
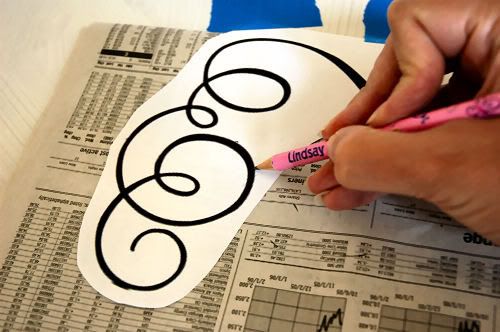
3. With a pen or pencil (preferably a pink one with your name on it like you are 6 years old) , trace the outline of your design directly onto the paper. Press firmly, but you don’t have to go overboard with the pressure.
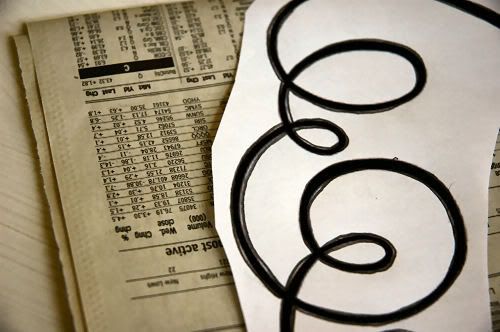
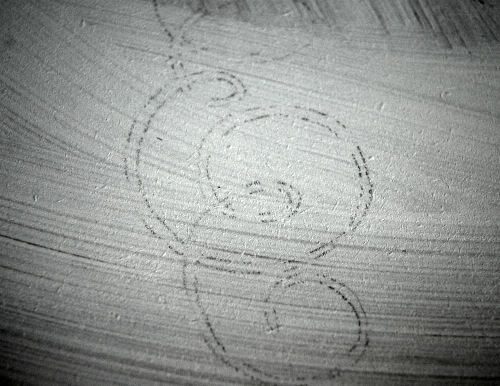
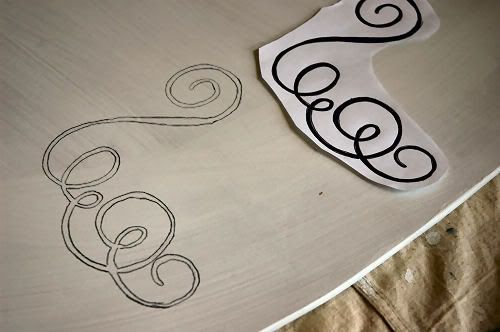
4. Remove the taped design and newsprint to reveal a light transfer underneath! I have turned up the contrast on this photo so that you will be able to see the transfer.
5. With your pencil (or with a paintbrush if you are way more talented than me), trace the transfer directly onto the wood.
6. Admire the beauty of your transfer, and then get busy painting!
Try this technique the next time you want to transfer a pattern or stencil a word onto a piece of wood. I’m pretty sure this would work on your walls, too. You’ll be amazed at how quickly and easily you can transfer that design. I’d love to know how it works out for you!
That is awesome! Great idea!!!
Blessings to you!
I have a query. I bought a saying thru online store and they sent me the saying that is the peel off deal. That can get really out of control!. But they sent along Blocked paper that is shiny on the other side. So WHAT AM I SUPPOSE TO DO??? I feel ridiculous that i cant figure it out ya know? Help anyone???
You assemble the saying in proper order, then peel the clear contact , put on top of the saying (or words) then transfer to wall.
OK, but waaaay too time consuming and complex. For something large like that to scale I would draw a grid on the drawing or whatever, then one on the project, then draw the lines in each square. Did that starting with about a 2″ photo and enlarged it to just under 4′ (that is 2 inches to 4 feet) in little time and no problems. Small stuff I just free hand sketch.
That's a great idea!
Well! Aren't you a clever cookie : ).
Awesome idea, thank you for sharing, I am sure this will come in handy many times over.
Are you kidding me? That is the most brilliant blogggy thing I've read since you painted your laminate. I am SO impressed with your ingenuity. You clever clever girl. I am bookmarking for sure.
Smiles and gasps,
Kate
What's that they say about the necessity of invention. Marvolous idea! I will be using this one!
Can't wait to see what it is you are making…
Sherrie
Neat trick!!! 🙂
This is a brilliant idea! I need a good use for all the newspapers floating around my house.
oh my gosh! So awesome! You are a genius!!!
that's pretty nifty. 🙂 I should try that out on the wall area above my desk.
What an excellent idea!
If you don't have newspaper around the house you can also rub your pencil on the back of the design, but that requires a little more time than your brilliant technique!
Thanks for sharing I will definitely being using this!
I use carbon paper to transfer my lettering onto wood projects and then I paint the letters whatever color I like
Or GRAPHITE PAPER that doesn’t rub off onto your project as much as carbon. Used that as far back as late 70’s.
So glad I found this site! My bf has been wanting me to draw something on a wooden box he has so he can carve and burn it but I’m reluctant to draw on the wood.. now i can just copy one of my drawings i already know he likes. Thanks ladies!
HElp… im trying to transfer on a dark a stained wood??? Any ideas?
Hmmmmm, can't wait to see how this turns out!!!
These Craft Ideas are great! Can these be done by those that are not as artistically talented?
Wow that is so cool! I don't think I would've thought of that myself =)
Looks like a great technique…thanks for sharing! I already have a project in mind 🙂 Love your blog, by the way!
Have a wonderful day!
~Michelle
(Treasure the Moment)
This is GENIOUS!!!! Thanks so much for sharing!
Clever, clever! As a previous poster said, necessity truly is the mother of invention! This is better than transfer paper, because it's recycling!
Fabulous, another use for newspaper! Love it, such a "green" idea!
Brilliant! I love, love, love it when these moments of sheer genius happen!
Ali T. @ My Little Kingdom
alitaylorbloginvite@yahoo.com
That is WAY cool! I love learning new techniques and I super love your pencil. =) I'll be linking.
Thanks, guys!
This is fantastic! Everywhere else I kept reading about freezer paper. I built my 7 yo niece a small jewelry box & just finished painting it the perfect shade of pink, after 3 tries, put some hinges on it, a mirror inside, of course & wanted make really stand out so I had a little Cinderella sticker that I made thick by gluing to several pieces of card stock & attached the princess (Cinderella, not my niece ;-)) to a spring & screwed the figurine into the center of the piece I built for the jewelry to fit so now when she opens the lid… “Bam! Cinderella!” 🙂 Just wanted share that. However, you blog or post about the transfer so appreciated! Now on the lid I’m going paint a beautiful floral scenery. I had to trace all of the flowers, butterflies & little birds. I’m not talented at drawing, at all, so very excited by this idea you’ve shared. Now, if only I can paint within the lines of the flowers & such! One challenge down though! Cheers! 🙂
That is such a great idea!!! Thank you! I am planning on making some wood signs in the near future, and I'll be using that technique for sure!
I gave you an award on my blog: http://madebyjaclyn.blogspot.com/
I love it! I had never thought of doing that before. My in a pinch way to transfer something was to scribble on the back of the template with a pencil or chalk. Voila, instant transfer paper. But this is even more simple! Great idea and thanks for sharing. BTW, I love the new look on the blog.
Anjeanette of the R&W; girls
Ingenious! Love the new look of your blog, too, though my first thought was, "What's with the hairdryer?" A second glance cleared that up. Glue gun! Duh! 🙂
Great idea!! 🙂
That is a great idea! Plus, I'm thinking that once the transfer and painting is complete, the lines will erase easily. I find that the graphite transfer paper lines don't erase…thank you so much!
my art teacher in high school showed us to use a pencil and do a rubbing on the back of something we wanted to transfer, then lay the transfer and trace over it, the rubbing transfered over to the object, it was really great for alot of reasons
Saw you on One Pretty Thing
Great idea – I've done the same as HomeSpun Threads but this seems even easier.
This is a really brilliant idea! Transfer paper is actually kind of difficult to find (around here, anyway). You can get the spendy Graphite Paper for real artist type people but not the cheapo stuff that I want.
Kimba
I am going to try this this week!
You are my new hero.
Here’s something else: If you ever need to REVERSE a design like that, trace over the whole thing with a really soft pencil (6B is my preferred), flip it over so the pencil is against what you need to transfer it on to and rub the back with a hard object (6Bs are usually eraserless so I usually use the other, flat end of them). Nifty idea, btw!
Oooh- you are a smart cookie! Thanks for that tip!
Clever!
Brilliant! I will definitely be using this tip in the future!
I’m SO going to try this technique this weekend! I want to transfer large words to a wall for painting. This is GENIUS!
Very useful, thanks!
Brill-yant! Love it. Thanks!
Found you on Pinterest! This is so simple, and somehow makes me want to go out and buy pencils with my name on them. I love the quick nap time solutions we come up with as mommas, and I keep thinking I could use this transfer method for some sort of inexpensive kid craft… Maybe those new plain chipboard notebooks that I keep seeing for back to school? I loved it so much, I featured you on my own blog!
It sure is better than carbon paper which tends to darken other places that should not be.
Great discovery! 🙂
You could also rub the back of the paper your design is on with a colored piece of chalk or a pencil and then just trace the front. It will have the same effect as transfer paper.
This is a life saver!!!! I have been wanting to paint a very intricate design on my 2 leaf dining room table and was getting bummed thinking about cutting out and tracing! Ha! Thank you thank you!
That is fricken awesome. Thanks for the useful info, I am going to try using that right now!!! Yeah.
Now, that’s NEWS to me…woka, woka, woka…
Fabulously fabulous ideeeyuh!!!
O.K. so I had to get back on Facebook to figure out how I could say (again) that this is awesome, cuz I was littttrally sittin down to print off a graphic to paint on my table…like right now… when I saw yur teknique on Shabby Creek… I’m, like, stoked.. And if this wurks I’ma totally line my house with newspaper and trace graphics evrywhur and everybody’ll call me that Crazy Graphic Lady… Watch out, cat…
What a wonderful idea! I love free uses for things that we already have one hand.
This is awesome! You have alot of great ideas 🙂 Adding you to my google reader.
OH MAN! I had everything but my name pencil. *fail* 😉
<3 AWESOME! thank you so much!
And it’s ideas like this that keep the world turning around.. Thank you!
“I love it”! …I bought a package of tracing paper at Staples a few months ago and it cost “$18.00” !!! …Believe me I’ll be using newspaper from now on…Thanks so much for sharing.
Hugz ..Betty
PS…I found you on Pinterest.
If you have a restaurant supply store or a smart and final or even possibly a costco. They have the paper you wrap sandwiches in not the white the thin almost waxy kind.(but not waxy) anyway you can get 1200 sheets for $12.00. I use it in my classroom all the time.
That’s a great idea! I’ve been searching for a great cheap idea and hope I’ve just found it! I’m going to try that…will let you know how it goes! Found you through pinterest…xo
Love the idea, and the humor!! Sometimes the simplest methods are the best way to go!!
PS. I also have stationery w/ my name on it. Ha ha!!
You are a god send. Totally just saved my project 😀 THANK YOU
How easy! I can’t wait to use this method! I was thinking I would have to whip out the messy carbon paper. Thanks.
You have an awesome blog…I’m following now! 🙂
jamie @ sewrockin.com
This is such a brilliant idea! I’ve been wanting to transfer a vintage design but hesitated. Now I’m ready to do it.
Thanks to Suzonne Stirling’s Pinterest I found your tracing brilliancy! Good grief this is going to save a lot of time on projects. Thanks so much for sharing it!!!
Cathe
This technique rocks! I just wanted to let you know that I featured this today on You Sew Rock Me Fridays. Here’s the link if you want to check it out: http://wp.me/s1VAkT-1183.
You can also take a #2 pencil and rub the lead on the back of your pattern in a close zigzag , just where you will be tracing. The lead will leave a mark where your tracing pen put pressure on it. You can also use chalk the same way if you need to see the “tracing” on something dark.
one other option is to trace the design with a pencil on the back and then trace it from the front. better than tracing paper won’t get anything on your project except what you want. . .your design.
Thank you so much for sharing this tip. I’m not artistic, so I’m always looking for ways to get around that! This is so easy!
Warmly, Michelle
I had the same problem. I used the pencil method. Check out my blog: http://dinxdeb58.blogspot.com/ There you’ll find what I mean by “pencil method”.
I enjoy your blog very much.
Very handy idea. Thanks for sharing!!!
this is another method but it will be a mirror image.
Draw the item with pencil.
Flip it over onto what you want to trace it on and rub it real hard with a bone folder or an old card of some sort. The design will transfer and you only had to do it once.
That is if a mirror image is what you want or is ok.
Oh, how I love you!! I keep seeing easy ways to transfer and then I read them thinking ‘how is that easy!?’. Thank you for changing my crafting life 🙂
So simple! Makes me want to get up right now and print something on my wooden bread board. Thanks for sharing.
It’s because of the carbon. Regular carbon paper can also be used or a soft pencil. With the soft pencil you turn your design over and rub a light layer all over the back of your design, then you lay the design down, rubbed pencil side down, and draw over it like you did. The graphite from the pencil will transfer. Learned this in art in elementary school!! Looks great btw!!
This does not work on canvas, I found that out today…. SO, I was only experimenting and finally came up with what I thought was a great idea…until I saw it on the comment above the one I am about to post…. Today has definitely been a live and learn day. However, I feel like I have the tools, thanks to your blog and my trial and error, to get the stupid design I want finally onto the stinkin’ canvas. AT LAST I can get to the fun part! Thanks so much for your ideas. I really enjoy your blog. I found you via pinterest, of course. Looking forward to seeing what you come up with next!
I would have totally thought that it would have worked on canvas. Good to know!
Yeah, the rubbing the pencil on the back trick is an awesome one. I remember doing ti as a kid. It’s hard to do that for really large transfers, though. That’s why I love the newsprint trick!
I ALWAY rub a pencil on the back of my transfers! I HATE doing it on large transfers!!! I’m sad this doesn’t work on canvas because that is always what I transfer to! I thought my life got easier! =(
I will still try this out in the future!
Check out some of my paintings that I’ve done by using the pencil rub transfer…
http://lifesprinkledwithglitter.blogspot.com/2012/03/few-more-of-my-paintings.html
Great thinking. Here’s another method is to hold the design onto a window with the right side to the window. Trace the backside with a lead pencil. You then may transfer onto the surface by securing the tracing in place and tracing it onto the surface. I’ve also used a credit card to run pressure over the tracing. Hope this helps! Any extra lead lines showing can be removed with clean paint thinner.
Very smart!
Great idea! I wonder if carbon paper would also work for you?
I want to see the whole project this went on. Looks so cute!
Oh thanks for this great idea. I have a textured wall that I tried to rub a stencil on, but it wouldn’t stick. Now I can transfer it and paint! Thank you, thank you!
Perfect!
wow what a neat idea thanks for sharing :O)
Thanks, Pauline!
A very clever solution.
I LOVE your ingenuity!!!! I CANNOT WAIT TO TRY IT!!!!!
I currently live Waaaayyyy out in the country on our family Farm. I am now a SAHM (Stay At Home Mom). I have NO neighbors!!! We have LOTS of Animals and I also raise or at least help a super population of feral cats NOT GET ANY BIGGER!! LOL They are slowly becoming my buddies. We have 7 crazy dogs that have taught me patience! We also have a Large thriving garden.
When I worked in the City, I worked at a Federal Health Ins Co. & had a SUPER group of friends. We would set aside 2 days each week to do crafting at the office. The 3 of us that started the “Crafty Group” would schedule what we were going to do the following week and send out lists of things we all needed. What we found is that there were a whole bunch of people like YOU in the group that could just think of things!!! We ended up doing projects like; 1 of us would bring in something (like newspapers) and the entire group would put our heads together and figure out as many things that we could make with the newspaper!! We had a whole bunch of fun gathering new ideas…
Thanks for all that you do!!!! I look forward to getting involved with your projects!!! God Bless You!!
This is such a great idea. I usually transfer an image by rubbing chalk on the back of the image and then tracing in the same manner you did, but using newsprint makes it even easier. Thanks for sharing this idea!
This also works by printing your image on reg computer paper. Outline right on the design with a pencil. (Remember to flip your design prior to printing so it isn’t backwards if that will be an issue.) Once you transfer a good bit of lead to the design, flip it over on to the transfer surface. Using your pencil…color, color, color over the design. This pressure and motion will transfer the lead to the surface! It works well….but I can’t for the life of me use a paint brush on letters or ANY OTHER intricate design for that matter! LOL!
Thanks for this tip! This is a great one too!
I’ve used pencil on the reverse side since I was little, but for larger transfers, the newspaper is brilliant. Recently I had to transfer a design onto felt that was already several layers thick (long story), and the pencil and the chalk methods were not working. As a last ditch effort before running out to the 24hr Walmart and praying they had transfer paper, I tried oil pastel. Worked a treat. It was sticky enough to stay on the looser surface of the felt, whereas the pencil and the chalk both lacked staying power. Love your blog!
Wow, what a great idea! often times I have wanted to transpher something for painting with no transpher paper. I will definatly try this one!
would it work on a piece of canvas?
Hi Victoria- I’ve never used this technique on canvas, but I’ve heard that it doesn’t work very well.
you can also iron it onto wood. Just take it right out of your printer and iron it directly onto the wood. You can do it with coloring book pages too.
Oh, I love that! I had no idea. I’ll definitely have to try ironing it sometime.
I found your blog from a pin on Pinterest. I had to read through all of the comments to make sure that I wasn’t repeating somebody else’s idea, but I do have another way of doing this and it’s worked great for me. Take a piece of tissue paper (everybody has white tissue paper) and trace your design on it (I use pencil for this). Next, lay your tissue onto whatever you’re transferring your design to (I tape it down with blue painter’s tape) and trace over your design with a fine Sharpie pen. The pen bleeds through the tissue and voila……transferred design! This should work on canvas, however, I might be concerned that the pen might bleed a bit on the canvas. Sharpies come in many colors now, but I always use black.
That’s a clever idea! I’ll have to try that one. Thanks for sharing it, Janet!
Another easy way to do this with no supplies other than a pencil and your design is to just flip your design over and use your pencil to cover the back of your design, the darker the better it will show up. Simply flip your design over and trace it. The pencil on the back will transfer just like the newsprint would.
Hi Cheyanne! I love the pencil trick, too. I always use that on small designs, and then the newsprint for larger designs where it would take forever to pencil.
Lindsey: Very clever! It’s fun to make our brains go to work, isn’t it? However, just FYI, and for all future dilemmas, ALWAYS have a roll of graphite paper on hand. It’s wildly inexpensive and it ERASES. I have transferred tons and tons of work with the use of graphite paper. Nevertheless, should I ever find myself without any, your newspaper idea will carry me through!
Hi Annie- I’ve never heard of graphite paper! I will need to look into that.
This is a fantastic idea….if you don’t livein an area that has changed thier newspaper print to the smudge proof kind 🙁 I may try it anywaybut we tried to use silly putty on the print and it wouldn’t transfer.
Oh, bummer! I didn’t even think about that.
Someone else may have mentioned this but I didn’t have time to read all 100 comments… I have used a similar method but I covered the back of the design with chalk (I had a bunch of different colored sidewalk chalks laying around). It works for wall art as well. Just tape the design down and trace with a pencil. It saves you from having to re-trace once you move the newspaper away as well. And the chalk brushes right off when you are done!
Smart, Erin!
Just can’t wait to try this method, clever you for finding such an easy method of transfering designs.
Great! I’d love to know how it works for you, Jan.
Hi Lindsey, I’m trying this on a huge design (we’re talking 36 pages of paper taped together here) and it’s not seeming to work. I did read above in the comments that someone said that their paper isn’t smudge proof so maybe that’s my problem. I was also wondering if you (or anyone else) knew if it might have something to do with using a mechanical pencil. I would think that the lead is the same in regular #2 pencils and mechanical pencils but maybe i’m wrong. Any thoughts are appreciated!
Ah I meant to write Lindsay… sorry for the misspell! My roommate spells it with an “e” and it gets me every time!
Hi Megan!
I wonder if you aren’t pressing down as hard as you would with a wooden pencil? Mechanical lead snaps so easily, so I know I am always ginger with it. Try a wooden pencil to see if that makes a difference for you.
Voilà une astuce absolument merveilleuse !
Merci beaucoup !
i use tracing paper, drawing pencil, (dark charcoal pencil, thick) print the design backwards, trace design with charcoal pencil, then flip, and retrace design onto wood, or canvas with a regular pencil. this works like old school carbon paper, just with an extra step, i keep a bunch of drawing pencils handy just in case.
Ingenious!…….Carbon paper is not readily available anymore, and when I’m desperate, I densely scribble on the underside with pencil, but that is a tedious process…… This is a great substitution…..I wood burn, so I prefer something easily covered in the process……definitely will give this a try…..Thanks for sharing!
Oh, neat! What kind of things to you make, Donna?
I have been looking for a way to transfer typography onto canvasses (for my “Quote Room”-eee!) for about two hours now. I found this site and my crafting skills felt instantly renewed. I AM READY FOR THIS PROJECT NOW (bring it on!), thanks to you! This idea is completely genius with no special equipment, solvents, or gels. I will let you know how it turns out!
Painting something for our daughters wedding and I am feeling lazy and didn’t want to go buy transfer paper…thank you so much for the simple idea…yea..girl power to share
Thanks, Terilyn
Girl power! I’ve already taught my 2 year old daughter to say that – it really makes my 7 year old son mad. 😀
I’m glad this tutorial helped. Happy wedding to your daughter!
Great thinking. As a calligrapher I have needed to do this more times than I can count. I just scribble on the back of the design with a #2 pencil, then trace over the design or lettering.
Thanks this is exactly what I need for my next project!
Thanks for this easy (and clever) tracing method. Just what I was looking for.
I used it on canvas and wrote a short blog post too http://couleursnouvelles.tumblr.com/post/45585818869 . Hope you’re okay with me using one of the original photos? I added links to your original post.
No problem! Thanks for letting me know!
Thanks for explanation…..a lot of pinterest things don’t have any information about picture, any way thanks again
Thanks for this idea.I am always looking for ways to transfer things on to other things. Keep me in the loop and add me to your email list.
Thanks for being so awesome!
Sure thing! I just added you, so you should get an email soon that asks you to confirm. Thanks, Virginia!
It is actually easier and better if you scribble on the back of your design with a pencil……then trace that onto ur project. It will give the same results, but since it is in pencil you can erase where u may have made a mistake!
I am in the midst of making a sign for my Dad to hang in his little “work shop” that will inspire him to “WWPD” (What Would PawPaw Do), this would be his grand father, which is my Great Grandfather. He passed away 2 years ago at the “ripe ole’ age” of 102 years old! YES you read that correctly, 102 years YOUNG! He was AMAZING at carpentry work and my Dad has followed in his foot steps! He just told me a few days ago, after sending me a picture of the fencing he has almost gotten finished with, on his new Retirement Property in Florida. I told him that PawPaw would be so proud of him and he said, “yes I think he would,,,I always think to myself when I do work with building things, WWPD” and IMMEDIATELY I knew I HAD to make a sign for him to hang in his shop so that he would ALWAYS see it! This post is going to be the best thing that will help me to get my letters PERFECT and look all worn and “rustic” and help get them on the piece of wood that I have chosen just the way that I want them! SO, THANK YOU so very much for sharing this post and I hope that I will be able to send you a picture of my finished product before I ship it off to my Dad! Thank you again! 🙂
Oh, I love this story! Thanks for sharing!
as the saying goes (or ought to) Motherhood is the necessity of invention! Great idea. And I spent all that money on transfer paper. Haha Love your site
Break Through!
This is totally awesome! Found it from Pinterest and I’m definitely going to use it! Have a good one!
Great idea!! I will say, working in newspapers tho, that some papers use water-based ink now that won’t work as well – but if they have an older press, it’ll work perfectly. 🙂 Thanks for the tip!
Lindsay, I’m so glad I came across this fantastic tip! Just tried it out on a project and posted about it today. It worked great! http://dimplesandtangles.blogspot.com/2013/09/diy-gold-letter-print.html
SOOOO I had a similar dilemma and cast about trying this and that and came across the easiest breeziest way EVER to transfer pencil to wood. Grab some Deoderant ( the stick kind) rub a very light layer onto whatever your tranferring to, then lay your drawing pencil side down and rub!!! THATS IT. Peel off slowly and gaze in wonder at what you’ve done!!
just thought I would leave you another way that works…it is a little more labor, but may be worth it for more detailed designs. Trace your pattern onto tissue paper with a pencil, then place on top of wood or where you want to transfer it to and then trace with a sharpie. the sharpie will bleed through the tissue paper and the pattern will show up. Thanks for sharing your tip!
well,i think ,using carbon paper is more easy
Hi Lindsay, I think that is a really great transfer. Is it possible to see the furniture that you put this on? I would love to see the finished end. Thank you for sharing your tips, it really is a great help to all but to me as I am a beginner with painting furniture and doing transfers and stencils.
Best regards
Debbie
Sure thing, Debbie! This is what I used the newsprint on: http://makelyhome.com/diy-create-your-own-custom-headboard/ It’s a big headboard I made for my son, and I used the newsprint to draw in all the details.
Hi,
Thank you so much for this tip. I wanted to do a wall mural and have a lot of design in it, tracing which onto a butter paper would have taken a lot of time. I tried this technique of yours with a newspaper and it worked very well!
Thanks a tonne for sharing this! 🙂
Nice method but too light for my project – The quickest and easiest way to make dark lines was to trace my design onto a plastic pocket with black NON-permanent marker then simply rub it onto the wood.
I like your wry sense of humor.
This is a neat idea! An easier way to do this is to use a dark sketch pencil and trace your design, then flip over on object and retrace(rubbing gently) using the eraser. Lead will tranfer onto object.
Another quick fix for that is to just use a graphite #2 pencil and lay it sideways and color on the back of the paper where your design is. Works like carbon or graphite paper!
That’s exactly what I was looking for, thanks a bunch for giving an awesome tip!!
Great idea! However, today not many people still get a newspaper delivered. If it happens that you should need to trace something again and you don’t have newspaper available you can just turn over your sheet of paper the design is drawn on to the wrong side of the paper (not the image side) and start rubbing with that pretty pink pencil you love to work with. Be sure to use the side of the pencil and keep rubbing the paper gently to build up a good layer of graphite for yiur transfer. After you have built up the graphite layer over the entire back side of your design it is as simple as turning over the art, taping it down, and tracing the design to transfer onto your substrate. They also sell jarred graphite to make your own transfer paper. I keep a jar of that handy since I haven’t held a newspaper in years, but for the occasional user the pencil rubbing method is fine. Keep on crafting and sharing those brilliant ideas!!
That sounds good, …I use carbon paper but I really had a problem when I went to put lacquer over my painted design , the ink bled through. I was devistated. I mean these paints we use don’t have primer in them. Did anyone have this problem?
I think this may be the best DIY tip I’ve ever come across on a blog! Huzzah to you! 😀
Fixin to try this right now =) hopefully it turns out as good as it did for you =) so happy i came across your idea =) fingers crossed it works =)
Now I know that I can look on Pinterest for craft solutions…. I needed to transfer a drawing onto wood a few nights ago. I drew the design on card stock paper, punch holes with a nail, 1/4 inch apart along the design, placed it on the wood, and used a sharpie in the holes. There was my design. Different minds, different ideas.
Thanks for sharing.
It’s a great idea.. I always use wax paper for wood transfer.. I think I need to try this..
This stinks that in order to see your photos, I have to join photobucket. I wish I could see what you did.
This is beyond Awesome! Thank you so much for sharing
We can’t see your photos anymore.Where the photos are meant to be it says “Is this your photo ? Please upgrade your photobucket account to enable 3rd party hostings”.
I use chalk — I chalk the back of my design and outline the front with pencil. The chalk comes through much like your newsprint.
“It was really insightful.
Thanks for the info.
Wanna have more contents from you.
Cheers””
I have been taking a lead pencil and coloring the back of my pattern for years this works also. like the news print lot faster
I have noticed you don’t monetize makelyhome.com, don’t waste your traffic, you can earn extra cash every month with new monetization method.
This is the best adsense alternative for any type of
website (they approve all sites), for more info simply search in gooogle: murgrabia’s tools
Wonder if this would work on fabric for hand embroidery? Hmmm…off to search for a newspaper.
Damn, content like this particular makes waking upwards worth your time and effort!
Reading through in in the sack today I got so motivated I also decided to work out.
I want to thank actually making my life
better. The only program that used in order to do that was http://www.rtjournal.org/how-to-choose-a-college/, but now Personally i think like you got the power.
I am a newbie at all of this! I have spent countless hours and days trying to find a way to do this for a project I’m working on for a friend! I’m going to use your method on a sailboat I’m going to hand letter the boat name, hailing port and all other exterior graphics using your method! I am convinced it’s going to be a win-win! Thanks a million you’ve saved me! I feel so cool!