I had a great first post of 2010 planned, you guys. I had been thinking about it for weeks. I even had my list started…I was going to fill you in on all the great projects I have in store for the new year.
The closer it came to January 1st, the more nervous I became. What if I didn’t get them all finished this year? What if I said I was going to do something that I didn’t actually do? We all know how the toile-covered headboard and mirrored nightstand tutorials that I promised but never actually wrote turned out. Y’all still email me about them weekly. You people are like elephants that never forget! I love it.
So, I panicked and decided to teach you an easy glue gun craft instead. Cool?
Framed Button-Filled Design
Supplies:
– Picture frame with glass
– Fabric scrap approximately the size of the glass
– Assortment of buttons
– Spray adhesive
– Glue gun and gluesticks
You will likely be able to throw this together without spending a dime. I raided my button stash, fabric stash, and frame stash (man, I have a lot of stashes!) and was able to pull this together for free.
Well, I take that back. I bought another frame at the Dollar Tree I was going to use, but my husband ran over it in the garage while I was letting the spray paint dry. I ran outside when I heard him pull into the garage and I said, “Did you run over my frame?” He replied, “Oh, is that what that crunching sound was?” But, I digress.
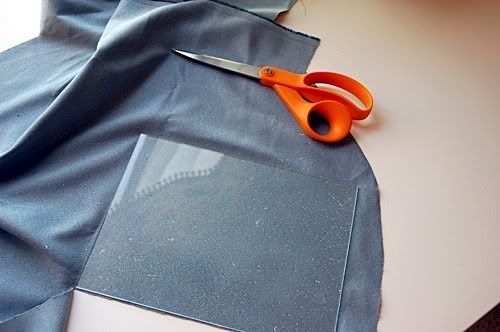
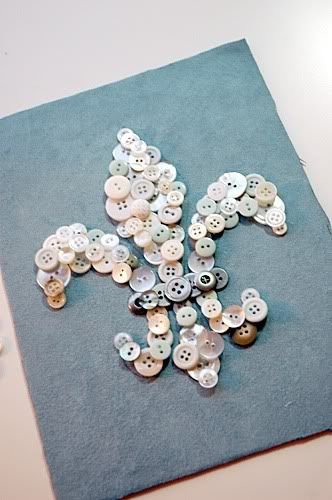
To start your project, remove the glass from the frame and set the frame aside. Spray the adhesive onto one side of the glass and onto the back of your fabric scrap. Wait for about one minute, and then apply the fabric to the glass, sticky side to sticky side. Smooth out any bubbles or wrinkles with your hand.
Flip the glass over, and trim away the excess fabric. You want it to just cover the glass.
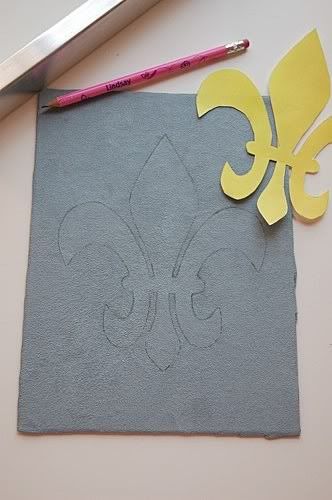
Next, lightly draw your design onto the front of the fabric with a pencil. I printed a fleur-de-lis design from the Internet, but you could draw an initial or any other design. Just remember that a design without a lot of small or skinny details works best.
Sort your button stash into like hues. For my design, I used white, off white, light brown, and light blue buttons. You are welcome to use a mix of every color under the rainbow if you would like, but I decided to keep mine in the color scheme that matches the room in which this picture will hang.
Now comes the fun part! Fire up your glue gun and just start gluing buttons on the fabric, filling in the design. After playing around with it, I decided that I like the buttons to overlap each other in areas. Make sure you are really varying your button size and color throughout your design.
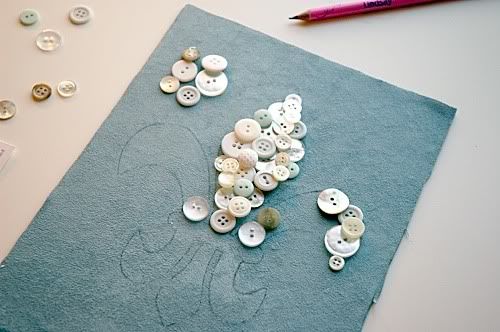
The time this will take will depend upon your design, but mine took me about an hour to glue together completely. You can still see the pencil lines on some of the areas if you look closely, so don’t look too close!
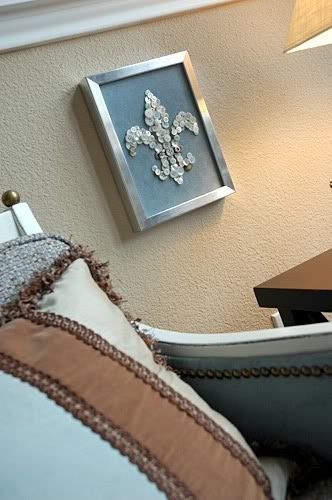
Once you are happy with your button-filled design, simply put the glass back into the frame and hang on the wall or set out on a table.

Isn’t it so fun? I love that I was able to customize it to fit in with my living room decor AND I was able to use up some supplies I had on hand.
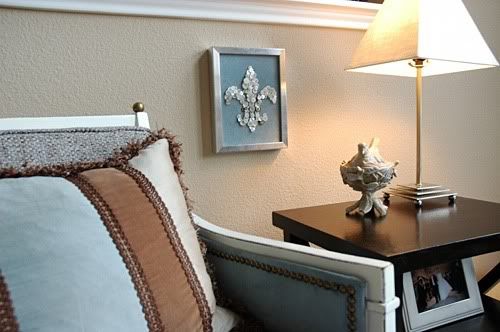
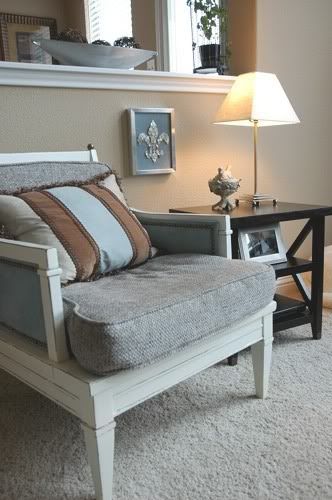
I’ve been wanting to hang a small picture in that space, and this fits just perfectly. I love it! What do you think?
Oh, that is TOO Cool!!!
Suzanne
OH, LOVE this..thanks for sharing and glad I have come across your blog!
I can do this!!!
I think it's lovely! However, writing down your ideas and making them public might actually help motivate you to complete your 2010 projects. I have found this the help me. I announced on facebook that I was running a half-marathon in April and found tons of support and motivation from the responses!
Beautiful. The peal/blue/silver combo is delish.
Great idea.
Oh gosh, girl, you KNOW I love free projects! This is very cool, and just perfect for that very spot. Thanks for the inspiration!
Love it! I've been following your blog for only a couple of months now but you've got some great projects (I made the book wreath and get so many compliments!) and I can't wait to see more. I think you should re-visit the mirror nightstand in 2010 – I have faith that you can do it and it will turn out fabulous. Keep up the great work, you are inspiring us all!!!
That is as cute as a button! lol
I love this! Thanks for the idea!
I love it!!! Thanks for sharing!!!
Your button craft really adds a pop of interest to that low wall. This is a great idea and would be a good way to use all those extra buttons that many of us accumulate.
Please take that down immediately and replace it with a lyre, young lady!!! You're no Kappa!
LOVE. IT.! I think I am going to try it first with a less permanent idea…I have a shadow box with a cork lining. May try that first. Thanks!
I'm so doing a "Q" for my daughter Quinn's room! Thanks for the super cute idea!
Very cool project. You could make so many designs. I just love your chair, I think I will bring my kindle over and cozy up and read for a while!
Megan
i. love. that. fleur de lis. must make one. wonder if i have enough gold buttons…
Very cute! Love it!
lindsay…what a great idea 🙂 this turned out really cute and looks great in that little nook.
Ooh, it's GORgeous!!
That is so cool…I am thinking of doing our initial in our last name on burlap! Woo hoo Thanks for a great idea!
What do I think? I think you are unbelievably creative and it makes my head hurt. 🙂
Very cute project!
I love it! I am a big button collector and have done projects like this in the past. I love your colors and that you found a use for those many, many white buttons. Of course I have more of those than any other.
Very fun! If ever I find myself in abundance of buttons, I'll know exactly what to do with them!
That is so cute! What a fun idea for designs and monograms. Thanks so much, I'll be linking.
LOVE it!
WOW!!!!! Beautiful. 🙂 I love the fleur de lis design, and the fact that you used buttons makes it even more fab in my opinion. 😉 Lovely!!!
Love ithat it's easy enough for kids to do (sans the hot glue part). This is up next on my rainy day craft idea list!
I absolutely LOVE your blog! You make the most amazing things and make them seem doable. You've inspired me to really decorate my house in 2010.
Get out!! That is too fabulous…
Janell
Aaaahhhh-dor-a-ble! Super cute. No pressure on your projects sweetie! We're just as busy and frantic in our own little craft world! Trust me!!!!
Lovely! If you're worried about your pencil marks showing, you can use a marking pen that will disappear with a spritz of water. Your local quilt store will point you in the right direction. You could also buy quilting stencils to make some designs. (spot the quilter!)
You are just amazing and soooooooo creative! I've been following your blog and I just love everything you do.
Have a wonderful day.
Gail
I love this. It's beautiful. I am going to copy very soon! This post is going into my favorites for sure!
That is just the cutest thing! I want to make some of these for me and to give as gifts! I've got a bag of antique buttons screaming to be used. Thanks for the idea!
I also wanted to thank you for your advice on refinishing that TV unit with the bubbly veneer! I sanded down through the veneer and put 3 coats of primer on and it worked like a charm! I posted a pic of it along with the game room re-do on my blog today if you want to take a peek! Thanks again Lindsay!
http://www.finesseyournest.blogspot.com
Very cute! Would love to post this and link to it if that's ok? Along with the high 5 garden!
innerhooker(at)yahoo.com
I LOVE the way this looks! The fleur de lis is adorable!! Thanks for sharing. I'm linking this tutorial to my blog. 🙂
Yes you DO need to work on that headboard tutorial! I'm going to be attempting a framed headboard and I LOVE yours! C'mon girl! 😉
Wow, love it. I'm going to go through my buttons and create! Thanks for the inspriation!
Very cute! I'm a sucker for a great fleur de lis project!
LOVING this idea! ALSO always loving the fleur de lis.
totally love it! Thanks, Lindsay, for such a fab idea!!
That's so cute
That is sooo cute! I'm going to have to try that!
I love this idea! And as a seamstress, I am extra enamored of it! I can't wait to try this myself. Thanks for the tutorial.
Lindsay…I love you! I think I.CAN.DO.THIS. 🙂 So wish I was going to Blissdom and could meet you in person. I'm sending my neighbor, Kristen from We Are THAT Family with a hug from me. Thanks for giving me the courage to CRAFT!!!
Absolutely lovely darling ! People would pay serious buckaroos for that in a specialty shop. You should sell some in your Etsy shop ! I love it – can't wait to meet you at Blissdom!
Kate
Wow, what a great idea. And such a cheap way to create artwork for a hard to fill space. What a great way to start off the year! Thanks for sharing.
Oh, this is SO adorable!! Definitely going to be trying this!
I love this, so very cute. I've been obsessed with damask recently. I plan to stencil it in my mudroom, and I did it on some curtains the other day. Something so very sophisticated about it. I'm not a button collector..? I guess I'll have to wait until garage sale season to collect some! Cant wait to see what you have for Teach me tuesday!
That is pretty creative! LOVE it!!!
I LOVE IT! What an awesome idea! Simple but beautiful! Thanks for sharing!
WOWEEEE, what darling idea! So clever and easy. Just wish I had that big of a stash of old buttons. But now I know what I will be on the hunt for.
Thanks for sharing.
XO Nancy
that is cute as a button!
This is fabulous! I love it … going in my to-do. Thanks for the inspiration – great job.
You did a great with that project. I am impressed. Thanks so much for sharing!
nancy
genius! wow. not gonna lie, when i read "art with buttons" from Kimba's DIY Day, i thought it might be cheesy, but this is FABULOUS! super super creative.
Really cute!! You could do lots of variations of this. Thanks for sharing!
I like that! And I have lots of buttons too! Maybe in a butterfly shape for my girls room… Or an airplace for my son… Thanks for the inspiration!
I love buttons, and the antique sewing machine in a cabinet came with a drawer full, so I am on the look out for projects. Thanks so much.
I never woulda thought of that. What a fun piece to make – and I have a ton of buttons! Thanks so much!
Love it! I'm thinking of doing something like that with my boys' initials for their room. Very cute!
Hi, I tried out this project today. So fun, I love it…though not as much as yours! 🙂 I linked to your post too….
Bethany @ Happy By Design
That is so cute! Great idea!
I love it and I am totally going to copy that!
Love this project!
It is sooo sweet!
blessings
barbara jean
This is adorable, Lindsay! Love it…
That is such a neat idea! So many possibilities!
LOVE this! You had me at fleur de lis….
Gorgeous! I featured this at somedaycrafts.blogspot.com
This is an awesome project – I MUST do it! I have millions of buttons just waiting to be made into something beautiful! Thanks for the tutorial!
I LOVE this! wow! I'm going to start collecting all the buttons I see now, so I can make it! 🙂
OMG, I have mountains of buttons just waiting for a good project to come along! I can't believe I haven't discovered your blog before….it's now bookmarked so I can get more great inspiration!
loves it!!!
I just stopped by another blogster, who you had obviously inspired with your craft project.
I like seeing the additional photos of it, on how you've place it in context.
It look stunning where you are hanging it and you kept it simple, which is the secret to successful craft, I have come to believe.
Thanks Lindsay, I am CRAZY about this idea! I have a plate that I have been wanting to put our initial on to hang in our kitchen, I think I will try buttons.
This inspired me to make this: http://redheadscraftmorefun.blogspot.com/2010/01/be-mine-conversation-heart-picture.html
Thanks for the inspiration!!
I think the depth added by the buttons makes the piece. It's lovely and adds such a pop of character to your sitting area.
i sooooooooooo love this. i’m gonna make one for my ‘boudoir’ x
I LOVE THIS! I love fur-de-lies to begin with this, but this is easy and so cute! I just can’t say how much I love it!
Wow, I really love this idea! I think I will try this one out very soon! Precious!
Your project ROCKS! I just wanted to let you know I featured it today on “You Sew Rock Me Fridays” on my blog Sew Rockin’. You can view the post here: http://wp.me/p1VAkT-mG. Awesome work…I can’t wait to see what you come up with next!
Great idea! It looks great in your LR.
Wow, this is gorgeous! You did a great job on this. I hope it is okay, I just couldn’t help but feature your beautiful framed Fleur de lis on my button crafts round-up hub here:
http://jamiebrock.hubpages.com/hub/Super-Cute-Button-Crafts-Tutorial-Round-Up?done
Thank you so much for sharing this!
Jamie