When we came upon my now-favorite booth during our trip to the City-Wide Garage Sale, I think an audible gasp could have been heard from within our little shopping group. It was one of those booths that has something you want to buy in every square inch of space. I found a wonderful chippy side table exactly like I’ve been looking for, but the vendor wanted $50 and I wanted to pay more like $10. Thrifting has certainly spoiled me!
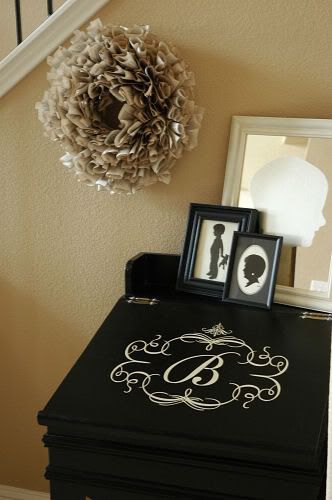
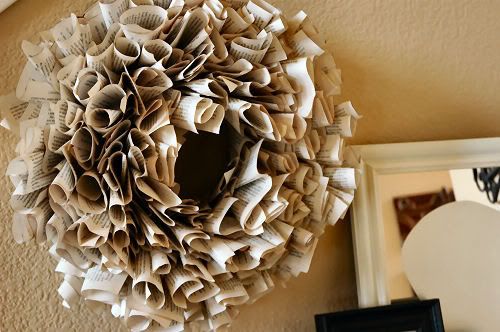
At the same booth, we came across a pair of simple, but stunning wreaths made from book pages. The vendor told me that she made them sitting in front of the television. That’s my kind of crafting.
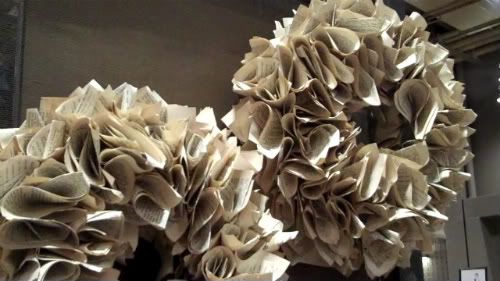
I honestly don’t remember how much she wanted for these lovelies, but I think it was at least $40 a pop.
Yeah, um, that’s way too rich for my blood. How about I show you how to make my version of the same wreath for just $2? Librarians and book lovers, please avert your eyes.
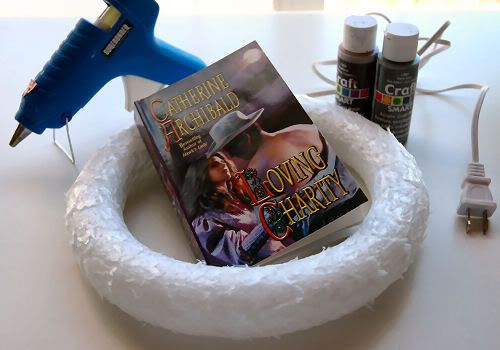
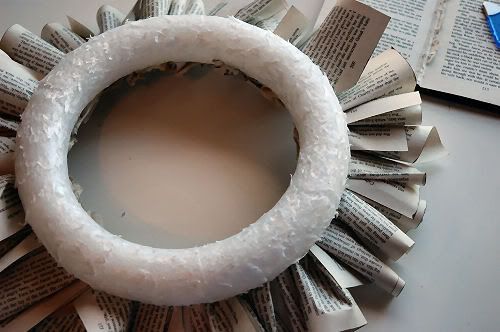
- 10″ foam wreath ($1 at Dollar Tree)
- Paperback novel ($1 at Dollar Tree – depending on the length of the book, you may need two)
- Brown and/or gray craft paint
- Glue gun & glue sticks
- Small strip of ribbon
- A few paper towels
- A few straight pins (optional)
1. Assemble your cast of characters. I felt slightly guilty about purchasing an author’s work from the Dollar Tree for the sole purpose of ripping up. I read a few pages of Loving Charity just to make sure I wasn’t about to destroy a literary classic; let me assure you that I wasn’t.
You could definitely use vintage books, magazines or sheet music for this project or even select a book off of your own bookshelf that you don’t think you’ll read again.
2. Using the paper towels, I applied the brown paint to the edges of the book. I simply squirted some paint onto the towel and wiped it on the book. I painted the brown first and then applied a bit of gray. This will give your book pages a vintage look. To be honest, two colors aren’t completely necessary, so you can use just gray or just brown if you would like.
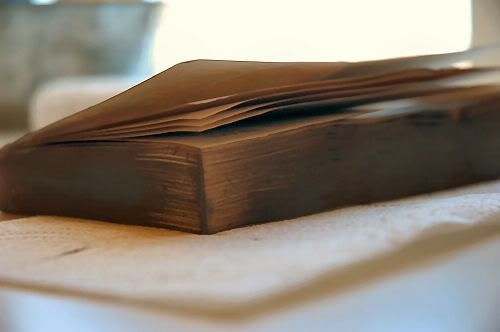
Lay the book on a clean paper towel for about 5 or 10 minutes to let the paint dry.
3. Cut or tear a page out of the book and roll it in a method of your choosing. I put together a video tutorial to show you some different ways to roll the page if you are interested in seeing how I did it. The main thing to remember is that you want to roll the paper and not actually fold or crease it.
4. After rolling the page, apply some glue at the end of the roll and glue it to the wreath. Make sure that the painted edges are facing up.

You will do this layer all the way around the wreath. When you have finished the full circle, flip the wreath over. That layer will become the bottom. If it won’t lay flat, put something heavy on top of it to flatten it out for a few minutes.
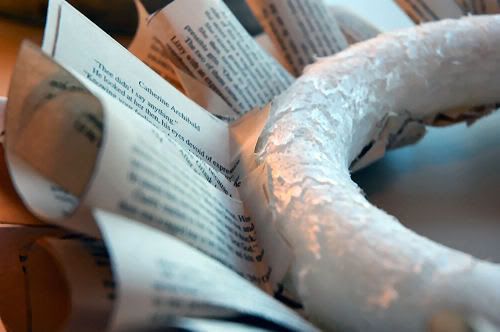
5. Continue rolling pages for your wreath. You will now fold a little tab on the bottom edge and apply glue only to that tab. Work your way from the bottom of the wreath up to the top, finishing one layer before moving to the next.
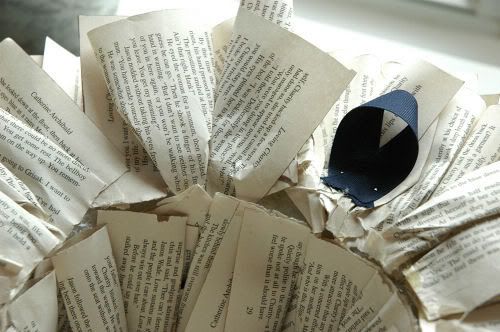
6. Once you get to the inside of the wreath, roll the paper and apply glue to the edge much like you did with the bottom layer. When you glue it on, the pages will be shorter than the wreath of the wreath. That’s okay.

7. At this point, your wreath will be mostly done, but there will be some sections you need to fill in. It should look roughly like this.
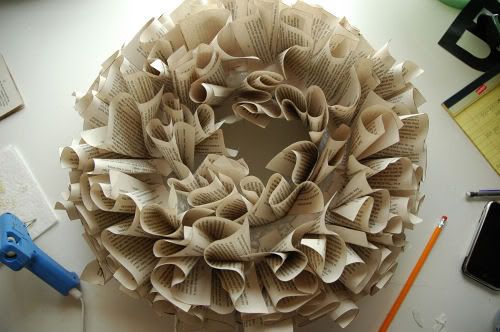
To fill in your spaces, you’ll simply roll a page, apply glue to the ends, and just stick it in the wreath. The filler pages don’t necessarily need to touch the styrofoam wreath; they can stick to the pages already glued to the wreath if need be. Use the filler pages to fill in holes and add some height and visual interest to your wreath.

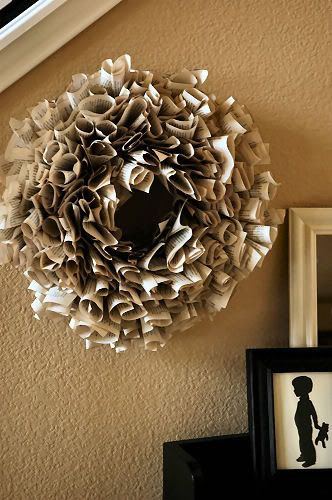
All that’s left to do now is to find a spot to hang your new creation!
I LOVE this and I will definitely make this!! I can't wait – uber cool!
Love this idea….I will be trying it very soon!
That's totally adorable in that space, and I love that you found such a good use for a cheap romance novel. 🙂
P.S. Did you read the one review for that novel on Amazon? It's really, really funny.
Gah, should've averted my eyes. I'll pretend it was Twilight. 😛
It's beautiful, but I'd get lynched by my coworkers if I had that in my home or office!
Looooove. As usual.
One should never feel guilty dismembering a book with a shirtless man in a cowboy hat on the cover. 🙂
I will definitely be doing this very soon.
what a cool project! I'm going to give a try this week!
I must make one!! How fun and inexpensive is this project!! Thanks for the great tutorial!!
AMAZING, I am so going to do this, and would you like to know why?? Because I am a BOOK LOVER, there are so many books at garage sales and thrift shops, not to mention the Dollar Tree, why not turn and unloved tattered book into BEAUTY, you will enjoy ALWAYS, thank you for sharing!!
Hmmm…I teach school. Every year the library has a book discard day. This would be one solution to all those books that no one wants anymore. Happy Monday ~Natalie
Oh what a fun project, Lindsay! I would definitely try this! It kinda reminds me of those colorful tissue paper balls that we used to get at the fairs when I was a kid- so big and fluffy.
Like you, I think the look of the B/W book pages- it gives the wreath character. Thanks for the tutorial. Need to go looking for some cheap ol' romance novels from my reading stash…
🙂 Sue
This would be beautiful using what our churches sadly are discarding…a hymnal! Display the songs of our faith! In looking at my hymnals here at home, several already have color-edges (red and green). Old hymnals can be found at the Salvation Army, Goodwill, etc. This would be a good project for a girls group at church as well. Perfect!
Oh my goodness, you weren't kidding! This IS gorgeous! So much better than the ones in the Dec. P.B. catalog. Thanks for the inspiration.
This is a really cute idea and simple to make, too.
I absolutely love this! How creative – and it looks awesome! Thanks for sharing the tutorial…
pk @ Room Remix
That is such a great idea. I absolutely love it.
Love it! I think that is a great idea. It has a natural vintage like feel! Plus I think it adds great texture to a space. Kudos!
Lindsay,
Thanks for the tutorial. I love the wreath and have plenty of old books I could use for this project.
Thanks again.
Jane
AWESOME!!!! Now I'm sad that I donated all those paperback books after they didn't sell at my garage sale; I could have supplied all your readers with enough to make their own wreaths!
Love it! it looks great!
I love this idea and it looks great in your home. Thanks for another great DIY!
Hugs!
Judy
I love that wreath. Looks like I have something else to do while watching Biggest Loser or crime shows. Thanks for the tutorial. I can't wait to try this.
Great wreath.
And I love the awesome thing in that space there. It's magnificent. You should really see it in my head.
Looove it! ♥
Love, love, love it! I'm an English major in college right now and am one day going to be an English teacher, but I still think this is great! I mean, books can be different forms of art, too! I can't wait to make one of my own!
This.Is.Fabulous!!!
Ridiculously cute! I so wish I had your craftiness…until then, I'll keep reading your blog 🙂 Maybe one day, I'll be able to return the favor. Thanks for sharing.
great job Lindsay – looks fabulous!
Now that is a cool project! I can see it being done fro the holidays with some vintage Christmas wrap or something of the sort. Love it and will file it!
What a fun idea! I just saw books at the dollars store the other day and thought there had to be something I could do with it! Now I know! I am filing this idea away at thecraftersfilebox.blogspot.com.
Thanks so much for sharing!
all I have to say is "WOW" love this. Thanks for the tutorial, Lori
I love this – what a great idea!!
This is such a cool idea! I wonder if it can be turned into a holiday decoration by using red paint? Or maybe using a kid's picture book? I'm going to experiment! Thanks Lindsey!
What a great project! I'll have to do this one, it's really pretty. Thanks for taking the time to show us how!
Okay, I am making one of these!! And since I am SUCH a glitter freak, wouldn't it be pretty to give it a light coating of that spray glitter??
Oh yeah!!
Thanks for the tutorial!!
Lou Cinda 🙂
I love it! This actually looks like something I might try. (And I'm a former English teacher!)
I love this! LOVE, with rainbow sprinkles and unicorn kisses. I must do this. Thanks for the tutorial!
I cannot wait to try this! Thanks so much for sharing!
LOVE THIS! When I saw your post with the original wreath, I thought, "I have to figure out how to make that". Thanks for figuring it out for me. I can't wait to make 1 (or 10..lol).
VERY cool, Lindsay! 🙂 I love the book you chose to use. 😉 At least it wasn't Don Quixote or something!! Great tutorial too…I really love the *fabulousness* of that corner in that last photo. 🙂
My goodness – I super love this – and I am a bibliophile from way back. I am headed to the Hobby Lobby today to pick up some other 'stuff' and have added the supplies needed for this.
Thank you so much for the tutorial.
Oh oh oh oh oh!! SOOOOO CUTE! I seriously love this! (And I am a librarian! LOL)
Linky party here:http://theshadesofpink.blogspot.com/2009/11/room-month-bookshelves.html
So Cute! Thanks so much for the tutorial, makes my life a lot easier 🙂
I'm so glad you figured that out for me! I have several old books that I can't wait to do this with! Thanks so much! Awesome!
This is so awesome! I think I'm going to have to try to make one of these….
I saw one of these on ETSY (for $50!!!) and my heart nearly jumped out of my chest. I liked it so much I showed the mister. Glad to see the tutorial… I guess I know what my project this week is! 🙂
This is awesome!! I love it – and what a great site, I'm glad I found you. I'm a new subscriber! 🙂
Terrific!
I AM a librarian, and I will be calling the library police on you! Just kidding…I love it. I'm going to have to make one myself. Now if you'd made it out of The Very Hungry Caterpillar, I might have been upset.
I’m a librarian too, and I have loads of discarded books to donate for this decoration!
My MIL is a retired librarian, and she said the same thing. Please! Come take these books!
LOVE LOVE LOVE it! I think I'm going to rip apart the poor book in front of me! lol
How simple & beautiful! You know me, I love cheap projects!
Yay! I saw the pic of these wreaths in the other post and was hoping you'd show us how to make them! LURVE! Can't wait to make a trip to Dollar Tree. May i ask is it better to get a larger book? or is that a standard romance novel size? 😛
Woooo Whooo!! Way to steal someones idea and make it yours for CHEAP!!
I just love this idea ~ who would have thought making a wreath out of pages in a book ~ I guess I have to start ripping books apart ~ Also for the holidays you can put red & green paint on the edges and maybe even some stickles ~ Thanks so much for sharing this great wreath!
What a great project. It seems easy, is super cheap and looks FABULOUS!! I think this is a project I can tackle.
C. Beth was so right, that review on Amazon was funny! (had to check it out after reading her comment)
This looks so amazing, I cant wait to try it. It reminds me of a lighting fixture from pottery barn I saw recently. Theres something about pages of vintage books that are just lovely, even if they arent really vintage. Your secrets safe with us!
a fascinating use for an old book. brings to mind the time I visited an outhouse in Central Russia, and they had a copy of the Communist Manifesto NAILED to the wall (for you to tear pages out of in order to "take care of business" in lieu of toilet paper.) so many bad books….so little time!
Excellent idea … you could theme it … "My Pride and Prejudice" wreath …. "Christmas Carol" wreath ….
I think the wreath is fabulous! I love it
What a neat idea! And I love that you used an old romance novel. So funny and probably better as a wreath than for reading. Maybe I'll give this a try! Thanks for the inspiration.
I'm a school librarian, but I still think this is an awesome project! Part of loving books is knowing when to let them go and create something awesome with the pages. I think I'll have to make this!
Really $40!? Yours looks so much better and full 😛
I love it! You did a great job and were way more patient then I in figuring out how to make those. I looked at them a long time at that booth, but couldn't bring myself to pay $40 for pages ripped from a book. The hub has lots of sheet music, I might give it a try with that.
This is awesome! Love it!
i am so glad that that you came back to teach us how to make this great wreath. i was reading the other comments and i had a great idea. i have a three yr. old granddaughter that has been destroying a page here and there from her books. this would be a really colorful wreath if you used kids books?! mine will be black and white!
The first thought that crossed my mind when you said you were making this wreath from a Dollar Tree book was,"It should be from a horrible romance novel." You did not disappoint. On book choice and in construction. Looks great!
i love this! how wonderful! i will be copying! thanks for the tutorial! looking forward to following your blog!
Love this project! I'll be imitating 🙂
So awesome… so pretty! You're a super star! 🙂 I'll link up at Dollar Store Crafts soon!
So adorable.
Someday when I fulfill my dream of owning a bookstore I will decorate with one of these wreaths, along with one of these: http://www.ragandbone.com/blog/?p=1444, one of these: http://rufflesandstuff.blogspot.com/2009/11/time-for-good-book.html, and some of these: http://sweetpaul.typepad.com/my_weblog/2009/04/c-1.html
A crafty girl can dream.
This is lovely! I would love to make it!
Wow! This is a beautiful wreath…I can also envision it done with beautiful seasonal papers.
It turned out great! This would be a great not-so-girly decoration that my guy could enjoy.
Love it! What a great idea.
I went home and tried this last night,, i had purchased the wreaths the weekend before so i was all set.. still gotta fill in some gaps,, but its lookin good,, thanks for sharing this..
WOW!!! I work in a bookstore and I LOVE this idea. Thanks for the clear instructions.
This is a really cool idea!
Great wreath!! I LOVE LOVE LOVE the B and scrolly frame on the table…where is it from? (iact2 @ hotmail.com)
Fabulous! I really need to make one of those. I love it – seriously!
XOXO
Jen
I have been waiting for your post on this!! I just think it is so classic and stunning!
I am LOVING this!!! Thanks so much for the great tutorial!!!
I love this wreath! Have you seen the latest PB catalog? They have the same thing in it! This is my 1st visit to your blog and I'll definitely be following… can't wait to make this.
I absolutely love this idea, and I have a piano bench full of my grandfather's favorite piano books and sheet music. Maybe I'll try to make one to hang over the piano they gave us! That's awesome!
Brilliant and cute! I featured this at somedaycrafts.blogspot.com
GORGEOUS!!!
This is too adorable for words!! And I love the cost! 🙂 What a fun idea…now to find the time to work on it. I am going to have to check out this City-wide Garage Sale soon! I live about an hour from Austin…it sounds like it is worth the drive!
Um. I think I'm in love. Can you make me one for my office ? It would go so well next to those books collecting dust on my shelf ….
You are amazing !
Join up with my Parade of Ornaments party !
http://www.centsationalgirl.com/2009/11/parade-of-ornaments/
That is so beautiful!! That would be perfect for my living room.
Absolutely FABULOUS!!
Lovely!
I'm doing this today! I'll be using a dictionary from Dollar Tree. Thanks so much for the tutorial. Next: one for the playroom using Archie and/or Richie Rich comic books!
This would go so nicely in the home library. 🙂
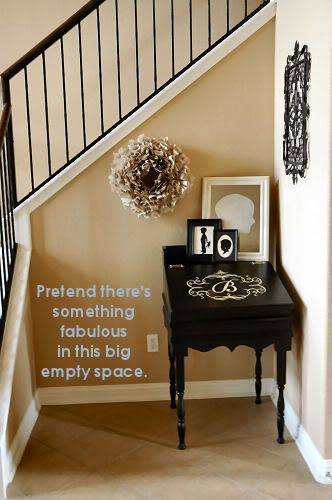
Thanks for the tutorial! (BTW, I had to laugh at the comment about "imagining there were something fabulous" in that empty space. I was too busy oohing and ahhing over how gorgeous the rest of that nook was to even notice there was an empty space. You should see my house. Or maybe you shouldn't.
Love it! I have a few books I bought just for the covers and now I know what I'm going to do with the pages I have to cut out. Thanks!
This is gorgeous! Thanks so much for the tutorial!!!
Oh, this is great…so pretty looking AND easy…L-O-V-E it!
Very cool, love it! I have worked at a library before, and trust me, crafty librarians are always looking for something to do with old out of date books. Romance novels work well too! 😉
I love this!!! and I'm a librarian, just so you know we throw out tons of books everyday, at least this one gets a second life
This is just too good to pass up, thanks for the tute! Also, that big empty space is crying for a faboulously vintage umbrella stand. Just saying. 🙂
I did it,, mine is not quite as fluffy looking,, think i need to fill in some more.. but it was fun doing it.. i linked back to your post on my blog. Thanks again
Brilliant- simply brilliant!!!
I am a total bibliophile so I was nervous about reading this tutorial but this: "I read a few pages of Loving Charity just to make sure I wasn't about to destroy a literary classic; let me assure you that I wasn't."
Made me laugh! Oh did it make me laugh.
It looks AWESOME and I have ruined books that I will be turning into this.
LOVE IT! Thank you 🙂
31everything.com
Great idea. I like the black and white look of the pages too. One thing you could do to add just a tad of color…for Christmas or to match decor…would be to use a different color paint to the ends, so it would mostly be black and white with just a hint of color…but it looks great this way too. Polly @ http://helpinglittlehands.blogspot.com/
Wow! I love this idea! Just perfect!
What a brilliant idea – Love the vintage look!!! Thanks
Can't breathe…have to make one of those now!!! I wonder if my boss would mind if I started taking apart files and gluing the pages onto a wreath form I created out of a manilla folder. Hmmm, I'll probably have to tough it out 'til the weekend, eh? 🙂
Thanks for the fab tutorial!
Tee Hee!!! By the looks of all the comments, the people are just as excited over this one as I am. Simply marvelous creativity!!
How cool is that?! I love it, Lindsay. I've never seen anything like it.
Love it! Here from ASPTL. I linked to you at morethanwedeserve.blogspot.com
Making my wreath today!!!
~Jen
I love it! And that big empty space is the perfect place for a drop all basket or boot tray…
Love it! thanks for sharing.. I'm so trying this!
I LOVE this! I mean really LOVE this! You did an excellent tutorial too….thanks!
I bet all the used booksellers are wondering why suddenly books are flying off their shelves LOL!
Oh my goodness, I just love this! Thank you so much for doing a tutorial!!!
I definitely think my husbands Mawmaw would love one of these made out of song books. Thanks for sharing!
This would also be great with an old songbook for a music lover. Just a thought
love love love this idea! I collect old books and use the covers to make journals….so I have plenty of old pages. I have made wreaths using coffee filters. Also very cute. Well…of the the $1 store!!! Thank you for a wonderful idea.
OH YES! I have tons of magazines ( tis the season). I have been looking for other ways of using up my paper pile…I can see magazine pages being put to this purpose.
That looks fabulous. You've got my head spinning in all kinds of directions now.
oops-I clicked befoer signing my note
That looks fabulous—
Cheri
Oh my goodness Lindsay, this is gorgeous. Now I have to go make some hot choclolate so I can settle in to read all of your archives!
You know I think would love fab in that empty space? I big dark brown or black, woven basket (think banana leaf). Awesome for the bottom of the stairs to hold/hide stuff that needs to go up the stairs, hats and mittens in the winter, etc. 🙂
Jacque
Mounds View, MN
absolutely stunning. am completely totally going to try to do this. just like anthropologie. thank you for the tutorial. so glad to find your blog. xo.
marta@martawrites.com
Okay, I'm going to the Dollar Tree after work! I want one! It is fabulous!!! And for $2 you can't beat that!
Wow this looks great and I can think of so many places for one. I am thinking of trying 2 different sizes to see if it turns out. Anything we can do in front of the tube right! I am so glad I found your site. I am now following!
I mostly build stuff but with all these great DIY projects I think I am becoming a crafter! Thanks!
I am definitely going to trying this project out…it is awesome! Thank you for the great tutorial.
So cute! I wanted to share a little secret with you- if you go to the library and ask them if they have any books that you could take off their hands, they will gladly load you up with damaged/retired books that are destined for the trash. So, save a dollar, save a book! (That sounds like a cheesy bumper sticker, lol!)
I loved this so much I had to try it immediately! Instead of a book, I used sheet music that I picked up at a thrift store for less than a dollar. Since the sheet music was 9×11, I cut the pages in half. The sheet music I found was perfectly aged, but to add just a touch of color, I painted my edges silver. Over I love the effect and the wreath looks perfect over my grand piano. Thanks for the tutorial!
i did it! last night we had a ladies craft night and i brought my wreath, book, and gluegun and got to work. i do have to say that mine turned out great. (= you did a wonderful job explaining and giving tips. i plan to take the wreath to my husbands office at wotk, he could use some fun little extras on the walls. i bought three other wreaths so look out who knows what i will make next, any ideas.(=
I saw a similar project {also made from book pages which made me cringe just a little} when recently visiting my son in Lausanne, Switzerland. Here's a pic, 9th photo down. In a bookstore window…
http://nouveaustitch.wordpress.com/2009/10/08/london-and-paris-and-rome-oh-my/
This is a great idea and looks just fabulous! How simple and inexpensive! I'm with you about not liking the videos, but I just had to watch – you did great! You need a black chair with black & white cushion in the big empty space! Check out the one I did for free! http://spartasavings.blogspot.com/2009/10/free-chair-make-over.html
I work in a bookshop and am in charge of the Christmas window this year. I think I have to make one. Thank you so much for the tutorial!
Hahaha! I just jumped over here from Kimba…love the wreath and am cracking up at the book choice. I would be worried if anyone looked too closely, they might find a "heaving bosom" or "burning loins" phrase jump out at them. Hee! Seriously though, thanks for the tutorial!
I wanted to mention this project in a blog post (and link back to you of course…do you mind?) You can email me at jenlaser2015@yahoo.com.
Im off to the dollar store now.
I LOVE that you saw something you could make, and then you MADE it! I think "I could make that myself" ALL the time, but I either forget about it or just never get around to it. You have inspired me to get with the program on my crafting! Thanks! 🙂
Cute! And, it's in the perfect spot in your house.
I love this idea – I will certainly be stealing it! Thanks for the tut!
Thats awesome!
This is wonderful! I'll be posting this on my site.
I totally made one last night! I used a book from the Dollar Tree that had cream pages and a pretty font and it looks great! I'll email you pictures when I take some! I think I might be making this as a Christmas gift!
Lindsay, you are so my hero!
Thanks so much for this tutorial! It's fabulous! I made one last night and I'm just loving the way it turned out! Like, luv luv luv, beyond luv, the way it turned out 🙂
I just found your site and I love, love, love it! Put you promptly on my Blogs I'm Following list.
What a great idea this is!! Thanks so much for sharing this. I LOVE the way it looks!!! I'm linking this tute to my blog.
I love this idea! Beautiful and cheap. I can't wait to try it!
Lindsay, how gorgeous! You are the bomb!
WOWWEYWOWWOW! THANKS bunches! LOVE IT LOVE IT LOVE IT!
I love this! I'm actually training to be a librarian now and I think this is beautiful – books really are beautiful and when no-one wants to read them anymore, why not turn them into something pretty?
WOW this is really really pretty! I'm going to try this…Thanks for the tutorial!
I'll just repeat what everyone else is saying. ABSOLUTELY ADORABLE. I saw a similar one on Etsy. Thanks for the great instructions.
AMAZING!! Thank you, thank you, thank you!!
Beautiful work! I found your blog listed in the same feature on Apartment Therapy as my wreaths.
I've enjoyed your blog and will be back for more visits! Have a lovely day! 🙂
Are you kidding me?! That is awesome! I can't wait to do it!!! You could do this with red tissue paper for christmas, or pink for valentines day…green for st. patties, etc. LOVE IT!
I love this! What a clever and easy project. Looks like I may be whipping out my glue gun this weekend…..Thanks Lindsay!
Hopped over here from The Inspired Room – love the wreath and can't wait to make my own! Thanks for a great idea!
Simply lovely. Thanks for the fabulous tutorial!
Loved this so much that I had to link to you today! Fabulous!
I am totally making this today! I posted a link on my blog too because everything you do totally ROCKS!
I love this idea! I found your blog via another blog I follow and will definitely be stopping by for more crafty ideas!
Wow! That is soo pretty. It is so ruffly! I just love it and you could make ones with scrapbook paper for every season!
i actually made one last night! i saw this post yesterday and was immediately hooked. i bought the supplies and did it at my kitchen table last night. mine is not nearly as fluffy as yours – and i much prefer yours. but mine is a decent start. i found that unless i rolled/folded the paper in cones, it was awfully hard to stick and hold to the styrofoam wreath. but it's your big, broad "folds" that gives your wreath the fluff. maybe i just needed to use more glue? how did you get those big, fluffy pieces to stay firmly to your wreath?
love your site. found it from apartmenttherapy.com. i'm a new addict!
lisa
I simply HEART this wreath so much! And it inspires me to do similar projects, too! Thanks so much for sharing!! =-D
Thank you so much for the tutorial! I can't wait to do this project.
I hope you don't mind, but I would love to do a bit of a feature on my blog regarding this!
Love you site!
This is so cute, I am going to make up some of these for christmas gifts. They might be really cute using ads from magazines to make a colorful one…..I am going to try it!
I Love this idea…I am thinking a book with gilded pages or maybe gold paint instead of brown or gray for christmas. My husband feels it is his duty to promptly break the binding of any book he reads now I have a use for them…
Oh yes, oh yes, oh yes! Finally a solution to all the books that haven't moved off my Bookmooch account and are still cluttering up my apartment! I wonder how it would look with green or red paint on the edges – I may not have to purchase a holiday wreath for my front door. This is perfect, Lindsay, thanks!
I absolutely love the way this wreath looks! Thanks so much for the tutorial. I'm off to the used book store to get some "supplies" so I can give this a try.
omgosh what a good way to get rid of those stupid phone books that keep appearing at my door! thankyouthankyouthankyou for this tute!
This is a great tutorial! Thanks so much for sharing it.
I love this awesome wreath. Thank you very much for sharing. I have so many very old paper backs, with yellowed pages, that will be beautiful I think. I can't wait to make one.
Wonderful!!! Thank you for the great tutorial!!!
LOVE this idea!!!
Thanks so much! I just made this for my mom for Christmas. It went beautifully thanks to your tutorial and I'm ecstatic with the results!
ooh, great idea! i see mine from hymnal pages, with gold ink on the edges to go with my Christmas decorations.
last year i made a wreath from my father's old atlas. i cut some squares in slightly different sizes, and rolled them into cone shapes, and hot glued them to a wreath form i cut from cardboard. they're very pretty with all the colors the maps have:D
kudzu
kudzukween.blogspot.com
Hi – I'm new here. I wanted to tell you how much I like the book page wreath. It has such an understated elegance about it. I think it's the perfect wreath FOR book lovers & librarians! I'm going to try my hand at this. I'll be sure to let you know how mine turns out. Thanks for sharing all your wonderful ideas.
ps…may I post a link to this post at my blog?
Love, love, LOVE this wreath! Can't wait to make it!!!! I'm thinking of also trying this out with a mixture of "antiqued" old book and a smattering of Christmas papers (either scrapbook paper or maybe left over wrapping paper(or both).
This is so funky! And it rocks that you jumped all over making it yourself. I linked to this on my weekly roundup, the post is here. Thanks!!
I JUST finished making this — except my wreath was SO BIG that it took me 5 hours! And my fingers are nearly burned off from the hot glue gun! But it looks fantastic, and even my husband loves it. I'll post some pics tomorrow.
THAT IS SO CUTE… IT WOULD BE DARLING IN A LIBRARY OR STUDY! IN THAT OPEN SPACE… A CUTE FLOOR PLANT IN A FAB. URN/ VASE WOULD BE GREAT! A SMALL ONE, so it wouldn't cover your story book wreath! GREAT JOB 😉
I think we can also do it for free by using the old phone directory ^ ^
Your wreath is just lovely! You did an amazing job. I hope you won't mind that I'm totally going to copy you. Thanks for the tutorial. Amazing!
Instead of filling in the blank spaces with more paper rolls, why not glue some shiny gold Christmas balls????
Lindsay, this is my first introduction to your site, and I love it! I'll be a regular from now on. I decided to wait until I'd actually tried your wreath to comment. Well, I did it, it was easy, I love it, and I'm going to show a couple of friends how to do it today! Thanks so much. My version is on my blog.
How cool is that…..found your link on feathered nest……thanks for taking your time to chronicle the technique….FUN!
Lovely, I made one…my daughters will be fighting over it!
http://flickr.com/photos/24113698@N08/4113102392/
That looks so amazing! I'm not sure I get the technique, though. This looks like something I'll have to SEE someone do before I can figure it out. But I can't wait to try!!
I love this! Thanks for the post. I just wanted to let you know that I linked to you in a post of my own at http://scrimpalicious.blogspot.com/2009/11/five-dollar-decor-books.html
Love this idea! Anyone who is interested in this should check out the "Anthropologie" store in Georgetown. I was just there this weekend and the theme is recycled book art. There is a seven foot tall ostrich made entirely from recycled books! It is amazing. Truly inspirational! I overheard a staff member telling a customer that artists come in at night and work through the night creating the art…Check it out if you can!
And yes we will be fighting over it mom!!
I am both a Librarian and a Book Lover, but I could not avert my eyes!! I LOVE THE WREATHS!!!!! I'm going to make them and hang them in the library! What a wonderful idea. Books are so useful! 🙂
I didnt have a glue gun so I didnt think to make this project. well, since it is EVERYWHERE i broke down and got one (i am a newby crafter, used to just be scarpbooks, no glue gun needed) i got a dual temp one as to avoid the dreaded burns and I have to say, i also did it while watching tv and am over half done! great work and youve got my vote 🙂
Love this … got my wreath and book all ready to go. Just hoping I can get it done before Thanksgiving! I linked this project on my blog (latenightcrafter.blogspot.com) Thanks for the great tutorial!
I just wanted to let you know that you inspired me to make a book page wreath. It's not exactly like yours, but something about those pages is really striking!!
Take a look–www.heartstringsnpreciousthings.blogspot.com
Hey, loved the tutorial and post about your paper wreath. Made me one last night. You can check out my "Copy Catting" at http://copycatcreations.blogspot.com
I love this so much! Thanks for the great tutorial.
Thanx for this awesome Idea! Will make one for my sisters new home!!!!
I finally made myself one of these and I LOVE IT!
http://jouneytojosie.blogspot.com/2009/11/book-wreath.html
Lindsay, your tutorial was fantastic – just the right amount of detail, explanation and images to show me how to tackle this paper beast, um, wreath.
I actually just completed the wreath. While trying to remain humble, I have to say, it looks stunning and I'm a bit impressed with my glue gun skills. Also, since I'll be using the wreath for a huge holiday decor project at a local cafe and art gallery, I had to go with a wider, 13" diameter wreath. From coloring the paperback novels to adding the ribbon to hang that baby, it took me 6 hours total. 🙂
A few things that have simplified the process for me:
– I stapled the twisted paper rolls in bulk first.
– Then, started gluing them to the styrofoam wreath one by one.
– I used pins to make sure the inside paper rolls really stay stuck.
– I added some satin ribbon on the inside of the wreath to cover the pins.
– I've posted my photos on my Facebook page.
Thanks for sharing this great project with all of us. I don't know if you ever use Scotch Quick Dry Adhesive but it dries in less than a minute. I decided to use it on the rolling and glueing of the book pages. It works great and less burning of the fingers. I also use clothes pins to hold them temporarily in place, where I can, till dry. I think the glue gun will be better for attaching them to the wreath though.
What about a phone book? someone may have suggested this already, but I may try it with that… I love it by the way thanks for sharing!
Thanks so much for this tutorial! I made a huge wreath for my entry way out of an old hard back book and the largest foam wreath I coud find at the craft store!
http://www.flickr.com/photos/expectfaith/4150848837/
I love it!! Thanks for sharing!! I will try to make one on my own too!
THIS IS FABULOUS! Thanks for the tutorial and I LOVE YOUR HALLWAY! gorgeous.
Awesome idea! I have a few choice textbooks that I will get great satisfaction from having a legitimate reason to rip to pieces 😉
I am SO making this for my mom for Christmas. She is the ultimate book lover and this will be the perfect gift for her! Hope mine turns out as lovely as yours! Thanks so much! 🙂
I ♥ this and so I had to give it a go….and made a couple and now on the third….I just posted a really bad pic on my blog…it was too dark and forgot to take another picture of the other wreath I finished before I gave it away…thank you for all of your ideas and for your willingness to share them…..you are so very talented….
I LOVE this project! It looks great 🙂 I would probably use newspapers though, because I can not tear a book apart, no matter how bad the story was… We are in the middle of Advent, the color beeing lilac, so I think I´ll make one with lilac accents to hang on the door!! 🙂
Siri
Hi Lindsay! I made your wreath, with slight variations (glitter) and just love the results. Thank you so much for sharing the tutorial. It's really, really beautiful. Mine turned out so pretty too, and I just love how it coordinates with all my vintage silver Christmas ornaments.
Blessings ~ Eileen @ Star's Fault
Wow, I love it! And thanks so much for the video, very helpful (and you're also just a darling!)
Thanks!!
I made this wreath, but instead of using a an empty circle, I glued the pages to one of those cheap round clocks you can get for 3 bucks at walmart/target around back to school time. I just didn't glue as many pages toward the center, so you could still see the clock face. I LOVE it. Thanks for the inspiration!
I loved this so much i tried it the next day after seeing it and about ten minutes ago i finished it. It is definately not the same as your tutorial said, but it did wonders for my recycling – so thanks for the brilliant idea and as a librarian – i can say: we are not that hysterical about cutting and ripping up books that are no longer in use 🙂
http://twitpic.com/sepuj if you are curious.
My friend sent me this website and I checked it out, got so excited, so I made one right away. It is so easy and fun…………..I didn't have a styrofoam wreath form so I made one by cutting a circle of cardboard, wrapped walmart bags around it, and then wrapped making tape around it until it was a nice firm circle. Then proceded to make the wreath. It came out great.
And so far I've gotten a lot of good feedback on it. Thanks so much for the super idea.
Ellen
perryellenstevens@yahoo.com
WOW this is AWESOME… LOVE it… I WILL definitely have to try this!
I was in a creative rut when I found this post. I just knew I had to make this. I had trouble finding the right kind of styrofoam wreath, but when I did, I got right to work and my oh my! I love how it turned out! I ended up using a 12 inch base, as that's all I could find, and it ended up being big and fluffy. Your video tute was most helpful and is what made mine a success. Thanks so much for sharing!
Chris in NJ
Wow, those are stunning! I made fresh evergreen wreaths this year on a grapevine wreath as a base. It was really fun and it looks great for the holidays, but I'd like to try this for the summer.
Love this! I made it yesterday.
One thing I did that made it easier for me: I rolled/folded the pages and then used a piece of tape to hold the rool/fold together as the bottom.
I don't know how or where I would store it so I guess it is a permenant addition to my decor!!
Thank you! This is so awesome, and I actually have a vintage book that I've hacked apart already to make a holiday garland (see post here http://www.katydidandkid.com/2009/12/christmas-decorating-with-upcycled.html).
I definitely want to make this wreath!
Wow – I have a TON of Reader's Digest Books and a TON of foam wreaths… Woo hooo!
Brilliant! Now I finally know what to do with all my romance novels;)
Thank you so much for these beautiful wreaths! I was so inspired by your creativity, that I used them as the theme to our annual Holiday Party!
I made 3 large wreaths, centered them on the cocktail tables and placed a large candle in the middle of each one.
I went a little crazy and made 3 trees in the same way and placed them on the food table. I continued with the black and white theme throughout the house.
I can't figure out a way to send you the pictures, so I posted them on our website to check out:
http://www.meetthejoneses.com/photos/thumbnails.php?album=158
Thanks again and I look forward to checking out all your fun projects!
I just finished my version of your book wreath!!
http://hundoghand.blogspot.com/2009/12/my-version-of-book-wreath.html
Siri
You inspired me! I made a similar wreath and I love it. Thank you so much!
http://www.katydidandkid.com/2009/12/recycled-book-wreath-tutorial.html
I adore the wreath! …and it's so easy to make! One suggestion is that I tied a bit of ribbon around the foam wreath BEFORE I started attaching the pages, which made it more secure to hang when I was done.
Keep the great ideas coming!
Wow, so cool!
Just love this idea. Will make for next Christmas.
Lovely .. common we can pretend nicer now =9
Thanks for sharing this aMMazzing piece with us !
Lindsay~I made three of wreaths just to give me a break from my knitting…. I just love them…. They are so gorgeous & so creative…. Thank you so much….. Only 1 burn!!! Marilyn
marilynw@rogers.com
I made mine out of an old book with BIG pages, probably made it too dense and as a result it is HUGE and MENACING! You can't even tell what it is supposed to be from a few feet away! It's like a giant paper bush growing on the wall. Hahaha, it cracks me up every time I see it. Oh well, I'll try again with smaller pages next time. 🙂
Keep that big empty space nice and empty! It's beautiful and uncluttered!
Just this and your blog. Wow! Thanks for sharing. I am looking for a new craft, this one is very exciting.
Man, you're fabulous! LOVE the wreath! And I still drool every time I see that desk!
I am going to make some of these…I saw a couple in a magzine and wanted one and I know they would sell well out of our booth…I might use sheet music cause I bought a box of it at an auction for $2…THANKS for the how-to tutorials…you ROCK.
I made one and absolutely love it!
I used your tutorial here :
http://justlivesimple.blogspot.com/
Just came across your blog via The Feathered Nest…this is adorable…thank you so much for sharing with us! Shhh…don't tell but I will be looking for a book to take apart too!! =)
Perfect little project and I think I'll change it just a bit… with Valentine's coming I'll use a heart shaped form and I know the local Animal Protection Society has their book sale going on right now so I'll pop in there, pick out a less than fortunate publication and give a little back to the saving of animals at the same time!
Thanks.
Susan
I just found your blog, love it! I'm going to try the wreath today!
jackie
blissfarmantiquew
I made one in a heart shape for Valentine's Day. Thanks for the great tutorial. You can see it here: http://piccolinadesigns.blogspot.com/2010/01/new-color.html
Wow, how kind of you to post this tutorial!!! IT's wondeful and your version is perfect!!!! Thanks so much for your generous spirit. xoxo betzie
I'd like to try this with some vintage cookbooks I have and put it in a kitchen.
It seems that over time the pages will yellow and not with a nice "patina". Has anyone come up with a way to make it more permanent? Maybe some spray fixative, like for drawings.
Hi Lindsey,
I linked to your blog today for your book wreath tutorial. I made my version and posted it here:
http://plantsomeroots.blogspot.com/2010/02/book-adventures.html
Thanks for the help!
Cindy at Lakewood
I just saw the wreath over at the Sevin Family blog…she made a beautiful one and sent us over here. I am in L-O-V-E with that wreath. Great tutorial. I think I am in L-O-V-E with your blog too! Great idea.
Holly @ 504 Main
This is such a great idea! 🙂
Loved your book wreath you inspired me to make my own. I posted it on my Blog http://thelittlebeansprout.blogspot.com/2010/02/drop-cloths-old-books-part-deux.html
Thanks : )
ps
love reading your blog
Lindsay,
I saw a wreath just like this at an antique market for $40 today and gasped just like you did. I bought a couple of old books at the same market and went right next door to Hobby Lobby to get a styrofoam wreath. I knew a handy crafter such as yourself would have some directions for me online–thanks so much, I can't wait to get started!
What a great way to use vintage book pages! I sell fabulous packs of vintage book pages in my etsy store, and I'm always looking for creative ways to use them. Thanks for sharing!
http://katieblue.etsy.com
Perfect! I LOVE it!
Warm blessings,
Spencer
I have linked up to your blog on our blog for your tutorial. I made some myself but I love your tutorial and your blog! Amazing ideas.
http://allen1reliefsociety.blogspot.com/2010/02/wreath-made-from-old-paperback-book.html
I LOVE it and had to make my own. Thanks for the turorial. http://blondieblueeyes.com/?p=428
this is truly amazing. I've GOT TO try this sometimes.
This is such a great and beautiful idea! I found an inexpensive wreath form and an old biology text book at the thrift store for pocket change. I went to work this past rainy weekend and love how it turned out…although it is slightly larger than it should be to fit properly between door and screen door, oops 🙂 I added some stone beadwork and a little birdie, only b/c i have a foundness for them, it’s really pretty all on its own. Thank you so much for posting the tutorial and a thank you to katydidandkid for posting the link to you 🙂
here’s a photo if anyone’s interested:
http://i51.photobucket.com/albums/f376/avica1976/bookwreath1.jpg
That looks so fantastic! Thank you for sharing!
Avica- I love your idea to add a bird. In fact, before I clicked on the link to your photo I was thinking a blue bird would be stunning. And there it was! Great job!
LOVE this project, and I’m a librarian! Funny thing is that librarians have no problem with things like because we try so hard to get rid of tons of books that NOBODY reads! I’m passing this along to my librarian friends! Thanks!
I’m a book addict. I have a hard time getting rid of books even when I should. So, this hurt my feelings just a bit. 😉 But, it is so cute!! I will definitely have to make one for our book room…just not sure which book I can defile in this way….
This is super awesome. I came across it via The Idea Room blog. I love it (and I am a librarian). Thanks for posting.
How fabulous! I have not seen anything like it and just love it. Can’t wait to try it myself
Great idea and now we can make a wreath to hang in our book store that fits the store! THANKS!!
This is the most amazing thing I have seen forever! I absolutely ADORE it. I’d love to post it on my blog! 🙂 Thanks for the inspiration!
Amy
emiliebean.blogspot.com
LOVE IT! I wouldn’t of paid $50 for it either. What a way to make it for yourself!!!!
I wish it was easy to do it as form your tutorial!
It would be beautiful on my empty wall… I really like it and love your blog!
Would you like to enter my new giveaway?
Please come to visit …
http://alices-adventuresinwonderland.blogspot.com/2010/03/easter-giveaway.html
Despite being a librarian … I love this idea!
So often I feel guilty when books Are just chucked away… Let’s recycle those out of date manuals or dreary guidebooks relics of pre Internet now full of misinformation.
Thankyou
omgggggggggggggggggg
I THINK I’M IN LOVE WITH YOU.
I LOVE THIS.
loveeeeeee this!!!! (and your blog!!!)
thank you SO much for sharing!!
Thank you.
Awesome! I am totally going to give this a whirl. I think this would make a fantastic birthday present as well. Really fun idea! Thanks so much for sharing…
I just completed a book page wreath. Thanks so much for your great tutorial! I blogged about my project and linked back to your tutorial!
Thanks again!
Awesomeness!!!!! Can’t wait to make one!
Lovely, sweet and at the same time modern. Love it….i really really do and also my mommY!
I love this idea, it’s super cute. But my personal opinion is that it looks a little bit too fluffy for me, I’d prefer one with like half that amount of pages. Do you think it would work toned down some?
If I’m using an old church hymnal, do you think I need to cut or tear the pages in half? I don’t want it to be too big. Help!!!
Hmmm…I would probably cut them in half width-wise. Otherwise, I do think it might be too big. Good luck!
I love your site! So many wonderful ideas! I’m new to this whole world of blogging, but just featured you and your site on my new blog. I can’t wait to try and make one of these! 😀
I love this! I bought the stuff to try this and mine did not turn out AT ALL. 🙁 I don’t think I rolled my papers right. I even watched the youtube video. I am just craft challenged. I will be trying it again soon, though.
Thank you so much for posting this! I LOVE your blog and etsy page!! Thanks again!!
I made your wreath. I love it! I think mine looks much better in person. Pictures just don’t do mine justice. http://postsest041208.blogspot.com/2010/06/book-page-wreath.html
I just copied your incredible creation. I was sure to give you mad props on my site, directing back to your tutorial. Thanks for your inspiration!
Just wanted to let you know that I created a book wreath and posted pictures on my blog. Thanks for the great tutorial. My version can be found here: http://simplysimonsisters.blogspot.com/2010/07/paper-wreath.html -dez
I am making this wreath for an upcoming photoshoot and found this link to your blog. LOVE yours!!! Beautiful space you have placed it in too. I am an Interior Designer and I wanted to make a suggestion if I may. You said to pretend there is something fab in that empty space next to your desk….why not put the desk on an angle? It would make the space seem more filled….you could add a great chair or stool too…a FAB one perhaps with layers of fabric for body. Anyway. Not trying to take away from your space but I thought I’d throw out that suggestion. You could leave the wreath in the same spot and it would be perfect still 🙂 Big hugs!
I made mine tonight and I couldn’t be happier with how it looks! I shared the wreath and featured you on my blog, sending crafters to your site for the great tutorial and videos.
http://beautifultome-sarah.blogspot.com/2010/07/beautiful-book-wreath.html
Thanks again, I love it 🙂
Just like most everyone else who saw this post, I made one too! I just finished tonight! It is posted to my blog for all to see, and I also linked to your blog! Thanks for this idea– it is SO gorgeous!!
I love this idea! I plan on trying it out myself. In the meantime, I have featured your idea on my blog with links to your tutorial. Thanks!
http://blushvintagerevival.blogspot.com/2010/09/so-hot-right-now.html
I am an English teacher and I’ve been looking for something lovely to make for my Secret Pal in the English department and THIS is PERFECT. I’m going to paint the styrofoam black, and use a gold edging on the pages of a classic novel (a beat up old one, of course) and a wider ribbon/bow.
~*~*Just found your blog!! I love it and love the wreath!!~*~* Im your newest follower~ ;)Rachel ~*~*
LOVE it! wouldn’t that be great for Christmas presents as well?! I’ll save your link to link back should I actually do one!
Love this! Blogged about it and linked back to you for the great idea.
this is great! I am doing a free Halloween link party over on my blog http://www.lorajeansmagazine.blogspot.com
this would be a great addition to my list would you mind if i added it to the link list?
I adore this project the wreath is phenominal! I think I will design it with sheet music.
xoxo
Karena
Art by Karena
What a super wreath! I’ll be making one for a music school fundraiser. And I will also be using sheet music.
Found your tutorial and had to try it. Posted it on my blog! Thanks for inspiring me!
I’m TOTALLY making this ~ was looking for a Christmassy one on etsy for my office in, yepppppp A LIBRARY 😉 but now I’m thinking I could do this?! I have a lonely cart of weeded books in here as I type…but I’ll avert my eyes just the same as I tear!
Oh gosh!!! I cannot imagine which book I could “kill” to do this kind of magic!!! But I’d really like to! I guess I’ll link you soon on my blog, hope you don’t mind!!
Thanks for sharing your genial ideas!
Laura@RicevereconStile
Reminds me of the tissue paper art we used to make in elementary school. I just got my new phone book, so I have tons of pages in the old one to experiment. Really want to avoid the styrofoam form though and see if I can make the entire thing recycled/able, but haven’t thought of a good hack yet… still working on that one.
Had so much fun creating a similar wreath with a girlfriend over the holiday! Beautiful!
Lindsay,
Great tutorial with the combo of pics, video and detailed description. This looks like a fun project that I would like to give a shot.
I found a typo that I wanted to bring to your attention:
“When you glue it on, the pages will be shorter than the wreath of the wreath. That’s okay.”
This would look amazing with old sheet music and hanging in a music room! I’m tempted to make one with my ridiculous collection of bridal magazines, too 😉
What a great idea! I like the tableau you created with the monogrammed table and silhouette cutouts. If you really have nothing in your big empty space in the last picture, consider putting a large potted plant or just a big empty basket or planter. You already have fabulous things, so you don’t need another statement maker.
Love this idea. So many books, so many wreathes! LOL.
Thanks for sharing! Very creative!
-Rebecca
Hi! I loved this idea! I’ve decided to feature it in my Christmas Wreaths Roundup, to propose it for my readers as a different and original Christmas Wreath. You can see it here: http://livingwithlindsay.com/2009/11/librarians-please-avert-your-eyes.html
Sorry, I got wrong with the link… the real one is here: http://unvagalume.blogspot.com/2010/12/nadalfeitoaman-coroas.html
Here is my book wreath. I bought a larger foam wreath and used nearly 2 whole books on this project. It took me much longer than a couple of hours as I wanted it to be just perfect. My fingertips are happy that it is now complete.
http://vegaslifestripped.blogspot.com/2010/12/hand-made-christmas.html
I cannot wait to try this, too bad the dollar store is closed for the night!! I love the colors of just a paperback book!
I LOVE THIS. So far the only thing I have is an old text book from the 50s (great aged color to the pages) and have to find the darn wreath form. In the meantime, last night I decided to experiment with the suggestion to color the edges of the paper. Since I (also) don’t have craft paint, I tested a stack of the pages with a crazy idea that worked beautifully: I took my favorite deep red nail polish, poured a dab onto a paper towel and smudged it a bit so it wouldn’t go on thick, and quickly — to avoid the polish drying — rubbed the towel against the outside edge of the stack of pages. The result: a most subtle but visible hint of red along the outer edges! Since it was an experiment I started with a light layer to make sure the pages didn’t stick , applied more as needed, and the result was better than I imagined! Success! Now it’s on to find the wreath form…
My friends and I had a wreath making party last week and 2 of us made your book page wreath!! Did u also post a book page tree project? I saw one and now I can’t find it. Thanks for the great ideas!
What a fabulous idea! Thanks so much for sharing! This would be a great project for the incomplete stack of old encyclopedias I have!
Just made this! LOVE IT! I used pins, don’t have hot glue… I had to pull a bunch out and start over, so I’m glad I didn’t use glue! Wasn’t filling it in enough. Used a 12 inch wreath and now it’s about 2 feet wide! Looks GREAT in our bedroom!
THANKS!!!!
I shared this post on my blog today. Great idea – thanks!
My Mother always repeated certain morals to us as children and “Don’t deface books” was one of them, so torn and abused books always make me wince. But I think I can say I am old enough to decide which books it is ok to upcycle. Great tut thank you
This is amazing. Well done. I hope you don’t mind if I post the link to my blog’s facebook page as inspiration to my followers?
Thanks for this idea! I’m making some wreaths for Christmas presents this year. I’m going to be using old hymnals for some people, as they are musically inclined, but will use the books for others. Thanks again!
Your tutorial is the best! I linked it to my “book pages” post too!
Wow, this wreath looks lovely. I never imagined that book pages can be this useful.
Thanks for the great instructions. I saw this on the Rit Dye fb page and ran right out and bought a foam wreath ring. I painted half the book page edges red, the other half green for a little Christmas vibe. Turned out very subtle and beautiful. Now just trying to decide who to gift it too…
Love this! Fabulous! <3
Thanks so much for the instructions, I had the perfect book to make this with as it was already falling apart. Turned out a little bit less “scrunched in” than yours, but I think everyone making these will end up with a specially unique wreath! Brilliant idea, thank you for the instructions.
My only warning to those doing this project is that you might not realize how BIG the finished product will be. It will probably double the width of the form you start with, plus it will have great depth and volume. Don’t design it for a tight space 🙂
Hi Lyndsay,
Thank you for the great instructions, can’t wait to start project !
I came across the paper book wreath in an Australian home magazine,
as I live in Melbourne, Australia,there is an australian store that sells the wreath for $250 AUD !!!!
They are specialised in paper products (papier d’amour).
I desperately wanted one but could not afford to spend that much.
I’m a bit of a paper and craft-a-holic,so now I can make my own.
Again thanks !
First of all, you are hilarious. Second, this is AMAZING! I’m getting ready to do a post on book-related crafts and I’ll be added this beauty in there!
looking forward to trying this myself! thanks for the inspiration! i love books!
Thank you for showing how to do this. I am a visual learner and unless somebody holds my hand, forget it. Looks great! Can’t wait to tear apart that book. I hate to read anyway! Unless it is a decorating book.
The is perfect! I bought an entire box of antique magazines that someone had just found in their attic a while back. At the bottom of the box was a book that no longer had the cover and all that was binding it was a few loose pieces of string. My husband has been on me to get rid of it because it was missing a bunch of pages and we cannot even tell what book it is. I could tell that someone used to really care about it so I couldn’t get rid of it. This will be the perfect way to celebrate this book! Thank you!
Just made this using a 70’s Better Homes & Garden cookbook I bought for 75 cents! It didn’t come out as “fluffy” as yours but it looks great in my kitchen. Because the paper wasn’t as thin as a paperback, it isn’t as filled in, so my mom gave me the great idea of hanging cookie cutters down the center of the wreath to give it more depth. Think I’m going to do that. It looks great & I can’t wait to do a 2nd one with a paper back novel. Thanks!! ♥
Thank you for this great tutorial. I really found your tips helpful while making my wreath. I linked to you.
http://minasarah.blogspot.com/2011/02/i-finally-finished-my-book-wreath.html
I made this yesterday with a few modifications and linked to you.
http://janeami.blogspot.com/2011/02/burnt-and-blown-beauty.html
Fantastic project. I’m going to link back to you from my blog. Thanks for sharing!
I’m in LOVE with this wreath!!! I love everything about it!
And I’m a new follower 🙂
Great tutorial!
It looks great… but even if the book is as bad like your pick I´m not sure I have in me the will to tore apart it. Especially if I have lots of old college reports I´m never going to use again^^
Hello! I just found your site and I love it! You have a lot of very creative ideas! I can’t wait to try some projects out!
Thanks, Kathy! I’m glad you found me! 🙂
i love this idea! thanks for the detailed tutorial. i just made mine last night, and was so happy with how quick it went, that i’ll have to make a few more for gifts! the practice one is mine, of course.
I love your wreath. I’ve seen so many of these on etsy, but I’m so glad you posted your tutorial (the video was super helpful). I blogged about mine today. Thanks again!
Being a reading teacher this is hard to look at, but hard to resist at the same time. Trashy novels are not good reading material for anyone, anyway! Thanks for the idea!
I am absolutely in love with this project! You’re so creative! I featured you and your project on my Earth Day blog post (www.diyordont.blogspot.com). Thanks for sharing!
Even though I saw this project last year I am just making my first one. I wanted to have something really meaningful on the pages in case someone actually read some of it. I finally found a paperback of hymns for 1.99 at the Goodwill and am having a great time with it. It’s turning out so well and is easy to do. Thanks for sharing this project.
Unfortunately it is 12.40am so can’t run out and buy these items. Can’t wait to see my new penny pinching work of art on my bedroom wall!!
I love your version of this wreath! It was my favorite in all my searches and I wanted to let you know I tried to copy it in this post- http://gardenberger.blogspot.com/2011/05/copyright-i-mean-copycat.html. I just have a little blog but thought you may like to know!
Becca
Thank you so much Lindsay! My husband and I made this for our new house that we are moving into at the end of this month! I am also going to make a small one that I can put by it! I cant wait to show these off to people and tell them that I got this idea from your blog!!
Thank you again!
Morgan
AMAZING!!! I love it!
I just finished mine! It’s really cool! I luckily bought a big fairytale book which I wanted to turn into a bookpurse so I didn’t know what to do with the pages, so thanks for the project! ^^ I’ll be blogging about it in a few days.
This is exactly what I was looking for! yay! Thank you so much!
I just posted a link to your site on this. I hope you don’t mind. This is the cutest wreath idea ever! I hope you’ll do the same for me!
This is such a cute idea- just bought my book to use!
Stumbled Upon this post last night. 24 hours later I have become a full-on book destroyer – and love my story wreath. I also used the 12 inch foam wreath, so it’s a big ginormous, but beauteous nonetheless.
http://images.instagram.com/media/2011/07/24/d57834e4e9844d9cb84e7c465332c7ce_7.jpg
Also, hat tip to the author whose book was dismantled in the name of crafting. Although destruction of books is somewhat taboo, I like to think the author would be pleased that his work ended up on my wall instead of sitting on the shelves of the local Dollar Tree.
Thanks for sharing this great tutorial!
I made this and it makes me happy everytime I look at it. I wrote about it on my blog: http://wanttogetcrafty.blogspot.com/2011/03/imitationflattery-book-wreath.html
Thanks for the great idea.
As a librarain, I WANT ONE OF THESE WREATHES!!!! School starts back very soon but this would be a great addition to our library! Also, this would be my 3rd wreath this summer! I definitely have an answer to “what did you do this summer?”
This is such a fabulous idea! You could do this with pretty much anything! I have tons of books and left over papers lying around! I cannot wait to make one (or two, or three…)!!! Thanks so much for sharing!
I have had this link saved for a year! I finally did it and I love it! Mine is a housewarming gift for my in-laws but I will be making these for wedding gifts in the coming year. Thank you so much for sharing and being so detailed. 😀
I adore this and actually feel like I could accomplish this despite my inherent ability screw up projects.
I came across your blog by way of the Funky Time blog! I’m intrigued & look forward to seeing more!!
I found this about a year ago while I was cooking up ideas for my own book wreath. I used a different rolling method (I think someone else called them “cigarettes” and “bugles” – skinny tubes and conical shapes – with wavy pages loosely interspersed) but same basic assembly. Your method is probably better; using full pages rolled into such compact shapes, my finished wreath was about two feet wide and took 15 or so hours to complete! However, as I had used two Harry Potter books (library discards, please don’t cry!), I added some red and gold ribbon, attached a gold glass ornament turned into a Quidditch snitch, and won a book upcycling contest!
i love this…believe me there are books out there that need to be destroyed! grammer errors alone are worth this wreath!
I used your tutorial to make book page puffs (not sure what else to call them). I used a styrofoam ball the size of a softball instead of a wreath. They will be the centerpieces for my wedding. I painted the page edges with the colors of the wedding for a subtle hint of color. I am super excited to have found your post, they really are easy to make and are quite impressive looking.
Ohh – what a great idea! Do you have any pictures? I don’t see a link to your blog. Me, I’m blogless at the moment – I keep too busy reading all of these other talented folks to start my own! Plus, it can be pretty intimidating for a newbie like me…. 🙂
Thanks! I don’t have a blog, but if you want to give me your email I can email a few preliminary photos I have of these.
Sure – that wld be great! I bet the whole group wld love to see them too!
My email is mskyles11@mchsi.com Thx!
I know a lot of people feel guilty about destroying a book (but the wreaths are so beautiful!) I just had a thought – I wonder what using an old phone book would look like? Do you think the pages would be too thin? I haven’t made one of these gorgeous wreaths yet. I have all my tools – including the books! Just wondering what y’all thought about the phone book idea….. Love your blog btw! 🙂
Hi Lindsay! I love this tutorial and am gonna give it a go. 🙂 Heard of you from Rhoda and have been voting for your Shaw room!
Wow your design is stunning and the tutorial is very helpful! I had a go at this, but instead of making it as a wreath i made it into a skirt for a competition. http://www.ngfoto.com/portfolio_images.php?catid=563# <mine is the bottom row in the middle. I used rolls of colured paper and old brochures, it was all attached to a large piece of paper. It came out amazingly (in my opinion at least). Thank you soooooo much!
Oops just checked that link and found out my picture is on page 33 😀
Wow, what a popular post! No wonder though–I love it too. But I also kind of liked the empty space…I really need to decluter.
I love this. I plan to make one with sheet music to hang above or set on the piano!
Beautiful book page wreath. I featured and linked your wreath in my webpage.
http://www.squidoo.com/doorwreath
Just discovered this wonderful DIY. It’s fabulous and I’ll be make one very soon for my office. New follower:)
I LOVE this tutorial, thanks so much!! I decided to recreate it and I posted the outcome on my blog: http://gingerflair.blogspot.com/2011/09/diy-book-wreath.html
It was super easy and lots of fun! 🙂
I fell in love with your post and made this myself about 6 months ago. Since then I’ve received so many complements as people walk through my home so I recently started referring people to your page via my blog. A big thanks from me and many others, for such a wonderful idea!!
Today is rainy and blah! I took the opportunity to stay inside and create this fabulous wreath! So fun! Thank you!!!
Hello,
I have just started blogging (whew heww I’m up to 38 followers-sad I know). I look at your site frequently and follow your blog. To generate some traffic I made a book wreath for a give away on Nov. 15.
http://mommyiscoocoo.blogspot.com/2011/10/follower-give-away-in-three-weeks.html
I used your tutorial video. It was so helpful and I thought you were very FUNNY. When I give my wreath away, I am going to credit your site. Thank You!!!
You could not give librarians and eco-friends a heart attack by buying a paperback book from the library book sale for about 25 cents and using that. 🙂
LOVE this wreath! Gorgeous and sophisticated… To be featured on our blog for sure 🙂
DIY Holiday Wreaths
avatar
November 25, 2011 Kalei
‘Tis the season to be jolly, fa-la-la-la-la-la! It’s officially time to start holiday decorating, and we’d love to see some unique ideas this year! Sure the reliable wreath is a gorgeous addition to your front door, but why not make your own? Get inspired from these creative DIY wreaths we found from all over the place, and create your own masterpiece this year! No matter what holiday you celebrate, this is a great way to bring that jolly spirit to your home. Your neighbors will be dying to know your secret, and you’ll have a unique door that’s easy to point out to visiting friends and family. With all these quirky tricks, you’re sure to find a wreath that fits your personality and matches your decor– so keep reading for a lesson on creating our favorite holiday wreaths!
This first wreath we found on GoodHousekeeping with a unique look that’s hard not to love! It’s bright colors and unexpected quirks make it a great addition to any fun household full of holiday laughs!
Deck the halls with this creative and gorgeous wreath from Living With Lindsay!
Made from book pages, be sure to hide this one from the book worm in the house… The guide has great step-by-step instructions and a video that will help you create this masterpiece in your own house! We love this look for those more sophisticated holiday homes.
Check out a DIY guide for this amazing wreath from StoneGable!
Although this bold wreath may shock you at first, it puts an edgy twist on the classic Fall wreath! We love the use of warm colors for homes with a classic red/brown theme, and the autumn look of this craft. You’ll catch the eye of anyone passing by, and it’s sure to warm up this icy season!
Last but not least, for an eye catching wreath full of fuzzy pom poms, check out this DIY guide at Nature’s Heirloom!
We love that they thought far outside of the box and created door decor out of these crafty little pom poms! If you want a vibrant and warm look to your home this season, try out this wreath!
If you create any of these gorgeous wreaths, let us know on our Facebook page and post a picture! Leave us a comment below which one was your favorite, or which you’ll try. Happy holidays!
http://epochbydesign.com/blog/diy-holiday-wreaths/
My children have completely worn out their Harry Potter books – they are coming apart in pieces! I’m so excited to have a use for all those pages I keep finding! And what a great way to remember how much they LOVE reading those books. THANKS!!
Wow! This one is gorgeous! I need to do it as well… some day!
I have done a pompom wreath out of wool-pompoms!
http://was-eigenes.blogspot.com/2011/11/christmas-crafting-diy-weihnachts.html
Have a great sunday, Bine
Excellent Tutorial – I love this and want to try it! Thanks so much!
Found you via a link of someone elses version of this… Thank you for the brilliant tutorial. Will be sharing on Pinterest.
I love love love this idea!!! I have this huge blank wall next to my (big, huge) TV and I’ve been searching and searching for something to fill it in with – this will be perfect because I have books scattered all across my living room! I love decorating with books and now I found a new way to do it!
I am a librarian and I love book wreaths and other book art. I think most librarians do. I’m creating signs for my library made out of discarded books. We probably destroy more books than anyone when we clear out the old damaged books.
Oh my goodness, this is GREAT!! My mother-in-law is an English teacher and I am going to make this for her for her birthday this year! She will LOVE it!! Thank you for the fun idea!!
Jane 🙂
Thanks again so much for posting this tutorial. Just finished mine and it looks great!
Another idea–use sheet music instead of book pages.
I was thinking of doing this but making it colorful for our Fiesta. i was thinking to roll and spray paint before I put them on the wreath then add streamers to match.
You Rock Lindsay!
How fun. And different. Also, as a teacher, I LOVE your tutorial ~ very infomative and detailed. THANK YOU!
Awesome…..
I think these would be super cute on a smaller scale for a Christmas tree…what a great little gift to give as well.
I work in a library and we are constantly weeding old books from the collection. If you don’t want to purchase a book, ask at your local library…they would be willing to give you some books if they are in the middle of weeding! Some old school librarians may give you a dirty look if you tell them it’s for crafting, but for us, it’s a blessing…these books aren’t all classics either.
I didn’t have brown paint, so I rubbed brown shoe polish onto the edge of the pages before I started tearing them out. It worked well!
Great idea!! By the way, I have the perfect little chair for that big empty space!
Thank you so much for this! Great instructions and pics! Ice been wanting to do a wreath in this style but all I could find were rolled wreath instructions. Then I *finally* stumbled upon yours. Thanks again!
Sorry… I’ve, not ice!
About a week ago I was wandering through a booth show, and a pair of wings made out of book pages caught my eye. I was very tempted until the woman told me she wanted $75 for them (even then, I almost emptied out my wallet as they were beautiful). But I think that I can modify this tutorial to help me figure those wings out! Thanks so much for sharing your genius!
I’ve seen book page wings around the internet and they are beautiful. Perhaps there is a tutorial out there somewhere. Good luck!
Well, I’m late to the game, but I finally made a wreath of my own and it turned out fabulously. Thanks for the tutorial! (I linked to this quarter’s Young House Love Pinterest challenge).
http://lodear.wordpress.com/2012/03/14/pinterest-challenge-completed/
I absolutely LOVE this project!!!
WOWEE!! I am doing a square wreath with rolled up newspaper right now. This one is beautiful!! I see that many other’s think so too! 🙂
I made mine today! I have been wanting to find the time to do this for a while now. It was very inexpensive. I did have to buy all materials because I am just now getting crafty. This has never been a hobby of mine and I have never been very good at it. I think I spent $20 in all and it only took a couple of hours to make. I bought Pride and Prejudice by Jane Austen because she is one of my favorite writers. Half Price Books always has good SuperBuy books. It was incredibly easy! My rolls are tighter so the effect is a little different. I hope this is a conversation piece. Maybe I will make some as gifts.
How fun! I’m so glad it worked out.
So cool – thanks for sharing!
My fav line “I read a few pages of Loving Charity just to make sure I wasn’t about to destroy a literary classic; let me assure you that I wasn’t.”
hahah – this totally has me cracking up! :o)
LOL I’m not kidding. It was Baaaaaad.
I fell in love with this wreath, so much, that I had to make one for a dear friend that lives to read. Your instructions were so easy to follow and the video helped sooo much. My wreath has gotten so many compliments and I have had alot of request to make more. I am so proud of the wreath and wanted to thank you for the incentive to make it. I also love all your other ideas and will probably try alot of them. Once again thank you.
Thank you so much for this idea!
I started my wreath late last night and finished this morning. I used gold and silver paint for the edges and a mixture of waves and rolls. For some of the filler, I rolled/scrunched, tore off about 1″-1.5″ off of the bottom, dabbed glue along the torn edge, then stuck it in where needed. I am considering adding a bit of sheer ribbon.
Also, I had bought my glue gun and glue several years ago at the Dollar Tree. So hopefully they still sell them for those of you who do not have them yet. They only cost one dollar but work so great!
Hopefully these links work:
https://www.facebook.com/photo.php?fbid=846393449042&set=a.846393424092.2194926.46104396&type=1&theater
https://www.facebook.com/photo.php?fbid=846393558822&set=a.846393424092.2194926.46104396&type=1&permPage=1
I am going to make more to give as gifts! I think I will make one with sheet music for a musician friend.
Thank you again!
Thanks so much for such a great tutorial! I just finished mine and I absolutely love it! I will be using it for my son’s 1st birthday party which has a book theme as he loves to read. Granted – even though I used a ‘tool’ (aka-pen), I still managed to burn my fingers a few dozen times…but that’s what homemade is all about! 🙂 Thanks so much!!
I made this tonight! One down, one to go. It was pretty easy overall though it is a bit time consuming doing the layers. Totally worth it though, fantastic idea!
What a great way to recycle old books!
I actually saw this post last year and made a wreath for myself. Instead of books I used sheet music. It was a hard thing for me to do to use my old sheet music, because of the memories, but I love how it turned out!
Great idea! My daughter and I made one for her music teacher with sheet music. So cute! Thanks! 🙂
What a thoughtful gift! I’m glad it turned out cute!
I created my own wreath, for my son’s garbage truck birthday party. It isn’t as PRETTY as yours. . .but it isn’t SUPPOSED to be. After all, I made my wreath with TRASH! 🙂 Thank you for inspiring and teaching me!
http://lauralooloo.blogspot.com/2012/08/creating-garbage.html
Laura, I’m simply blown away. It’s so cool! You’ve GOT to keep that after the party! Thank you for sharing it with me.
I created my own wreath, and placed a link on my site to your tutorial. Thank you so much!
Awesome, Megan! Your crumpled pages look really cool.
Loved making this! Although for the 7 hours it took to make, I can understand why it would sell for $50+. Whew! It does look beautiful in my dining room. Thank you for the inspirations!
LOL! Yes, it does take some time, that’s for sure! I’m glad yours turned out great.
I love this wreath, I have made several and want to know if you have any ideas for turning it into a “turkey” for Thanksgiving. Thanks!
I like where you are going with this, Peggy! You could cut out a silhouette of his body out of cardboard or something and blue the pages to the back of them. I’d love to see a photo if you come up with something cool!
WOW! It took me a long time to find your tutorial here. I saw your wreath on Pinterest, re-pinned to my board (or whatever it’s called) and then went looking for you & your tutorial. This is so great. I love making wreaths.
Thanks, Sandra! I’m sorry that it took you so long, but I’m glad you found it!
http://betsyjaneco.blogspot.com/2011/02/librarians-please-avert-your-eyes.html?m=1
Did they straight up steal your entire blog post?
Sigh…they did. Thank you SO much for bringing this to my attention!
Possibly the coolest thing I’ve done off Pinterest to date! THANK YOU!!! Here’s my results- http://zookeepingblog.blogspot.com/2013/02/i-shall-call-her-cordelia.html
Possibly the COOLEST craft I’ve done off Pinterest to date! THANK YOU!!! Here are my results- http://zookeepingblog.blogspot.com/2013/02/i-shall-call-her-cordelia.html
Possibly the COOLEST craft I’ve done off Pinterest to date. THANK YOU!!!! Here are my results- http://zookeepingblog.blogspot.com/2013/02/i-shall-call-her-cordelia.html
Oh whoops! Sorry about my 3 comments! I thought that the site was glitching and the comments weren’t going through! teehee But thanks again! I LOVE my paper wreath!
You are welcome! Yours looks great!
Thanks so much for posting this! I’m an English teacher and I’ve been looking for super easy projects with book pages to decorate my room 🙂 This is great!
You are so welcome!
Thanks for this great tutorial! I just made my own, but didn’t have a wreath, so I used a paper plate. It turned out great!
Normally I don’t learn post on blogs, however I would like to say that this write-up very pressured
me to check out and do so! Your writing taste has been surprised me.
Thanks, very nice article.
It has lasted so many years before it was officially
out of air. In conclusion, hydroponic and organic
hydroponic gardening allow it to be feasible to obtain much more pure and
healthy environmental conditions. Stories open up
an imaginary exciting and fantasy world to them which allows children to feel happy.
Really informative forum.Thanks Again. Want more.
With havin so much content do you ever run into any problems of plagorism or
copyright infringement? My site has a lot of unique content I’ve either created
myself or outsourced but it seems a lot of it is
popping it up all over the internet without my authorization. Do you know any methods to help reduce
content from being ripped off? I’d definitely appreciate it.
In fact when someone doesn’t know after that its up to other viewers that they will assist, so here it takes place.
What’s up mates, pleasant post and pleasant urging commented here, I am in fact
enjoying by these.
Modern snare project:
http://silvia.go.telrock.net
And I found a lot of interesting information on this site https://grandhomedecoration.com/