Makely

Let's Make Life Awesome

  • Home
  • Decorating/DIY
    • Create Your Decor
    • Decorate Your Home
    • Paint Your Walls
    • Transform Your Furniture
  • Healthy Living
    • Essential Oils
    • Family Wellness
    • Household Care
  • Project Gallery
  • Contact
You are visiting: Home » Decorating/DIY » Create Your Decor » Hi. I’m a New Rug.

Hi. I’m a New Rug.

by Lindsay Ballard on February 2, 2012 39 Comments

Over the last few weeks, I’ve been working on updating the powder bath in the entryway of our home.  It’s always been unremarkably boring, but since it’s the bathroom that a) you see when you walk into the house and b) our visitors always use, it was overdue for a little revamp.

I have a few more things to finish before I can reveal the entire room to you, but I must say that it is pure bold, vintage quirk.   Oooooh, that sounds like a perfect eclectic style mix, doesn’t it?  However, I do want to show you a fun little piece that can be completed in under 15 minutes.
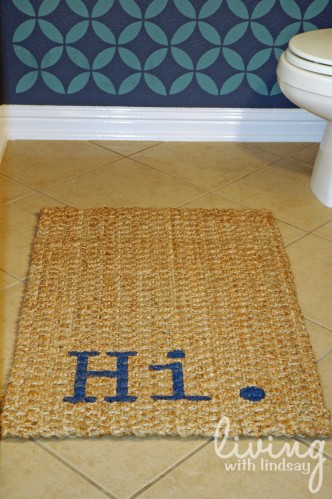
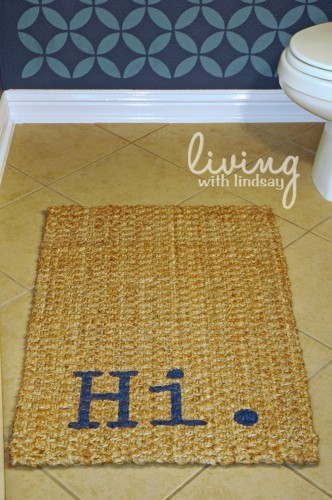
Well, hello to you, too!

The floor needed a small, textured rug, but necessity didn’t mean that it had to be plain and boring.  The simplest process ever yields a “talking” rug.  Besides, who wouldn’t want a little greeting when they walk into a room?

How to Paint a Talking Rug

1.  Find a natural fibered rug, such as jute or sisal.  The rug I used is a 2 x 3 jute rug that I picked up at Cost Plus/World Market for $16.99.  As a side note, they have really great natural rugs for reasonable prices, so make sure you check them out when you are in the rug market.
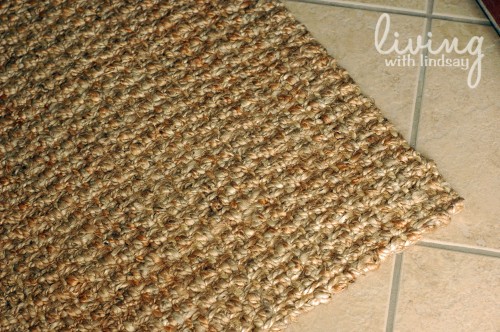
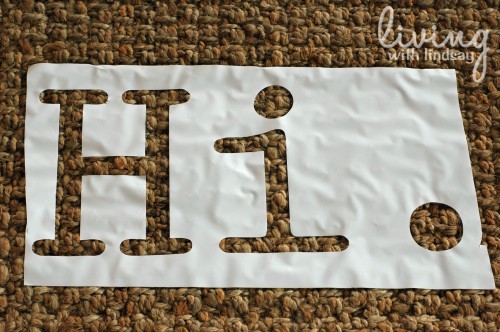
2.  Cut your word out of vinyl and position it on your rug.  I used my Silhouette SD to cut out the word, but you absolutely do not need to have a craft cutter to do this.  You could trace your word onto a piece of sticky vinyl shelf paper (i.e. Contact paper) and cut out the stencil by hand.  The font I used can be downloaded here for free.
3.  Dab your paint onto the rug with a cheap chip brush, using a up and down motion.  The vinyl won’t stick incredibly well to the rug, so I wouldn’t brush the paint on to ensure that your brush won’t slip under the vinyl.  Any craft paint would likely do, but I am using Martha Stewart craft paint because it is really thick and creamy.  The color I chose is Wild Blueberry, which looks like a dark navy under the light in my room (remember that your lighting will effect your color choice!).
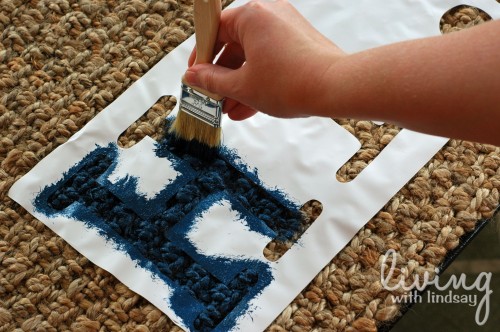
4.  Keep dabbing until your stencil is completely filled in and only solid color shows through.  For reference, it took me under 5 minutes to fill in my word.
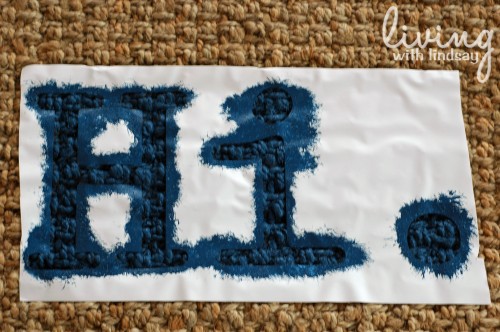
5.  Carefully remove the vinyl and put your rug in a place where it can dry.  If you are in a hurry, you can use a hairdryer and it will dry more quickly.

I love my little “statement” piece and the fun that it brings my tiny bathroom.  If the paint comes off after a lot of wear, I could easily touch up the paint.  Or, for only $16.99, maybe I’ll buy a new rug and give it a new voice.
What say you?  Could you use a little unexpected greeting somewhere in your home?


About Lindsay Ballard

Lindsay Ballard is a former college mascot turned political geek turned roller derby playing, DIY fanatic.

Lindsay chronicles her projects, design ideas, and lifestyle tips here at Makely, where she shares tutorials and inspiration. Her DIY designs are bold and graphic, while her spirit is fun and full of color.

Lindsay lives outside of Austin, Texas with her husband (Tom), children (Zack and Emma), and dogs (Duke and Jill). She plays roller derby for the Rockin' City Rollergirls out of Round Rock, Texas.

« Finding Color Scheme Inspiration in Textiles {and a Quiz!}
It’s a Pinterest Linky Party! »

Comments

  1. michelle says

    February 2, 2012 at 7:04 am

    Love it, how clever! Thanks for sharing.

    Reply
  2. Karoline says

    February 2, 2012 at 6:51 am

    Good morning Lindsay,
    that rug is cute. I want to do one with the phrase “May you always have a shell in your pocket & sand in your shoes”. That will be a long stencil LOL! Anyways, I am just looking for the right size of rug for my entry way. I will have to see if I can find some kind of “top coat” to seal mine as it will get a lot of wear. Have a good day! I always enjoy reading your posts!

    Reply
  3. Diane@InMyOwnStyle says

    February 2, 2012 at 7:11 am

    How simply adorable chic! I love it.
    I can see why having a Silhouette cutter can come in handy.

    Reply
  4. Jen @ a place 2 call home says

    February 2, 2012 at 7:28 am

    This is so simple and so adorable. I really love it. It’s like the friendliest rug I’ve ever seen lol

    Reply
  5. Jen @ A Touch of Lovely says

    February 2, 2012 at 7:47 am

    I absolutely love this idea! I’m definitely going to have to try it for my bathroom!

    Reply
  6. Nicole says

    February 2, 2012 at 8:29 am

    Another reason why I ‘need’ a Silhouette. Cute rug. I want to make a similar one for our entryway.

    Reply
  7. Marty@A Stroll Thru Life says

    February 2, 2012 at 8:54 am

    This is really such a cute idea. So fun. Hugs, Marty

    Reply
  8. Angie @ The Country Chic Cottage says

    February 2, 2012 at 9:18 am

    I love this rug Lindsay!! Absolutely love it!

    Reply
  9. Dharma says

    February 2, 2012 at 9:28 am

    Hi! I like the simple homey feel that this welcome gives to guests. It’s cheeky and fun.

    Reply
  10. Anne says

    February 2, 2012 at 10:06 am

    I LOVE this rug! I want more of my home furnishings to talk to me. 😉

    Reply
  11. Cindy M says

    February 2, 2012 at 10:11 am

    I LOVE LOVE LOVE it! SO cute! 🙂

    Reply
  12. Xazmin says

    February 2, 2012 at 10:23 am

    How cute! I love it – what a fun idea!

    Reply
  13. Brianna says

    February 2, 2012 at 11:29 am

    That is unbelievably awesome! Thanks so much for this great idea! 🙂

    Reply
  14. lisa says

    February 2, 2012 at 11:58 am

    Can’t wait to see the rest of the room! 🙂

    Reply
  15. Stacie says

    February 2, 2012 at 1:16 pm

    How adorable! I can just see guests pausing as they go into the bathroom and then smiling. It is those little things that brighten peoples moods. I just love it.

    Reply
  16. Dana says

    February 2, 2012 at 1:43 pm

    I love inanimate objects that greet me! Cute stuff.

    Reply
  17. Amanda says

    February 2, 2012 at 2:54 pm

    Love that and completely copying you.

    Reply
  18. Lisa says

    February 2, 2012 at 2:37 pm

    In my son’s bathroom I would use, “If you aim to please, please aim.” 🙂

    Reply
  19. Kimberly@Colors Mixed Together says

    February 2, 2012 at 2:38 pm

    So cute and such a nice surprise greeting for guests. In my bath that guests use I made a framed printable that says “You are the fairest one of all”. Nice job!

    Reply
  20. Christina says

    February 2, 2012 at 8:50 pm

    LOVE this!!

    Reply
  21. Teresa says

    February 2, 2012 at 10:30 pm

    LOL that is so cute!

    Reply
  22. Teresa says

    February 2, 2012 at 10:31 pm

    I was going to add, you could put ‘Hi, you’re on Candid Camera’ hehe.

    Reply
  23. Rachel says

    February 3, 2012 at 8:26 am

    I want to make one for the front door that says, “Hey Y’all”

    Reply
  24. Lyndsey says

    February 5, 2012 at 5:52 pm

    So cute, now I want to make myself a “talking” rug for my bathroom.

    Reply
  25. Nicole says

    February 6, 2012 at 11:15 am

    That’s a very cute idea!

    Reply
  26. Jenny @ Simcoe Street says

    February 7, 2012 at 1:18 pm

    So cute! I pinned this 🙂

    Reply
  27. peggy says

    June 17, 2012 at 4:34 pm

    Hi Lindsay, thanks for the great idea. I followed your instructions exactly and LOVE the result. I’m making them in all colors as gifts for my girl friends.

    Reply
  28. Jessica Rickman says

    January 19, 2013 at 9:22 am

    I LOVE this idea. I have recently stumbled upon your blog and I’m already in love. Cant wait to make this.

    Reply
    • Lindsay Ballard says

      January 24, 2013 at 10:31 pm

      Awesome! I hope you love make one, Jessica! I still love mine.

      Reply
      • Elaine Simmons says

        October 17, 2018 at 12:12 pm

        Have you ever cut down a jute rug??

        Reply
  29. Mel the Crafty Scientist says

    May 19, 2013 at 6:13 pm

    Love your blog and this project – so fun and cute! Just wanted to let you know I featured you in my roundup of jute craft projects here. Feel free to check it out if you want and hope you like it! : )

    -Mel the Crafty Scientist

    Reply
  30. Linda Schombert says

    October 25, 2013 at 7:32 am

    Reminds me of a Xmas gift I gave to a cranky friend many years ago – I stenciled a rug similar to yours with WELCOME on one side and “GO AWAY” on the back! He loved it and used it for many years…thanks for the fun memory.

    Reply
  31. Jackfamily5 says

    November 30, 2013 at 1:30 am

    Did you stencil the wall too? If so, where did you get the stencil?

    Reply
  32. La Costa Gaston says

    January 4, 2014 at 9:55 am

    I love this idea. My goal for my home this year is to make more personalized items for my home to put my personal touch in it. Thanks for sharing!

    Reply
  33. Allie says

    April 13, 2014 at 2:08 am

    So doing this for my bathroom makeover, coming soon 🙂

    Reply

Trackbacks

  1. Freelance Friday: Create A Rug with Martha | Paint Me Plaid says:
    February 17, 2012 at 9:07 am

    […] Here is a great example of how you can spruce up a boring rug. We found this rug on a blog called, Living with Lindsay. To see how she made this click here. Have you ever used craft paint on a rug or other household […]

    Reply
  2. DIY: Hand Painting a Rug | BonBon Rose Girls says:
    June 25, 2012 at 6:03 am

    […] better instructions? Visit my site to see the tutorial. Have you tried your hand at painting a rug? Give it a […]

    Reply
  3. DIY Weekend Inspiratie nr 17 | Jip by Jan says:
    August 29, 2014 at 7:07 am

    […] Leuk idee: verf een tekst (of afbeelding) op je deurmat. Tutorial van MakelyHome […]

    Reply
  4. Deco: personalizar alfombras y felpudos | Bueno, bonito y barato says:
    January 12, 2015 at 3:05 am

    […] puedes utilizar la misma idea para cualquier alfombra de tu casa. Por ejemplo, en el blog Makely Home se han animado a pintar una alfombrilla de baño, esta vez pintando con brocha y pintura […]

    Reply

Leave a Reply Cancel reply

Your email address will not be published. Required fields are marked *

This site uses Akismet to reduce spam. Learn how your comment data is processed.

  • Email
  • Facebook
  • Instagram
  • Pinterest
  • Twitter

About Makely

Lindsay Ballard is a former college mascot turned political geek turned roller derby playing, DIY fanatic.

Lindsay chronicles her projects, design ideas, and lifestyle tips here at Makely, where she shares tutorials and inspiration. Her DIY designs are bold and graphic, while her spirit is fun and full of color.

Lindsay lives outside of Austin, Texas with her husband (Tom), children (Zack and Emma), and dogs (Duke and Jill). She plays roller derby for the Rockin' City Rollergirls out of Round Rock, Texas.


Archives

Categories

PRIVACY POLICY
Copyright © 2009-2019 Makely School for Girls | All Rights Reserved | Posts may contain advertising content or affiliate links