Makely

Let's Make Life Awesome

  • Home
  • Decorating/DIY
    • Create Your Decor
    • Decorate Your Home
    • Paint Your Walls
    • Transform Your Furniture
  • Healthy Living
    • Essential Oils
    • Family Wellness
    • Household Care
  • Project Gallery
  • Contact
You are visiting: Home » Decorating/DIY » Create Your Decor » Mastering the Master Bedroom {Layered Frame Gallery Wall}

Mastering the Master Bedroom {Layered Frame Gallery Wall}

by Lindsay Ballard on January 9, 2012 134 Comments

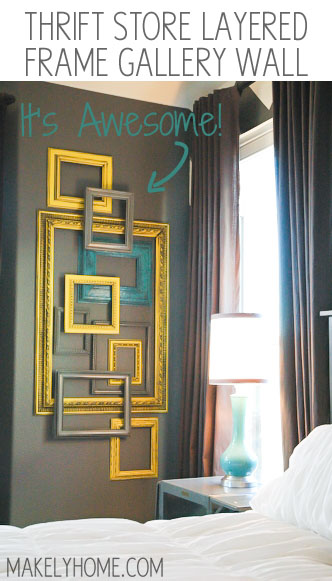
The very last project I had to complete in the master bedroom was to come up with something to fill a blank corner wall between two sets of windows.  The wall is one that you see when you walk into the room, so I wanted it to make a big visual impact.  Because I felt that little space was so important in setting the tone of the room, I also wanted it to be something unique.  After much consideration, I ended up with a wall of colorful, layered open frames.

This is such an inexpensive way to create art in a big space - Thrift store frames used to make a layered frame gallery wall via MakelyHome.com

Bestow my little thumping heart!  Every single thing I’ve placed in the bedroom brings me so much joy, and this wall is no exception.

It took me a bit of trial and error to figure out exactly how to hang the layered frames.  There are great tutorials for hanging filled frames in a layered fashion, but the open frames presented a unique challenge because you have such a small area from which to hang since there is no back on the frame.  Since I was finally able to figure it out, I’m happy to walk you through the steps in case you’d like to create a similar wall of your own.

How to Create a Layered, Open Frame Gallery Wall

1.  Gather a good number of frames in various sizes and designs.  You will want one very large frame, some medium ones and some small ones.  The amount you need will vary depending upon the size of your wall, but I used a total of 10 frames.  I found all of mine while making two different trips to Goodwill.  Look for frames with a lot of detailing.

2.  Next, measure the length and width of the space on the wall you would like to fill.  Since my wall was on the small side, I took the measurements of the entire wall.  Then, lay out paper the size of your measurements on your floor.  Butcher or brown kraft paper is often used for this purpose, but I taped together a few rolls of old wrapping paper that I knew I’d never use on gifts.  You’ll want to mark eye level on the frames and use this as a “center” point, as you traditionally want to hang framed art at eye level.

Take the old artwork and glass out of your frames, prime them (I used Kilz latex and a Purdy brush) and arrange them on the paper until you find a pattern that you like.  Use a pencil to trace the outline of each frame. I labeled each outline and frame with a corresponding number so that I could more easily replace the frames.

At this point, I decided which of my three colors – yellow, light grey or teal – to paint each frame.  I also labeled each with the color.

3. Next, you will paint your labeled frames.  You can use either spray paint or a brush – just make sure you get good coverage on each frame.  I used leftover latex paint from my yellow dresser (Sherwin-Williams Decisive Yellow), matching spray paint from my gray dresser (Krylon in Classic Gray), and a lovely teal spray paint that I found in my garage from another project (American Accents in Lagoon).  After painting, I used my trusty Ralph Lauren glaze tinted to Black Silk.  Really work the glaze into the detailing with a cheap, chip brush.  Work a section at a time and wipe the glaze off of the high spots with a wet cloth, wipe with a dry cloth to remove the bulk of the glaze that’s not down in the detailing, and then wipe with another wet cloth to make sure the frame doesn’t look dingy.  Mandi at Vintage Revivals has a great tutorial on this technique.

4.  Hang your paper template on the wall.  I just held mine in place with painter’s tape.

5.  Now, go ahead and hang your frames that will be directly against the wall.  I put two nails into the wall and hung them on the lip of the frame where the glass would usually go.  I used a level to make sure that the nails for each frame were level.

6.  Here was the tricky part for me.  I tried to use several types of construction strength adhesives to attach the 2nd level of frames to the first.  Perhaps it was they were painted, but nothing would adhere!  So, I ended up going the old fashion route – a drill and hammer.  The instructions make it sound a lot more complicated that it really is.

Take the first of your frames that would be on the top layer, and figure out where it would overlap the bottom frames.  On the back of the top frame, drill a small hole just large enough for a tiny wire nail to fit into.  Snip the head off of a wire nail with snips and put it upside down in the hole, so the pointy side up.  I did this in two places – you’ll want your frames to attach in at least two places.

7.  Take your bottom layer frame off the wall and lay it flat on a table, fancy side up.  Position your top layer frame (the one with the nails) where you want it on the bottom layer frame and push down.  The two nails will create little holes on the front side of the bottom layer frame.  Use your drill to drill those holes all the way through to the back of the frame.  In those locations, hammer finish nails in far enough so that the points start to come through the front of the frame.

8.  Take the little wire nails out of the top layer frame and position the tips of the nails from the bottom frame into the little holes where the wire nails used to be (both sides will now be fancy sides down).  Hammer the finishing nails in so they go about half way into the top frame.  Be careful that you don’t go all the way through!

You will likely have some of the nail head sticking up on the back of the bottom frame.  Just use a Dremel to cut the nail down flush with the back of the frame.

9.  Repeat that process for your other layered frames.

When you are ready, tear down the paper template and hang the bottom layer on your wall.  The top layer frames will hang with no problem and will be sturdy enough.  As long as you don’t decide to swing from them, they will hold on just fine.  I put 3M Command Poster strips on the bottom of each frame so they would stick to the wall and not shift.  Love those things!

The friends who have been to my house since I hung these layered frames have been blown away.  It’s an easy and cheap way to take up a lot of wall space, and the result looks incredible.  Do you think you have a spot in your home for something like this?

The reveal of the complete master bedroom is coming up next week.  Did you EVER think it would be finished?  I was beginning to have my doubts!  😀

 Linking up this post with Beth’s Tutorials & Tips Link Party at Home Stories A to Z.

About Lindsay Ballard

Lindsay Ballard is a former college mascot turned political geek turned roller derby playing, DIY fanatic.

Lindsay chronicles her projects, design ideas, and lifestyle tips here at Makely, where she shares tutorials and inspiration. Her DIY designs are bold and graphic, while her spirit is fun and full of color.

Lindsay lives outside of Austin, Texas with her husband (Tom), children (Zack and Emma), and dogs (Duke and Jill). She plays roller derby for the Rockin' City Rollergirls out of Round Rock, Texas.

« When Good Thrifting Goes Bad
That Other Pesky Thing to Consider when Choosing a Paint Color »

Comments

  1. Jen @ a place 2 call home says

    January 9, 2012 at 11:29 am

    Very nice, I really like this.

    Reply
  2. k says

    January 9, 2012 at 11:42 am

    I hate gallery walls b/c I can never come up with things to put in the frames. Here’s my solution!

    Reply
    • Linda Chainey says

      August 21, 2017 at 2:04 am

      Oh… such a waste not to fill the wall with something really beautiful!
      I would look at the owner of the space, the colours in the room, the atmosphere required and paint or draw a picture to suit.
      E.g. If it was my granny’s room, I might fill the space with a portrait surrounded by objects that mean something to her like memories or favourite objects etc
      What a joy upon entering the room and seeing something meaningful as you enter!!

      Reply
  3. sonny says

    January 9, 2012 at 11:45 am

    it looks fabulous and your tutorial is perfectly detailed and easily understandable.
    thanks so much
    Sonny

    Reply
  4. amanda @ mommyiscoocoo says

    January 9, 2012 at 11:47 am

    FREAKING! awesome!!! Love it.

    Reply
  5. Centsational Girl says

    January 9, 2012 at 11:48 am

    LOVE this Lindsay, that teal just pops and the yellow is absolutely divine! Such a stylish accent, thanks for the how to!
    xoxo
    Kate

    Reply
  6. Connie Huntington says

    January 9, 2012 at 11:55 am

    Serious love going on here!! I love the colors you chose too! Thanks for the tutorial! I may just give this a try.

    Reply
  7. Nancy @ dream it...build it...style it! says

    January 9, 2012 at 12:09 pm

    Looks great!

    Reply
  8. Kate says

    January 9, 2012 at 12:10 pm

    I LOVE THIS!

    Reply
  9. Cindy M says

    January 9, 2012 at 12:18 pm

    Love it! Can’t wait to see the full reveal Lindsay! 🙂

    Reply
  10. Diane@InMyOwnStyle says

    January 9, 2012 at 12:40 pm

    Hi Lindsay –
    I saw this photo on My Colortopia and thought wow. It looks awesome and I love the scale of the frames. My Goodwill never has beefy frames like that. I guess because you are in Texas and everything is done BIG there 🙂 there are plenty. It looks divine and is so classic. Looking forward to seeing the entire room. Thanks for the link.

    My best- Diane

    Reply
  11. Anne says

    January 9, 2012 at 1:10 pm

    I LOVE this! Definitely pinning. 🙂

    Reply
  12. Marty@A Stroll thru Life says

    January 9, 2012 at 2:21 pm

    Great collage. Love all the different frames. Hugs, Marty

    Reply
  13. Shannon @ Imperfectly-Inspired says

    January 9, 2012 at 2:21 pm

    Ah!! I’ve been looking for something like this!! I’m tackling my dining room this weekend and I couldn’t find exactly what I was looking for… but something like this is it! Do you think it would look good if they were all one color too?? I was thinking all black frames…

    Thanks!

    Shannon

    Reply
  14. Ashley S. says

    January 9, 2012 at 2:38 pm

    So cute! Very creative!

    Reply
  15. Beth says

    January 9, 2012 at 3:26 pm

    I LOVE IT! I’ve never seen anything like it but it’s really amazing art.

    Reply
  16. the Blah Blah Blahger says

    January 9, 2012 at 3:29 pm

    I LOVE it!!!

    Reply
  17. Erin @ His & Hers says

    January 9, 2012 at 3:42 pm

    This is gorgeous! I’m pinning your tutorial. 🙂

    Reply
  18. Emily says

    January 9, 2012 at 4:33 pm

    That looks extra cool. Love the color choices with the dark wall. Only wish I had more wall space in my little apartment!

    Reply
  19. Peggy says

    January 9, 2012 at 7:23 pm

    Wow! what a great impact that makes. I love it. Thanks for sharing Lindsay.

    Reply
  20. Stacie says

    January 9, 2012 at 8:12 pm

    I just found your site and it is wonderful! Your wall of frames are beautiful!

    Reply
  21. Felicia Kramer says

    January 9, 2012 at 9:43 pm

    That wall is stunning! Great job!

    Reply
  22. murfnik says

    January 9, 2012 at 10:05 pm

    At the point where you have them all laid out on the floor/paper, it is really helpful to snap a digital pic of them, too, besides just drawing the outlines. Very nicely done. 🙂

    Reply
  23. Shannon at madiganmade says

    January 9, 2012 at 10:15 pm

    Lindsay – this wall looks gorgeous! Love the colors and scale of all the frames.

    Reply
  24. Kelly @ Eclectically Vintage says

    January 9, 2012 at 10:19 pm

    Love it – the colors, the 3d effect … everything. Glad to have found you and following along!
    Kelly

    Reply
  25. The Real Housewives of Bucks County says

    January 9, 2012 at 10:28 pm

    I am completely in love with this project. I couldn’t love the colors or the layout any more than I do. I’m currently collecting tons of frames to do a collage in my dining room over the Graham and Brown “Frames” wallpaper and think that an overlapping collage just might be the way to go! Thanks so much for the inspiration!

    If we were doing Beth’s party for her next week, you’d totally be in my top 5!
    -Monica
    (and Jess)

    Reply
  26. Megan Brooke says

    January 9, 2012 at 10:39 pm

    This looks amazing! I never thought to layer frames like that. Works perfect for that wall space.

    I’ve been dying to try glazing. I actually am working on a set for our video room at work and had bought a bunch of frames to make a gallery wall. Now I’m wondering if I should layer and glaze them up after seeing this 🙂 Great job!

    Reply
  27. Drama Mama Lori says

    January 9, 2012 at 11:45 pm

    Lindsey, this is really pretty! I would have NEVER thought to try it in different colors. Amazing! – L

    Reply
  28. Christi says

    January 9, 2012 at 11:19 pm

    Absolutely love the gallery wall! But I also have to admit I love that your ladder is covered with paint from previous projects!! I thought I was the only one with a crazy, messed up ladder! You rocked it girl!

    Reply
  29. Sandy says

    January 10, 2012 at 12:38 am

    that looks so awesome! great colors!

    Reply
  30. megan says

    January 10, 2012 at 7:32 am

    Love this idea!!! All the color are so pretty together and the layering just takes it to the wow level!

    Reply
  31. Libby says

    January 10, 2012 at 2:37 pm

    Holy Toledo that looks hard. I’m trying it on a smaller scale. if you are ever in St. Louis, let me know before you get here and we can hang out. My friend and just went to the goodwill outlet and SCORED stuff for future projects. el cheapo, mah friend.

    Reply
  32. Jen @ A Touch of Lovely says

    January 10, 2012 at 3:08 pm

    This looks amazing!

    Reply
  33. Ellie says

    January 10, 2012 at 3:20 pm

    Beautiful! I just love the texture on the frames and the accent colors. Great job figuring out how to hang everything too!

    Reply
  34. Laurel@Ducks in a Row says

    January 10, 2012 at 4:47 pm

    This is really pretty much AWESOME! Thanks for sharing and all the tips!

    Reply
  35. Elizabeth says

    January 10, 2012 at 9:48 pm

    I came across your blog today and pinned this project. It’s now been pinned close to 100 times thus far. I would say this project is a big hit. I can’t wait to try it myself. I have just the wall for it! I hope this sends some traffic your way!

    Reply
    • Lindsay says

      January 10, 2012 at 10:06 pm

      Glad you found me! It’s been an overwhelming response, that’s for sure! I keep running across where a single pin has been repinned over 300 times, over 200 times, etc. Pinterest sure is fun! 🙂 Thanks for reading!

      Reply
  36. Tom Corliss says

    January 13, 2012 at 12:19 pm

    I found your blog a few days ago and I am very inspired by your articles. This project looks great. I hope you don’t mind if I write a post about your blog with a link so my readers can also enjoy your articles. Great Job.
    My blog is http://www.homeinformationgur.com . Please visit if you would like. It has only been up for a few days so forgive the simpleness right now.

    Reply
  37. breanna says

    January 13, 2012 at 12:47 pm

    i’m in love! I shared your post here: http://dollarstoremom.com/2012/01/pinterest-picks-22/

    Reply
  38. Kristi @ Addicted 2 Decorating says

    January 15, 2012 at 12:36 pm

    This is amazing! Wow, wow, WOW!! I can’t wait for the whole room reveal.

    Reply
  39. Abbie (Five days...5 ways) says

    January 16, 2012 at 10:51 am

    Hi Lindsay,

    I clicked over from CG and love, love, LOVE your layered frames! AND the colors you chose. The dimension and the drama are awesome!

    I would be thrilled if you would link this up at my second ever Feature Friday FREE-FOR-ALL…going on right now (we had almost 300 links last week…can you tell I’m excited??! : ))

    http://www.fivedaysfiveways.com/2012/01/feature-friday-free-for-all-2.html

    Would love to have you by for a visit!

    P.S. I’m a new follower. : )

    ~Abbie (www.fivedaysfiveways.com)

    Reply
  40. wanna says

    January 20, 2012 at 6:08 pm

    Love It!!!

    Reply
  41. Roeshel says

    January 20, 2012 at 7:45 pm

    It’s awesome, Lindsay! Great tutorial and beautiful result! I love it!

    Reply
    • Lindsay says

      January 20, 2012 at 7:55 pm

      Thanks, Roeshel!

      Reply
  42. Amanda says

    January 23, 2012 at 9:00 am

    I could not love this more! Thanks so much for the idea and tutorial. This is going down in my house this weekend!

    Reply
  43. Courtney {a thoughtful place} says

    January 23, 2012 at 12:11 pm

    Wow. This is just fantastic. I love the mix of colors and the eye you had to arrange just like that. So beautiful. Might be doing something like this on my stairwell.

    Reply
  44. Ansley says

    January 25, 2012 at 4:35 pm

    Love, love, love….LOVE this! I’ve already decided I am going to do it in my home…I just need some more frames and to decide where to put it! I am planning on sharing your post soon, so look out for my “Featured” email!

    <3 from my blog to yours!
    Fabulousified.blogspot.com

    Reply
  45. Andi says

    February 8, 2012 at 6:01 pm

    i totally want to do this but can’t seem to find black glaze. Can you tell me where you bought it?

    Reply
    • Lindsay says

      February 9, 2012 at 2:06 pm

      Sure! Mine is by Ralph Lauren, and I bought it at my local Benjamin Moore dealer (who also sells Ralph Lauren paints). They tint it to your specific color, and I chose Black Silk from the RL line of paints. I hope that helps!

      Reply
  46. Maike says

    February 19, 2012 at 4:00 pm

    I LOVE this. Beautifully done.

    Reply
  47. abdulrahman says

    March 4, 2012 at 4:07 am

    Fantastic! I will consider this great idea…

    Thank you so much for sharing

    🙂

    Reply
  48. Khalilah says

    March 31, 2012 at 11:26 pm

    Lindsey, I’m sorry I wasn’t more specific. The frames for your family portraits.

    Reply
    • Lindsay says

      April 3, 2012 at 9:40 pm

      They came from Michael’s and Aaron Brothers.

      Reply
  49. sherry says

    June 2, 2012 at 8:49 am

    I luv, luv, luv this! I’m glad to have found you and I’m now following.

    Reply
  50. tanuja says

    June 14, 2012 at 6:08 am

    I just luved it….gr8

    Reply
  51. Cynthia Martinez says

    July 1, 2012 at 6:59 pm

    I found you threw a link on Pinterest and then you linked to a site, Vintage Revival, that I already follow. It was a friendship waiting to happen. I loved your tutorial and the way your frame wall turned out. I look forward to reading many many more of your blogs. I’m just getting my blogging and businesses started so I need all the inspiration I can get. Plus i’m moving, in 7 days, back into a ole family home and it needs lots of work. Inspiration and instruction is much needed for this. Have a blessed day.

    Reply
  52. Ansley @ VivaciouslyVintage.com says

    July 21, 2012 at 2:16 pm

    I totally just made my own version of this last night! Check it out! http://www.vivaciouslyvintage.com/2012/07/3d-layered-picture-frame-art.html I hope you like it; I was so worried it wouldn’t come out as cool as yours. I think it looks great, though. Thanks for the over the moon inspiration!!!

    Reply
  53. Christy Benning says

    August 9, 2012 at 9:02 pm

    OMG, this is genius. I absolutely love this idea. Must have for my bedroom.

    Reply
    • Lindsay says

      August 10, 2012 at 10:30 pm

      Do it! Do it! Thanks, Christy! 🙂

      Reply
  54. Jeanne Olson 8-9-12 says

    August 9, 2012 at 9:43 pm

    I love your frame art and have a large wall in a living room to fill. Can I copy the directions or send for a copy?

    Reply
    • Lindsay says

      August 10, 2012 at 10:31 pm

      Hi Jeanne! Do you just want them so you can recreate it for your living room? You should just be able to print them out.

      Reply
  55. Maggi says

    September 16, 2012 at 12:50 am

    I loved this so I finally got around to making my own on a smaller scale. I love it. The dimension/depth or whatever you want call it is what makes it a true piece of unique art. Thank you for such a great idea!

    Reply
    • Lindsay says

      September 18, 2012 at 5:12 pm

      Great! I’m glad it worked out!

      Reply
  56. Whitney says

    October 8, 2012 at 1:40 pm

    Thank you for such an awesome idea and tutorial! My husband and I just picked out all the frames to start this project. We are excited to hang it above the bed since we don’t have a headboard and wanted a unique focal point for the room.

    Reply
    • Lindsay Ballard says

      October 13, 2012 at 4:26 pm

      How fun, Whitney! Good luck with your project. I bet it’s going to look great above your bed.

      Reply
  57. Cannington Electrition says

    November 21, 2012 at 5:15 pm

    This is actually a brilliant idea in transforming a bedroom. Loving those layered frame and the lightning effect that it brings from the side of the window. Kudos for a job well done!

    Reply
  58. Alisha says

    February 4, 2013 at 4:39 pm

    Totally love this idea! Way to take frames to the next level!

    Reply
    • Lindsay Ballard says

      February 6, 2013 at 3:15 pm

      Thanks, Alisha! I did this over a year ago and I still love it as much today as I did then.

      Reply
  59. Emily Maldonado says

    March 20, 2014 at 10:13 pm

    I’m absolutely in love with this! I have just the spot for something similar. Thanks for the inspiration!!

    Reply
    • Lindsay Ballard says

      March 20, 2014 at 11:17 pm

      Excellent! I can’t wait to see what you do!

      Reply
  60. Rilane says

    June 25, 2014 at 11:31 am

    Decoration looks really cute. I like the choice of colors 🙂

    Reply
  61. home style says

    October 7, 2014 at 12:51 pm

    Absolutely gorgeous. You really know how to put a beautiful ideas, thanks for sharing it with us

    Reply
  62. Sam @ DIYJUSTCUZ.COM says

    May 25, 2015 at 6:44 pm

    This is absolutely fantastic! I would love to do this, and it’s great that you are repurposing something. Nice!

    Reply
  63. Shirley says

    January 2, 2018 at 10:49 am

    This came out just gorgeous! I love frames! I have always had a love for them, so much, that I have boxes and boxes of them in all different sizes, colors and designs. I knew that when I found my forever home/retirement home one day that I would be using these in many different ways. I found that home four years ago. Of course I’m retired now and things are much harder for me to do at this age but I am determined to get frames layered like yours and used in many other ways as well. I don’t just collect frames though. I have many collections that I have acquired over the years such as tea cups, tea pots, window frames, lamps..and the list goes on. Don’t get me wrong, I am not a hoarder! I just have a love for things and want to put them all to good use. If they all don’t fit I will repurpose them and sell them. I am at the point of pulling my first room together. Yeah it took longer than anticipated as hubby went through cancer over the last 3 years and things have been rough but we are getting there bit by bit. I buy things one piece at a time now and have everything I need to get my formalish living room going but it will take a bit of time as there are walls and ceilings to refurbish, some things to repurpose and making sure it all comes together the way I have envisioned.

    Reply
  64. silicio de mejor precio para la venta says

    June 26, 2018 at 4:04 am

    Hello very cool blog!! Guy .. Beautiful .. Superb .. I will bookmark your blog and take the feeds additionallyI’m glad to search out a lot of helpful info right here in the publish, we want develop more strategies in this regard, thank you for sharing. . . . . .

    Reply
  65. Keea says

    July 1, 2019 at 11:10 pm

    Hello I’m working on this now … but my frames are going to be colorful. Is the best way for black frames is to paint them white then use color

    Reply
  66. Chaniki says

    May 28, 2020 at 12:34 pm

    Thanks Linda Ballard for your beautiful wall aet, I just needed to recreate this piece and add it to my diva den. I’ve received alot if positive response and love my master piece

    Reply
  67. Valley View says

    November 22, 2021 at 1:32 am

    Hi Lindsay, This looks so beautiful! You have done a fantastic job. I am totally impressed! Keep sharing the great work.

    Reply

Trackbacks

  1. Pinterest Picks | Dollar Store Mom - Frugal Fun - Crafts for Kids says:
    January 13, 2012 at 12:42 pm

    […] This is so brilliantly done! Can I just move in? via Living with Lindsay […]

    Reply
  2. Centsational Girl » Blog Archive » BOTB is back! says:
    January 15, 2012 at 11:58 am

    […] We love Lindsay’s color choices on her smart and stylish layered frame gallery wall. […]

    Reply
  3. Open Frame Gallery | Be A Strainer says:
    January 20, 2012 at 1:01 pm

    […] Open Frame Gallery […]

    Reply
  4. How to Make the Most of What You Own {by Positively Splendid} | Home Stories A to Z says:
    April 18, 2012 at 7:00 am

    […] abounds with forward-thinking ideas to breathe new life into old objects, like this stunning layered frame gallery wall at Living with Lindsay.For my outdoor decor each year, I create a tiered planter with three pots of ascending sizes […]

    Reply
  5. DIY | Pearltrees says:
    April 29, 2012 at 3:03 am

    […] and certainly didn’t scream Lindsay. The new room is a 180-degree turn from the previous. Mastering the Master Bedroom {Layered Frame Gallery Wall} The very last project I had to complete in the master bedroom was to come up with something to […]

    Reply
  6. Creative Art Wall Ideas » talk.cil.ca says:
    May 4, 2012 at 9:01 am

    […] The frames become the art in this creative gallery installation – disparate styles of frames are unified with a coordinating coat of paint. (Living with Lindsay) […]

    Reply
  7. 7 Creative Layouts for Empty Frame Wall Gallery says:
    May 9, 2012 at 8:31 am

    […] Living with Lindsay […]

    Reply
  8. DIY Layered Frame Gallery Wall says:
    September 5, 2012 at 12:43 pm

    […] The process is not complicated. The frames need to be arranged the way you want to look on the wall, you must paint them the nuances you choose and then hang them on the wall. You will need to pay attention to some details and have enough patience to finish it. The result is amazing and you will not believe that you were able to do such thing for your room. You will see how easy is to create some wonderful things if you have the necessary qualities and love for your work!{found on livingwithlindsay}. […]

    Reply
  9. Giant Frame Find « The Thrifty Ginger says:
    January 4, 2013 at 8:46 am

    […] 1. Makely School for Girls 2. Uploaded directly to Pinterest from Natalya O. D. 3. Project Life by Becky Higgins 4. Unknown […]

    Reply
  10. 25+ Upcycle Ideas & Ikea Hacks says:
    October 25, 2013 at 11:28 pm

    […] for your extra frames! I’m a huge fan of what Lindsay did with her open frames! 1…2…3…  And what would a post on upcycles be without mentioning pallets?  2012 and 2013 […]

    Reply
  11. 29 Creative Wall Art Ideas says:
    December 20, 2013 at 11:15 am

    […] Thrift Store Layered Frame Gallery […]

    Reply
  12. Eclectic Home Tour - Makely School for Girls says:
    March 22, 2014 at 4:50 am

    […] How cool are the layered frames. […]

    Reply
  13. What is your decorating style? | Mila's Little Things says:
    June 21, 2014 at 9:09 am

    […] source […]

    Reply
  14. 41 DIY Ideas To Brilliantly Reuse Old Picture Frames Into Home Decor. Very Creative! | says:
    November 15, 2014 at 9:33 am

    […] Source: makelyhome.com […]

    Reply
  15. 35 Fantastic Ways to Repurpose Old Picture Frames - Seek Story says:
    December 20, 2014 at 5:56 pm

    […] Source: makelyhome.com […]

    Reply
  16. 20 Absolutely Brilliant DIY Ways To Use Old Pictures Frames Into Home Beautification | eKanpSack says:
    January 8, 2015 at 8:04 am

    […] source […]

    Reply
  17. 5 Ways to Reuse Old Picture Frames says:
    February 10, 2015 at 7:36 am

    […] Frame Art Wall – Create an open-frame gallery wall, using frames only – by makelyhome.com (with a tutorial!) […]

    Reply
  18. Corner Gallery Wall + Some Extra Gallery Inspiration! - Dwelling In Happiness says:
    February 11, 2015 at 6:23 am

    […] out-of-the-box gallery wall makes me happy! Empty frames stacked and hung look SO pretty in Makely School for Girls‘ master bedroom. Paint them any color to match any […]

    Reply
  19. Projects with Picture Frames | The Budget Decorator says:
    March 18, 2015 at 5:59 pm

    […] at “Makely Home’ made a thrift store layered frame gallery wall… Ok, this is amazing, and so easy… and budget friendly, and fun! She takes you through […]

    Reply
  20. The Crafted Collective: DIY Wall Art - The Benson Street says:
    April 24, 2015 at 6:36 am

    […] Normally frames are used to hold photos, but they have a really fun effect when they are painted and layered to create a beautiful accent wall. For instructions check out Makely School for Girls. […]

    Reply
  21. Living room decorating ideas | Mila's Little Things says:
    May 3, 2015 at 12:10 pm

    […] source […]

    Reply
  22. Cómo hacer collage en pared- Tu reforma en casa says:
    June 8, 2015 at 11:16 am

    […] Sí sí, así de simple, y os queda una zona original y bonita. Aquí tienes un paso a paso de cómo hacer un collage en pared con marcos que queda fenomenal. Aunque el más típico y que verás en muchas casas es el collage de fotos. […]

    Reply
  23. DIY Artwork Ideas That Anyone Can Do - Addicted 2 Decorating® says:
    June 26, 2015 at 9:07 am

    […] via Makely School For Girls […]

    Reply
  24. She Finds Some Old Picture Frames Trashed In The Garage, But She Has Other Ideas. Can You Believe It? says:
    July 18, 2015 at 9:37 am

    […] Makely Home […]

    Reply
  25. La voz del muro says:
    July 21, 2015 at 8:47 am

    […] este enlace te explican bastante bien cómo llevarlo a […]

    Reply
  26. She Paid $1 For This Frame, But Watch What She Does With It – I Can’t Wait To Try! | Allusefulthings says:
    May 29, 2016 at 4:23 pm

    […] and place frames in an abstract fashion to create unique art. Click here to find out […]

    Reply
  27. How to Reuse Old Picture Frames Into Home Decor says:
    June 3, 2016 at 8:00 am

    […] Source: makelyhome.com […]

    Reply
  28. 10 nuovi usi per vecchie cornici #DIY - BLOG ARREDAMENTO says:
    June 4, 2016 at 9:24 pm

    […] Tutorial: vintagerevivals.comFonte: makelyhome.com […]

    Reply
  29. Great Ways to Reuse Old Picture Frames - DIYCraftsGuru says:
    June 15, 2016 at 9:02 am

    […] Source: makelyhome.com […]

    Reply
  30. She Paid $1 For This Frame, But Watch What She Does With It – I Can’t Wait To Try! says:
    June 19, 2016 at 2:01 am

    […] and place frames in an abstract fashion to create unique art. Click here to find out […]

    Reply
  31. Amazing Ways to Reuse Old Picture Frames - DIYCraftsGuru says:
    July 7, 2016 at 8:57 am

    […] Source: makelyhome.com […]

    Reply
  32. Unique Wall Art Ideas says:
    July 16, 2016 at 7:20 am

    […] Thrift Store Layered Frame Gallery […]

    Reply
  33. Rámy obrazu v interiéru. Jak využít staré rámy obrazu. Co vyrobit ze starých obrazů. DIY nápady ze starých obrazů. says:
    August 8, 2016 at 10:21 am

    […] Zdroj: makelyhome.com […]

    Reply
  34. How to be more creative - Melissa Melorie says:
    August 27, 2016 at 10:39 pm

    […] since it will be covered). Picture frames can be picked up at the Salvation Army or Goodwill and spray painted the same color to appear to match. Finally, if you are really stuck, head out to Pinterest or Google images for […]

    Reply
  35. 15 Ways to Reuse Old Picture Frames and Windows | How Does She says:
    September 14, 2016 at 4:35 pm

    […] Have a lot of old frames to use? This Frame Gallery would be so amazing to […]

    Reply
  36. Don’t Trash Those Old Picture Frames Yet. They’re Still Useful. See This! says:
    September 28, 2016 at 9:54 pm

    […] Unique Home Décor […]

    Reply
  37. 25 Resourceful Ways to Repurpose Frames – Toss the Pictures and Think Outside the Box - DIY & Crafts says:
    October 17, 2016 at 3:14 am

    […] DIY Instructions and Project Credit – Makely […]

    Reply
  38. 47-Epos Möglichkeiten Zur Wiederverwendung Von Alten Bilderrahmen Zu Hause – Haus Deko says:
    January 28, 2017 at 6:58 pm

    […] über makelyhome.com […]

    Reply
  39. 47 Epic Ways to Repurpose Old Picture Frames at Home - The Veranda of ideas says:
    January 29, 2017 at 3:11 am

    […] via makelyhome.com […]

    Reply
  40. 24 kivaa ideaa, mitä voit tehdä vanhoilla käyttämättömillä kehyksillä | Vivas says:
    February 3, 2017 at 8:27 am

    […] Lähde […]

    Reply
  41. Decorating with gesso frames - Vintage Unscripted says:
    May 8, 2017 at 6:37 am

    […] Ballard of makelyhome.com has a thoughtful tutorial for creating a wall display of stacked vintage frames. She paints […]

    Reply
  42. 17 Amazing Ways to Reuse Old Picture Frames - DIY says:
    May 17, 2017 at 6:22 pm

    […] Unique Home Décor […]

    Reply
  43. Awesome Wall Art Ideas says:
    August 2, 2017 at 8:04 am

    […] Thrift Store Layered Frame Gallery […]

    Reply
  44. DIY Frame Ideas - A Little Craft In Your Day says:
    December 10, 2017 at 7:53 am

    […] DIY Frame Galery Wall […]

    Reply
  45. Compra un marco viejo por 10 dólares y lo transforma en algo impresionante para su casa - Bellezas de la Vida says:
    January 20, 2018 at 7:18 am

    […] Fuente: Makely Home. […]

    Reply
  46. Don't ignore photo frames. Check out 10 wonderful ways to repurpose them instead - DIY says:
    February 4, 2018 at 10:26 pm

    […] RICHMOND THRIFTER Share this list of projects with your friends on Facebook to spread the inspiration! RESOURCES MY ANYTHING AND EVERYTHING, I HEART NAPTIME, GROS GRAIN FAB, C SIPKE DESIGN, WHAT TREASURES AWAIT, EMBROIDERY GARDEN, WISHFUL TINKER, SALTY CINDERELLA, THATS WHAT CHE SAID, RICHMOND THRIFTER, AND MAKELY HOME […]

    Reply
  47. Mom Buys Old Picture Frames For $1, Transforms Them Into A Stunning Piece For The Home says:
    February 27, 2018 at 1:58 pm

    […] and place frames in an abstract fashion to create unique art. Click here to find out […]

    Reply
  48. Kupiła w sklepie zwykłą ramkę za 4 złote. To, w co ją przekształciła, jest warte znacznie więcej! – CiekawySwiat says:
    March 24, 2018 at 5:14 am

    […] MakelyHome […]

    Reply
  49. Compró un marco por 1$ y lo convirtió en algo genial para el hogar says:
    March 26, 2018 at 6:13 pm

    […] y coloca marcos de manera abstracta para crear un aspecto único. ¡Haz clic aquí para descubrir cómo […]

    Reply
  50. 14 leiA�ir til aA� nota ramma | Hun.is says:
    April 26, 2018 at 7:30 pm

    […] Makely Home […]

    Reply
  51. 23 façons créatives de réutiliser les vieux cadres dans la maison says:
    July 27, 2018 at 8:50 am

    […] image : makelyhome […]

    Reply
  52. Ce poți face cu o ramă veche de tablou? Vă arătăm câteva idei inspiraționale | Live Trending says:
    August 21, 2018 at 10:22 am

    […] și așezați cadre într-o manieră abstractă pentru a crea o artă unică. Vedeți aici cum se […]

    Reply
  53. 35 DIY Ideas to Reuse Old Picture Frames for DIY Projects - DIY & Crafts says:
    October 12, 2018 at 8:34 am

    […] If you strive for the geometrical wall or interior decors then you can also go handmade with the old picture frames for bringing great geometrical décor statements to your interior walls! Just repaint the old picture frames in dashing colors and next put together on the wall in custom configurations like in overlapped manner for amazing geometrical wall art! Peek into details of the given sample art and do clone it for any of your walls! Full project instructions here makelyhome […]

    Reply
  54. Picture Frame Wall Art Diy – Art Coronium says:
    October 18, 2018 at 5:51 pm

    […] Mastering the Master Bedroom {Layered Frame Gallery Wall. – Lindsay Ballard is a former college mascot turned political geek turned roller derby playing, DIY fanatic. Lindsay chronicles her projects, design ideas, and. […]

    Reply
  55. 35 Fantastic Approaches to Repurpose Old Picture Frames | says:
    December 2, 2018 at 3:42 pm

    […] Source: makelyhome.com […]

    Reply
  56. 20 Things to do with an Empty Frame - Hercottage says:
    February 18, 2019 at 7:51 pm

    […] Image source […]

    Reply

Leave a Reply Cancel reply

Your email address will not be published. Required fields are marked *

This site uses Akismet to reduce spam. Learn how your comment data is processed.

  • Email
  • Facebook
  • Instagram
  • Pinterest
  • Twitter

About Makely

Lindsay Ballard is a former college mascot turned political geek turned roller derby playing, DIY fanatic.

Lindsay chronicles her projects, design ideas, and lifestyle tips here at Makely, where she shares tutorials and inspiration. Her DIY designs are bold and graphic, while her spirit is fun and full of color.

Lindsay lives outside of Austin, Texas with her husband (Tom), children (Zack and Emma), and dogs (Duke and Jill). She plays roller derby for the Rockin' City Rollergirls out of Round Rock, Texas.


Archives

Categories

PRIVACY POLICY
Copyright © 2009-2019 Makely School for Girls | All Rights Reserved | Posts may contain advertising content or affiliate links