I can’t tell you how many times I’ve Googled the following search terms:
“Painting laminate furniture”
“How do I paint laminate?”
“Can I paint laminate?”
“Why won’t someone tell me how to paint this piece of laminate furniture?????”
You know what those searches returned? Nothing. Nada. Zilch. I couldn’t find a single tutorial out there to tell me how to paint laminate furniture.
Well, fine. I’ll just figure it out by myself and share it with my blog readers. ::sticks out tongue at Google::
Let me be the first to tell you this: With the right preparations, you CAN paint laminate furniture and it WILL look good. You just need to follow the following steps:
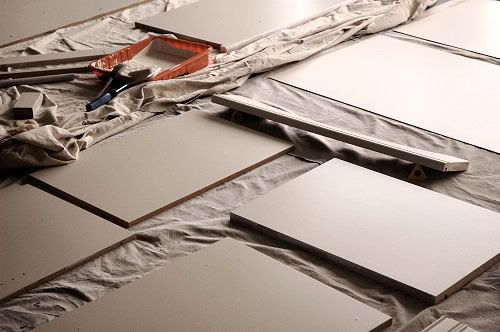
1. I started with a light wood laminate armoire from my son’s playroom. The piece is very heavy and solid, so it’s a nice piece of furniture despite it being covered in laminate.
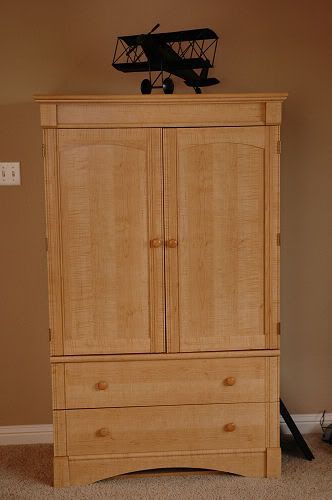
2. If your laminate piece is one that can be easily taken apart, go ahead and do that. DH offered to take apart the armoire for me to paint, and it made it much easier in the long run since the piece was so big and heavy. There was no way that DH and I could have gotten it from the upstairs playroom down to the garage by ourselves. If you can’t take your piece apart, at least try to remove any doors, drawers and shelves.
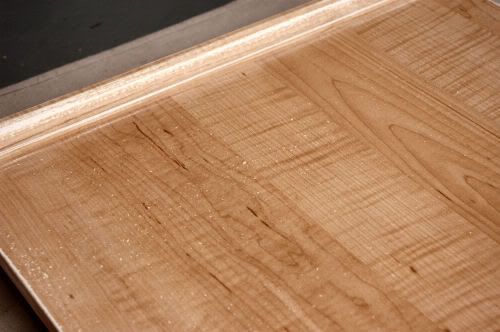
3. With a 220 grit sandpaper, sand every square inch that you will be painting. The sanding will be much easier if you use a palm sander (they are about $30 at home improvement stores if you don’t have one). You will need to hand sand any areas you can’t reach with the sander.
Sand until you start to see little white flecks on the furniture and the shine of the laminate is removed. Be careful not to sand down to the plywood or other pressed wood that is underneath the laminate.
4. Next, take a tack cloth and wipe down the pieces you sanded. You’ll want to make sure you remove all of the sanding dust so that it won’t ruin your paint job. I like to wipe down each piece right before I prime it so that I don’t run the risk of additional particles getting on the pieces before I paint.
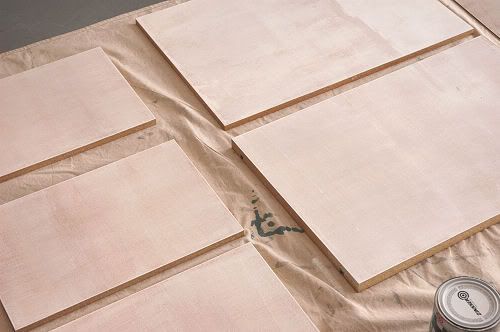
5. Now it’s time to prime your pieces. There may be other brands of primer that will work, but I specifically recommend the Zinsser Bulls Eye 1-2-3 primer for this job. It is formulated for all types of projects, including laminate. I picked up a quart of this at Lowe’s for about $9.

Prime each piece with a foam brush. I used a foam roller to paint the large pieces and then used a 2-inch foam brush to paint the edges and hard to reach areas. I gave each piece one coat of primer.
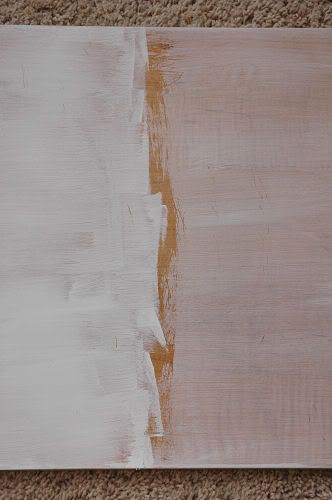
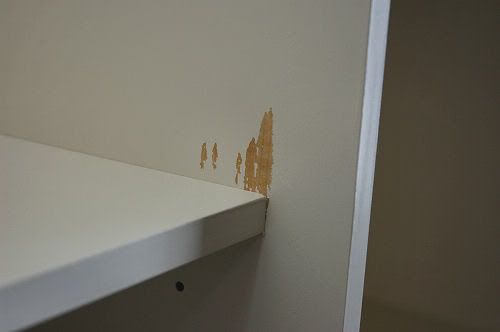
I primed one of my pieces after just sanding half of it, just so you can see how important the sanding step is in this process. Here, the left side was sanded and the right side wasn’t. The difference in the way the primer laid down is truly remarkable.
You will need to let your primed pieces completely dry and cure before you move to the next step. Zinsser recommends 7 days; other brands may recommend a different length of time. Your pieces will be dry to the touch within a few hours, but they will not be scratch resistant until the primer is fully hardened. I cannot stress this enough. Don’t rush it and try to paint over the primer before it is cured, as your pieces will scratch easily. If you wait the recommended amount of time, your paint job won’t scratch easily.
6. Now comes the fun part – the paint! Using a foam roller and foam brush, I painted two coats of paint on my pieces, allowing each to dry overnight before I applied the second coat. I chose an interior eggshell sheen for my paint, which is in between flat and semi-gloss. I paid careful attention to catch any drips, but those I missed I removed with a single-edged razor once dry and repainted.
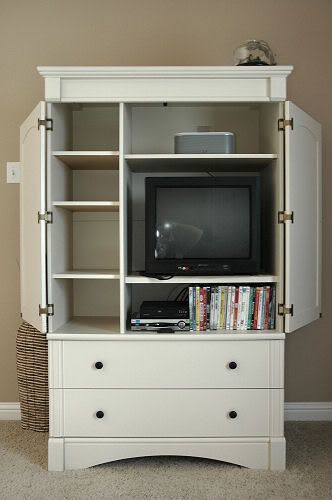
7. Once the paint dried overnight, we reassembled the piece and touched up any areas that I missed or that got scratched during the reassembly process. We definitely scratched up the interior of the piece when we were putting the shelving back in since they are a very tight fit.
With a small foam brush, I simply touched up those scratched places with a few coats of paint and you can’t even tell they were scratched.
8. If your piece is one that is going to get a lot of wear and tear, I’d recommend applying a polyurethane coat. Minwax makes a wipe-on version you can apply with a sponge, so I think that one would be easy to apply. I will likely go back and apply the polyurethane coat to my piece when I have time in a few weeks.
9. Now it’s time to sit back and enjoy your “new” piece of furniture!
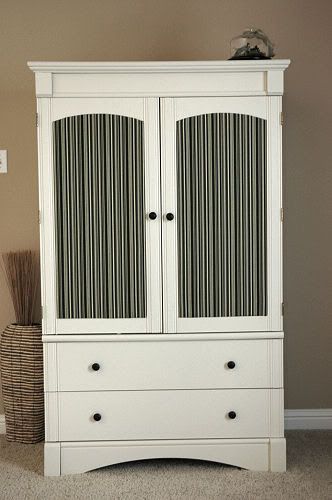
Pretty easy, huh? It just takes some patience and time, but the results would be well worth it. I’d love to know how these steps work for you (and let me know if you have any questions)! Or, are you still scared to paint your laminate furniture?
Update on 12/8/11 – Since writing this post, many advances have been made in laminate painting. Although my method still works wonderfully, there is a new product on the market called Rustoleum Cabinet Transformations. I have tested the product and think very highly of it. Although it is made with kitchen cabinets in mind, it can be applied to laminate furniture with really great results. If the thought of allowing primer to cure for the full 7 days scares you, head to Home Depot or Lowe’s and see if they have the Rustoleum product in stock.
Thanks for the tutorial! I have a cheesy, fake dark pine laminate lingerie chest that is hideous (but free!) I have it in the corner of my walk in closet so that no one can see it. I never tried painting it before because I thought it would not work. I think I will give it a try now!
Thanks for this post! I knew it could be done, but it’s nice to see it step-by-step.
What a fabulous tutorial. The armoire looks gorgeous painted and I love the fabric insets in the doors. Now you have a true treasure. Love it. Hugs, Marty
Awesome! Thank you! We have several pieces of laminate furniture hanging around here… all sturdy and functional and all UGLY. My husband also brought home a headboard recently that has a laminate covering. It needs some work to look good but it is totally cute with a little heart cut-out and will be perfect for my 6 year old daughter. Now I know how to paint it and I am thrilled… sure beats the ideas we were tossing around, like upholstering it (imagine that with a sticky fingered 6 year old!)
My friend and I are the chair fairies, we do custom painted furniture. Great job, I will keep up w your blog. Thanks again, jackie
Thanks for the tutorial! I always wondered how to paint laminate…you’ve made it soo easy! Thanks for sharing…it’s beautiful!
Great tutorial!!!! 🙂 I posted a pic of a redo I worked on with a Wal-Mart laminate chest of drawers I had from college. I painted it to go in my first daughter’s room. I had NO clue about sanding, etc. I had to prime that thing about 20 times!! 😉 It has held up pretty well for 3 years now, although I bet the top has peeled off underneath the plastic storage bins I put on top (it’s in the closet) 🙂 Great tips and photos!!
Great tutorial! I have a set of bookcases that I painted (same procedure that you followed)…it was 7 years ago and they are holding up fine.
Don’t be afraid to paint…after all, you probably don’t like the way it looks NOW, right?!
You are my hero!!! I’ve been a chicken and have so many “finds” I want to re-do! Thank you! Thank you! Thank you!
Thanks! I had luan wood paneling in one room. I painted most of it then moved some more furniture and discovered some water damage. All I could find to replace it was laminate. I sanded it down and painted it and it peeled up almost immediately, I don’t know why it didn’t occur to me to prime. I will do that next time!
Turned out wonderful Lindsay. I would have given the same exact steps you did. I have painted lots of laminate and that is the way to do it. Is that fabric in the doors? Love it.
That turned out great. Believe it or not, My hubby and I actually stained some laminate furniture we had.
Ancient thread, I know. But how did you stain laminate furniture? Did it hold up in the long run?
Oh these are great tips! I’ll be linking.
Yea – I am so thrilled you did this post. It will be so helpful as I have one piece that I want to paint. Here’s to many hits from people who Google – how to paint laminate furniture. 🙂
THANK YOU! THANK YOU! THANK YOU!!! I want to do a couple of laminated dressers and needed just this to show me how!! Super post!
Aw, you are too good!! I never do the “guts.” 🙂 I’m about to start another laminate furniture project and I’m not even painting the inside of the doors — I’m too impatient!!! This turned out so great!
I have a few laminate bookshelves that could do with a paint redo. Thanks again for always giving such great info. My bookshelves and I thank you.
Great tutorial! You could put me out of business! (*smile*). Jennifer
Love, love, love this!!! We painted some ugly laminate bookshelves green to match my son’s room. I was suprised at how easy it turned otu to be. 🙂 tina
We are actually going to paint our kitchen cabinets which are laminate so this is a huge help!
If I spent more time blog surfing I might have helped, but looks like you figured it out yourself, LOL. Here's some directions out of one of my painting books on painting laminate. 1) Sand w/ 220grit sand paper to lightly scuff away the gloss. Use the same grit between each coat of paint. 2) After each time you sand the piece wipe it down w/ a tack cloth. 3) to avoid brushstrokes use a roller to apply primer, paint & polyurethane. 4) cover w/ thin coat of primer designed for nonporous surfaces (Kilz or XIM Bonding Primer/Sealer). 5) Once primer is dry (overnight) roll on thin coats of latex paint. Allow each coat to dry and lightly sand before applying next coat. 6) When latex paint is dry, apply a few coats of clear-drying latex polyurethane, making sure each coat dries before adding the next one.
If you're painting something you want to keep around for a while it's worth the time to put into doing it right. Otherwise the paint will scratch off anytime something bumps into it. The key is to use a good primer, don't be cheap on the primer, and a good paint. I have been really happy w/ Kilz and Ralph Lauren.
Cheers!
I was wondering about your instructions compared to this blogs instructions. With the sanding do your instructions mean to use a palm sander also? I wonder because I got my bookshelf for 5$ at a garage sale and I’m not about to buy a palm sander for 30$, kinda beats the purpose of having bought a garage sale item.
this is very, very helpful!
Girl, you are my hero. I was Googling the same thing ! Ha ha, how funny. I am definitely bookmarking this and adding it to my links page.
You are awesome ! Now I can’t wait to paint my hideous beast of a laminate piece hanging out in the kids’ room. Crikey.
I was just wondering if this was possible. I have a few little cupboard/drawer sets I would love to paint. Your armoire looks amazing! Is the striiped part fabric? How did you do it?
wow!! Lindsay, you did a fantastic job and thank you for the tutorial!
Have a fabulous weekend!
Melly:)
That looks amazing! I am in the middle of an armoire re-do. The sides are laminate and that is exactly what I did. How did you do the stripes on your doors? Is that fabric or paint? I’m planning on putting wallpaper in the door panels but haven’t done that on furniture before.
Great post!
I found you thru One Pretty Thing, I am so glad I checked that site out today, this tutorial will be a life saver for me.
My daughter is wanting black furniture, so I was thinking I could paint it. This tutorial is exactly what I needed! Thank you so much!
Came here from Centsational Girl, that armoire looks fantastic! I never would have thought of painting laminate – now think of the possibilities!
What kind of paint did you use?
I also Googled those same things and got nothing. Until one fortunate day when I found your tutorial. THANK YOU so much for this! It's exactly what I needed. You're the best!
I'll let you know how my bookcase turns out. 🙂
I have been SEARCHING high and low for good instructions on how to do this and just found this through the Blissfully Domestic site. Thanks Thanks Thanks – can't wait to get started.
Thanks for the helpful info! I have a laminate bookshelf I need to paint white for my daughter's room. Couldn't decide whether to paint it before or after I build it. You helped me decide to paint it before, since that would be easier, and then just do touch ups after I assemble it to cover any scratches that occur during the assembly. Your armoire piece looks fantastic. Thanks for taking the time to post about what you did!
I have searched google for the same "how to paint laminate" a THOUSAND times myself!!! Thank you SO much for this.
I had already done most of what you said. Two coats of Kilz primer, then put on a Latex finish with a foam roller (in a package at Lowe's advertised as for cabinets). however, the finish is not as smooth as I would like. It looks like it was rolled on with a fine nap roller. Is ther any way, short of a sprayer, to get a really nice, professional-smooth finish?
Lightly wet sand it for a smooth finish. 3M makes nice wet sanding sponges. Worked great on a whole bedroom set that I painted.
I am so thrilled to come across this. Your information is so helpful. I am going to paint a tacky laminate dresser to put in my basement/family room to hold towels and linens. This is exactly what I needed! Thank you!
I want to paint my bedroom furniture. I noticed the sides and tops are laminate but the drawer fronts are wood. Do I paint the wood fronts the same way I would paint the laminate pieces? What type of paint did you use? Do I really have to let the primer dry 7 days? Thats a long time for my dressers to be in the garage! My e-mail address is wallacenyg@verizon.net
What a great tutorial! Thank you so much for posting this. You definitely have helped TONS of people out there, including myself.
I do have one question… Behr paint just came out with a paint and primer in one. Do you think that would work on this or should we still keep it as a 2 step process? I've used the Behr Paint and Primer on my walls and it's fantastic! It definitely cut out a whole step and it dried really quick. Colors are great too. Plus it has low VOC – very important for me. So I know it's excellent on walls. You think it would be just as good on laminate?
Thanks again!
Peechee
peecheeneric@aol.com
Hi one thing you should do (I worked in a paint dept for 15 years) is wipe the wood down with mineral spirits first (paint thinner) to remove any wax that maybe on it
This is wonderful! I just bought a nice night table for our nursery at Salvation Army for $15, despite the tacky laminate finish! My DH said there was no way to paint laminate so I jumped on Google and found you! Now I can add this to his honey-do list. heehee! I will take before and after pics.
I am taking on a very exciting but timely project of repurposing an old gun cabinet and turning it into a curio cabinet. I purchased the gun cabinet for $35 from Craigslist. The wood is laminate and I was happy to come across your post and reassure myself that I can paint it. My hubby will be adding some shelves in the cabinet for me…but the best part is there are glass doors, a lower cabinet, and it's pretty darn tall and will look fabulous in our office. For $35…I couldn't go wrong!
Thanks for your tutorial. I will post before and after pics of my project if you'd like to check it out.
Wow, this really helped me. I have also looked and looked on the internet and your site was very very helpful. I like the pictures plus the step by step procedures. Thank you so much!!!
I tried to paint a Sauder laminate bookshelf once and also encountered a lot of scratched paint. I wasn't aware that you had to let the primer "cure" for so long (or at all). I have a laminate desk I wanted to paint for my home office, so thanks for the tip!
Hi Lindsay,
I was wondering how your piece is holding up? I have a laminate desk that I'm thinking about painting, but I'm not sure if it's good to paint something that way if it gets a lot of use.
Thanks in advance
http://www.home23duncanboys.blogspot.com
We just bought a 1970s house that has a 1970s dining table that i dont like cos of the laminate but cant let go cos its so retro. I googled and googled and almost gave up before I hit this page. Thanks a ton.
Thank you for sharing this information! I've been wanting to paint my laminated bathroom vanity but have been nervous. This is very helpful.
Thank you for your post. I just painted a two-shelf blond laminate bookshelf that was a little ratty and just didn't look very cute in our expected baby boy's nursery. Your post was extremely helpful in its transformation to white! I ended up just using Kilz primer since I already had some and the can didn't say anything about waiting more then 12 hours for it to dry. So I took the risk and didn't wait as long as you! Hopefully it will be just fine 🙂 Thanks again!
I just found this article via Ms. Centsational Girl. I'm very interested in trying this. Thank you for a wonderful turtorial.
I just bought some Sauder laminate furniture (so it is the plasticized paper laminate that they have on all their furniture) that is actually pretty, but it is dark-colored and would show scratches bad. Is there way to put a protective coating of polyurethane or lacquer or something on it to protect it from scratching?
lwalling4951@yahoo.com
I actually have a question about doing the opposite… My exwife decided to paint the cabinets in my home with latex paint without doing any sanding, priming, or cleaning. How can I remove the paint to restore them to their original color? They are laminate white cabinets and she painted them poo brown.
Thanks!
For an even more durable finish (without the need for a poly coat), use an oil based paint instead of latex. Oil will dry to a hard finish with a nice gloss, while latex will never completely 'dry' and things will stick to it (like books if you paint a bookshelf).
I don’t think you are ever suppose to put oil over latex paints or vice versa. I know you can put water based poly over acrylic paints because I’ve done it before and it does help to preserve the paint layer.
I don't now if this will help or not. I work with laminate as part of my job and the laminate that is used on furniture is the same as the laminate used on countertops. If you add "countertop" to your search tems you should find a few paints and other product to help you.
As a student, I've got several cheap bookcases for my library of books. Thanks so much for posting this. Now I can at least upgrade a bit without spending a fortune!
thank you for this very thorough post. i had a general idea of how to do this but your tips are going to make the job look much nicer!
-allen
Next time use a shellac primer. You don't have to do all that heavy sanding and the finish should provide the same, if not better, longevity.
Search for "paint laminate shellac" and you'll find lots of useful articles.
I like how it turned out!
Wonderful! I told my partner it could be done. Thanks for helping me win the bet.
Thanks for your tips, Lindsay! Your instructions are so easy and straight-forward. 🙂
Wonderful, thank you! I, much like many in my age group, have tons of pieces of el cheapo laminate furniture from Wal-Mart hiding out in closets and the garage. I can't wait to re-do them now!
this is so perfect that its eight months later and you're still getting cooments!!
this was exactly what i was looking for 🙂 do you think this would work with black laminate too? i have a dresser that is the perfect length/size for my room, but is not the right color at all. i want to make it much lighter (was toying with the idea of white). would that just mean a lot more primer and paint, or is it impossible?
thanks! meghan1122@gmail.com
You are my hero!! It's been on my to do list to google THIS VERY SUBJECT and I was just reading through your old posts and found this – thank you so much!! I have several pieces to redo and this is just the advice I needed!
THANK YOU for the tutorial. Thank goodness you had the patience and the forethought to get it all documented. I will try it on some shelves in my bathroom, and will redo the interior of my kitchen cabinets. I sanded and primed them, but didn't wait the 7 days you recommend, and it shows. Thank you again!!!!
Lindsay I am using your tutorial to re-do my husband's grandmother's wardrobe. I even put a link from my blog to your tutorial. Thank you so much for your help!!!
Thank you so much! This was just the info I needed for a project I have in mind — turning a super bland IKEA buffet into something fab! I'll be sure to post a picture with a link to your tutorial when I get it finished!
Thank you for this article. I just bought a laminate cabinet that I really liked knowing there had to be info on how to paint it. Sure enough came home and googled paint laminate and up popped your tutorial. Thanks!
I am so excited to to re-paint my laminate furniture after finding your article, does it matter what kind of paint you use to paint the furniture after you prime it?
Hi Stephanie – I actually just use latex paint, like the kind you buy at home stores to paint your walls. Works great!
I recently painted a cabinet from Ikea and I used the Bulls Eye primer like you suggested but used an exterior acrylic paint. It worked great and holds up much better than the pieces I have used regular interior latex on. The paint dries hard and objects I set on it dont stick like they do on my other pieces. Hope this helps!
For the last 2 days I have been looking all over the web for “How to Paint Laminate” and was getting the same problems you first had:( So THANKKKKKKKKK YOUUUUUUUUU SOOOOOOOOO MUCHHHHHHHHH!!
It looks GREAT and I have a much better feeling of how my desk will turn out. THANKKKKKKKKKKKKKKKKKKKKKKKKKKKKKKKKKKKKKKS!!
I was so excited when I found this tutorial – I have some heinous Ikea hand-me-downs in our master bedroom just begging for a makeover. Thank you for such a detailed tutorial!
I have a question – is there any alternative to the primer that needs 7 days to dry, that will still produce a good base? I looked into the shellac primer like the anonymous poster recommended, but at the moment I can’t be around any toxic fumes like that, even for a few minutes. We don’t have a garage, so the only room I can leave the disassembled furniture in is our guest room, and I don’t think my husband will agree to a week of furniture bits on the ground. Do you know of anything that works that only needs a night or two to dry?
Thanks! Fantastic blog. 🙂
Hmmm….I actually used some spray primer today that I really liked. It’s also by Zinsser, but it’s called Cover Stain. It’s oil based and says on the can that it sticks to all surfaces (it also comes in a non-spray form). What I primed wasn’t laminate, but it is wood with some sort of shinny sealant on it, and I was too lazy to sand it all down. It dried very quickly, and I was able to bring my project back into the house in an hour. It seems like it would be worth a shot in your case. I did wear a mask, though, since I’m pregnant and didn’t want to inhale the fumes.
Here’s the product link: http://zinsser.com/product_detail.asp?ProductID=12
That same company (I’m totally not pushing their product – I just love what I’ve used that they make) makes a low VOC odorless primer. I’ve never used that one, but it would also be worth checking into in your case.
Thanks for the tips on painting. I’ll be doing a small shelf unit and this will help. Your cabnet looks great! What is the front doors – paint?, a texture material? Looks very nice and classic.
so easy to understand even a novice like me can’t wait to try it on some old bedroom furniture.
Thanks!!!
Thanks for the tips! Same as everyone else – IKEA piece that I want to paint. What did you do to the doors to make them black and white? I thought about wallpapering the inside of my cabinet (similar to yours)… any thoughts on that?
Wallpapering would probably work well. My panels are actually fabric covered foam core. 🙂
Thanks so much. I am going to try this on a headboard and nightstand. Have you ever used a deglosser instead of sanding? I have heard mixed reviews. Thanks again.
I have used deglosser on painted and varnished wood, but I don’t know how it would work on laminate. I think I’d go for sanding, since laminate is basically plastic, but I really don’t know.
Great tutorial! Just wondering if you ever heard of “gripper” primer instead of sanding? My husband swears this will work. I don’t want to skimp…but thought of sanding then waiting 7 days is daunting. I have a cabinet, table, wall mounted shelves, and a few frames to do. Have you ever heard of this or used it? Is it the same as the Zinsser 1-2-3? Thanks!
Hi Geneve-
Yes, the Gripper is essentially the same thing as the Zinsser, just a different brand (Glidden, I think). They are both high-adhesion primers. I’ve only used that brand once, but it wasn’t on a shinny surface like laminate.
I have found recent success with another Zinnser primer called Cover Stain. It’s oil-based so the clean up is more difficult, but I painted a changing table for my nursery without sanding or anything using it. I only waited 4 hours between priming and painting, too. I’m not positive it will hold up as well as the sanding/painting, but it seems to be doing so as of now.
Good luck!
Hi Lindsay,
Great information-thank you. I have a similar situation- I am redoing a little girl’s room on a $500 budget while she is out of town for a birthday present (her mom is helping me surprise her) and we have to paint her furniture- we have a laminate cabinet and we only have 3 1/2 days til she returns. How is that changing table holding up, because I am going to use your tip -the Cover Stain and this is a robust little girl, I want to make sure that I am doing the right thing. Did it work okay without the sanding and 7 days?
Thanks again,
Khristy
Hi Khristy – The changing table is holding up perfectly…but baby’s not here yet so it’s not getting much use! LOL We have moved it from room to room and banged it around and it seems to be holding up with absolutely no problems, so I’m thinking the Cover Stain is a pretty good product. I’m sorry I don’t have a “final” answer yet.
Thanks so much for the feed back! I did experience some problem with the adhesion but overall it was a great solution. Laminate is just so difficult. The room came out great-if you want to see the pictures let me know and I will get them to you. Congratulations on the new baby and best of luck!
did you end up putting the minwax wipe on poly on your piece? i applied the wipe on poly to a piece of wood furniture that i painted a few months ago. the finish is very tacky. i called minwax and the grumpy customer svc rep said it’s not made for painted surfaces…. i need to find something that is since i have lots of painted furniture.
Hmmm…I’ve used that on tons of painted surfaces and have never had a problem with it being tacky or anything like that. I haven’t gotten around to using it on my armoire, but that’s only because I’ve just been too lazy to do so.
great tips….
any experience with after painting the laminant….sanding the edges for a distressed look? or am I asking too much and should just be happy I am able to paint it….
I have no idea, Sandy! It’s worth a shot, though. The worst that could happen is that you have to repaint the edges. Maybe try it on a test area (and let me know how it goes!)?
Another way to get the distressed look is to wipe on just a smidge of wood stain. Maybe this would work?
Thank you so much. I’ve googled about how to paint laminate, and found nothing either! This is a wonderful tutorial!
I will have to try this! Thanks for sharing the detailed steps.
I cannot express enough how great it was that you took the time to post this tutorial. It is definately an issue that is hard to research. I have a project I want to do and will let you know how it turns out.
Thanks again!!! ~Kristina
Thank you! Thank you! Thank you!
I have some unattractive laminate furniture that really needs some freshening up. These steps sound really simple. I can’t wait to get started!
AH i am so glad i found this blog! i have been searching everywhere for a correct way to paint my lam coffee table~! thanks so much. i will follow your advice to a T and hope it turns out as beautiful as yours!
I am now so excited to paint my bedroom set, it is from 1960 and is mahogony covered with laminate. I could never afford to replace it with something as sturdy so the next best thing will be a nice new paint job.
Do you think this would work with stain instead of paint?
I’m not sure stain would work because with laminate, there’s no actual wood grain to stain. The laminate is basically just plastic, so that’s why the paint works so well.
but there’s always faux painting to get the wood grain look – right?
Thanks so much for your post. I hope this works for my son’s bookshelf but you did miss a step. #1 Scrape off all the paint that is peeling because you thought you could just slap a coat of paint on it like the wall. (A pampered chef nylon scraper is very useful for this step.) LOL. Sigh, an afternoon of my life I’ll never get back…
Wonderful! I’m so glad I found this! I too was wondering if a stain would work. Anybody try staining instead of painting? TY again!
I’m not sure stain would work because with laminate, there’s no actual wood grain to stain. The laminate is basically just plastic, so that’s why the paint works so well.
I’m going to try this with a desk. It’s a light colored wood desk and I want it a dark color to go with a file cabinet and book shelf that I have already – and I want it to have a wood grain look. I’m going to try and figure out some faux painting… I’ll keep ya posted. 🙂
Is there something I could use as a topcoat on a kitchen table that would make it safe to eat on? I have a table that I’m dying to redo!
Hmmmm…I know people use the wipe-on poly and varnishes for kitchen tables, so I would think that using poly would be okay.
You can use a clear Shellac for surfaces that will have food on them. It’s also safe for childrens’ furniture.
Thank you so much for your detailed post! You’re helping me save some money as we move into a larger place and other “big” things need to be fixed first.
I’m wondering if the paint you used is going to yield a sticky surface. Reason is the handyman that painted my current home used a white shiny latex paint to paint my bench too. It’s very sticky and when I put something on it, the paint either comes off and sticks to the object or the object’s colour/paint sticks on to the bench.
Thanks for your tips.
Kerry
Hi Kerry-
My armoire isn’t sticky at all. I guess it all depends on the humidity and paint used, but mine has absolutely no tact to it. That’s a bummer that your bench is so sticky!
Lindsay
What about items laminated with the wood looking paper? Is there any way to paint those? I am assuming, after reading these posts, that the only laminate people are painting is the plastic coated kind.
What an awesome tutorial! Thank you so much. I have been trying to paint a headboard with a foam roller and foam brush, but the finish is far from smooth. What is your secret to getting a smooth finish?
my first search on this subject and I hit a home run. Thanx to all the comments before me I feel confident in doing the small counter top in my bathroom. I just don’t have the funds to replace the formica so paint was my only option. Now I’m really excited to get it done. Isn’t the internet wonderful?
Great tutorial.
Help please…
I am having a problem with my laminate furniture that I painted this week. I initially painted it w/o primer and the paint did not “stick”. So, I removed the paint with a stripper, sanded, primed with Kilz primer for latex paint and then painted with latex paint. Two days after completion, the paint feels a bit tacky and I am able to easily scrape through the paint and remove it with my finger nail.
I don’t know what to do at this point and I am very disappointed. I can’t imagine removing the paint again from an entire chest of drawers and bed.
Can you please tell me what I could have done wrong? I do live in a humid environment and I did not allow more than a day for the layers to dry even though they felt dry…. When I used this exact painting method on real wood during the same week I did not have this problem.
Do you recommend something I can put over the paint (polyurethane)?
Home Depot told me to use a fine steel wool over the paint to get it to dry or something. I can only visualize the paint tearing to shreds…
Thank you for your advice,
Jenn
There seems to be an explanation of this problem in this article about painting laminate in the Washington Post. Hope it helps!
http://www.washingtonpost.com/wp-dyn/content/article/2005/09/21/AR2005092100593.html
I would like to crackle glaze a laminate table that I bought from Ikea does anyone know how to do this? IS IT POSSIBLE?
I am getting ready to paint some cheap laminate bookshelves. Two are white–kind of a plastic-y material–and one is more of the face wood grain. I am wondering if anyone has tried the spray paint that’s made for plastic? I read several posts that said laminate is basically plastic, so I’m wondering if that paint would work?
Great column. 2 questions. When you talk about “laminate” furniture, is this the same as the Sauder “wood grain” type furniture – which I always thought had a “paper” finish? Would it work the same? Also – we have some old black lacquer furniture from the 90’s. Would this method also work for it?
Hi Kathy!
Yes, the Sauder furniture is generally laminate from what I have seen. I would think that the technique would work the same way for lacquer furniture, too. You just want to cut down that shine and put on a good primer so that the new paint would stick.
Good luck!
This is perfect timing. I am so glad that when I googled “how to paint on Laminate” I got your blog. I have a piece of furniture in my Kitchen on a tarp right this minute that I have been sanding. I will have to see if I have sanded it enough and what the weight is. Your cabinet turned out sooo nice, I hope mine will look as nice as yours. Thanks for your tutorial. I will post my process on my blog and put a link to you on it as well. Thanks again.
Well, you have fixed the problem of Google not returning a good aswer to painting laminate. I googled it and your site popped right up with all the answers I needed. Now my “many different shades of wood” laminate furniture finally has a chance of matching. Thank you so much!
You are so right…I have wasted far too much time searching for this. Thanks for your brilliant blog.
I was hoping you’d be able to help me…I want to paint some bathroom counter tops and wardrobes and have bought some melamine paint (I assumed that melamine is the same as laminate??). This doesn’t mention a primer. Have you used this/ any thoughts?
Thanks
Thank you SOO much, I’ve been looking for days for something like this!
I am going to follow your steps to the T, my furniture is part real wood and part laminate, my only question is do you think a heavy duty spray paint would work over the primer? I was just thinking it would cover better and not be as thick especially when I coat it with the polyurethane….
Thanks so much again!
Thanks for the time and patience it took to put the tutorial together and post. My son received some end tables and a coffee table from my daughter after many years of abuse. He wants them to be painted black. Now I know I can try and make his dream come true. I will laugh if my daughter and her husband like them so much they want them back!!! Thanks again for all the help.
I painted the cover stain primer on with a foam roller but it did not leave a smooth surface. The hardware store recommended lightly sanding and then brushing on the paint. However, after the first coat, it left brush marks. I am being to critical? What should I do next? Thanks.
Regarding a deglosser / liquid sandpaper – I tried this and then painted a piece – didn’t turn out so well. The paint just peels off when it gets scraped. I should have primed, but I’m not sure that would have helped. I’m seriously considering a sanding, spray prime, and spray paint job on a table & hutch I bought on Craigslist today. Since it’s a kitchen table, I think I’ll just have glass cut for the top so I won’t have to worry about messing up the paint. Wish me luck!
I want to try painting on laminate. The piece I have is a dresser, but it does have one small area that is showing the plywood that is underneath. How can I repair that so I can sand it?
I have to thank you too! I have been searching and searching and finally found your blog. Great step by step instructions! 🙂
I posted to a couple of comments above – some other folks are wanting to get a wood grain look. I’ve got a light colored wood desk and I want it a darker color to go along with a file cabinet and book shelp I already have. I fell pretty certain that after we get the primer on, a wood grain isn’t going to come through… but I was thinking we might be able to do some sort of faux paining on it. I’ll keep you posted and take some pictures to let you know how it turns out.
I do have a concern about the “sticky” or “tacky” issue that some others have posted. You made a comment about it not being humid where you are… I’m in the deep south, on Alabama Gulf Coast… IT’S HUMID!!! Not sure how it’ll turn out – but again, I’ll keep ya posted.
Thanks again so much for helping out with what, apparently, a lot of us need help with! 🙂
thanks so much for this step by step….i have several beautiful pieces of “fake” wood. it is time to add color, i will get busy tonight
Thanks for this guide. It’s really helpful because I finally found the answer for my questions.
Kara, How have your projects turned out with the “sticky” “tacky” issues people were having? I, too, am in a humid coastal climate.
Thank you, thank you, THANK YOU! I have been mulling over the few details I already knew in regards to painting a couple of pieces that are partially covered in laminate. I found the Zissner primer at Lowe’s, but I really wanted to hear from someone who had used to water based kind to see if they liked it or not.
You pretty much summed it up for me, and I already planned to end with the wipe on poly from Minwax. Yay!
Oh, and I did find your post by googling, but I’ve visited before after my mom sent me a link to your blog. Great work!
Thank you! I can’t wait to get started on my project now that I know how to do it! Yeah!!!!
Thank you so much for the instructions. I just bought an armoire and 2 night stands. Can’t wait to paint them.
Thank you!!! I have been staring at the worlds ugliest laminated dresser for a couple of years and have been really wanting to paint it. Like you said every time I searched the internet nothing came up until now! So again Thank you!
I don’t have laminate furniture, but there are laminate cabinets in my kitchen, and I really don’t like them. As far as you know, will this work on my cabinets or do I need to do something else? Thanks!
Hi Stephanie- As far as I know, it should work exactly the same!
Hi Lindsay,
I have ugly, old laminate kitchen counter tops. I want to use your technique to paint them. I realize that we’d have to eat out, or at least out of the kitchen for 7 days while the Zinsser Bulls Eye 1-2-3 primer dried (that would be great) and I definitely would apply a polyurethane coat at the end….My question is do you think that if I was careful, that the counter tops would be resistant to stains and scratch?
And a second question: I’d like to apply a design….something from the faux finish (used on walls) to give the counter tops some pizazz. Any suggestions?
Thanks,
Nadia
Hi Nadia!
To be honest, painting the countertops scares me a little bit. It could definitely be done, but I’m worried about the wear and tear that kitchen counters take. I think this technique is great for a piece of furniture that doesn’t get used and abused, but I’m concerned that the counters would end up getting scratched really easily.
We haven’t tried it yet, but Rustoleum makes a paint for laminate counter tops. We found out about it from the paint person at our local Lowe’s store. You can have it tinted in 9 or 12 different colors. You might look in to it.
http://www.washingtonpost.com/wp-dyn/content/article/2005/09/21/AR2005092100593.html
i am commenting on painted counter tops. My friends and I paint everything! the counters come out beautiful. sand, prime, paint , faux, poly. I have seen them last years with no scratching, stains or peeling. my Diane painted faux granite, i had to touch and knock on it to believe it wasn’t real. go for it!
Lindsay, EVERYONE told me that my countertops would not hold up, but I found Rustoleum Counter Top paint and did a post on “ONE YEAR LATER, My Painted Counter Tops” so you can see how they held up! My Mom did here’s a year ago too and are GORGEOUS, I just did a post on her’s too – and they have held up PERFECTLY, but she sealed her’s with poly. I didn’t do that right away… Anyways, if you want to check out the links to our painted kitchen counter tops, here they are: http://kammyskorner.blogspot.com/2012/01/moms-gorgeous-painted-countertops.html
http://kammyskorner.blogspot.com/2011/11/painted-kitchen-counter-tops-1-year.html
p.s. Here’s a counter top that I just used regular Zinnser Bull’s eye primer on, white paint, and polyacrylic on in my craft room, and I’m AMAZED that it shows NO WEAR (it’s been a couple months now) http://kammyskorner.blogspot.com/2011/11/jackson-resale-factory-counter-top-and.html
Hi Nadia – I painted my countertops and they turned out great – and very durable – I primed with the Zinsser oil based primer – it dries in just a few hours and you don’t need to sand. I then followed up with Melamine paint and did a faux granite looking finish. I actually did this several years ago when I was selling my previous house – so sorry I don’t have any photos.
So have you tried it?? I used the rustoleum counter top paint a few months ago from Lowes and it has held up well and I LOVE IT! My mom and another friend also did their’s… I have all of the counter top projects posted on my blog, here are the links so you can see what mine and my friend’s turned out like, and how we did them:
http://kammyskorner.blogspot.com/2010/09/painted-kitchen-counter-tops.html
http://kammyskorner.blogspot.com/2010/10/painted-kitchen-countertops-again.html
http://kammyskorner.blogspot.com/2011/03/danettes-painted-counter-top.html
Great tutorial!! I did this myself many years ago and it does work. I strongly recommend applying the polyurethane coat though. I used a brush on liquid type in a satin finish…actually did 3 or 4 thin coats, sanding with very fine sand paper between dry coats of polyurethane. Looked sooo good and we used it for years until it finally started falling apart. The painted surface still looked great though. A wipe on polyurethane is news to me….will keep that in mind next time I do something like this.
Excellent explanation!! Just what I needed to know. Thank you for the pictures of the step-by-step instructions.
OK, so I wasn’t crazy. I THOUGHT I should be able to paint my laminate computer desk but was kind of afraid to try. Now I think I’ll go for it. Thanks for the great information.
I have what I consider a limated TV Armoir that I’d like to paint. It’s made from maybe pressed board or MDF with a sheet of printed paper like stuff covering to make it look like antique wood treatment. Is this laminate?
I have the same problem. Please, can this type of laminate be done successfully
Yep! That’s what my armoire is made from. 🙂
Did your armoire use the whole can of primer? I have a LARGE entertainment center I want to paint but am wondering if I should buy the small can or the HUGE can of primer…
Thank You soooo much for your step by step information. i have a desk a bought and want to paint it black to match a book shelf i have but my husband swears up and down you cannot pain laminate furniture. I can’t wait to surprise him with this and prove him wrong. Again Thank You i will keep you posted.
Thank You soooo much for your step by step information. i have a desk a bought and want to paint it black to match a book shelf i have but my husband swears up and down you cannot paint laminate furniture. I can’t wait to surprise him with this and prove him wrong. Again Thank You i will keep you posted.
Thank you!!! I bought a couple of night stands for 5 dollars. I like the design but it needs some new paint. The “wood” finish is just laminated on. The problem is that there is some water damage and blistering has occured. If I just sand off the blisters and prime right, do you think that will take care of it?
I had previously googled the net to find ‘How to paint laminate’ but to not avail. Thank you so much for your tutorial. I want to do my kitchen cupboards as I am sick of the dar woodgrain laminate. Here in Australia there are businesses that actually do paint your laminate but I think I will try myself as a trades person would be far to expensive for me.
Thanks. I followed your directions and re-painted a bookcase and a nightstand. I used your painting instructions for the bookcase, and I spray painted the nightstand. They both came out great!
Thanks again.
Marcela
I am a little nervous to try and paint my lamonite furniture but now that i read your article and the step by step guide, i feel a lot better about starting this project. although it is a faily large project so we will see how it goes. when i am done i will post again.
Hi, thanks for the tutorial, but I have a question about the piece you painted. How did you get the stripe look on the front panels of the dresser/tv stand? It looks gorgeous, is it wallpaper or fabric or just paint? Thanks.
Karley
There is a granite paint kit just for laminate countertops now from Giani. Visit http://www.GianiGranite.com
I used the granite paint kit from Giani last year and faux finished my countertops. It works perfectly. It comes with a poly top coat that is safe for food. If you are painting a countertop that food will be on, you need to be sure that whatever you use is safe for food consumption.
I have had quite a few people run to my new “granite” counters excited that I had gotten them, only to realize that is wasn’t granite. Usually after I tell them!!
Does this also apply to older kitchen cabinets, dating back to late 70’s. They seem to be a flakeboard, with a vaneer finish…the inside of cabinets are sturdy wood. They are an odd size, so new would be custom, very expensive. My kitchen is very small and the cabinets are dark and dreary. Can you steer me in the right direction.. Thank you Denise
Thanks so much for these tips! My 16-year-old daughter wants to paint a bookcase for her sister’s Christmas gift but all she can afford to buy is a cheap laminate bookcase from Walmart. I wasn’t sure if that would work but now I think it will.
wow, extremely helpful and so glad you wrote what products you used!
Extremely helpful. I will try it with my Sauder stereo cabinet.
It is a pine color whch I will paint chocolate tone.
Can this be stained?
Hi Marlena,
I saw your post about paintinf your sauder furniture. I have the same brand in a desk and I was curious how it turned out. If you have time could you please send me a quick reply! Thanks
This is an excellent tutorial. I sort of tried to paint laminate once but was afraid to sand very much. I think I just barely roughed it up and then tried to pain – it didn’t work. Now I realize I should have done a bit more sanding and been less afraid.
Someday I might try again!
omg thank YOU!
I just bought one of those ClosetMaid cubicals and, it’s so BORING in plain white. So, I’m thinking of painting MY OWN design on it. Maybe not the whole thing in a different color, but definately some design. And, I’ve asked so many people and they’re all like “I don’t think you can cause it’s a smooth, laminated surface. Won’t the paints just like..slide off?”
And, I KNOW there has to be a way!
I spent hours googling and looking at vids. and I finally stumbled on your blog!
Thank You so, so, so, so, so much!
OH! And, when I actually get the job done, I’ll make sure to post it up and credits the help to you 😀
and show you my work 🙂
If you want it really shiny before you clear coat it sand it with some 400 grit west sandpaper. Wet the surface and have at it. Pretty quickly it will be smooth. Then clearcoat then sand then clearcoat then sand and clearcoat and you are done. Different brands recommend different amounts of coats to apply. I used miniwax polycyrlic and it turned out amazing.
If your piece is mostly decorative … ie. you don’t have children LOL … you can skip the primer and just do a quick sand. When I was renting a house years ago the basement was full of old cast-off furniture. I sanded a few pieces with my Black & Decker Mouse and painted it directly with some kitchen & bath latex paint. The pieces were low functioning ones that were in spare rooms, so didn’t really get a lot of use – one was a TV stand and another was a shelf. I lived there for four years and they looked great still when I moved out … and left them behind.
We use white laminate wood for the walls in our break area at work. The white is just blan and we were hoping that painting it would brighten up the employees. Because it is laminate though I knew it would be a big problem. Thanks to google and the amount of hits your blog has recieved, I found you in know time. Now the hard part is actually painting it. Its three big walls. Thank you.
Can’t wait to start my projects! Trying to match 6 pieces of furniature, because who can just throw them out and buy new, right? I can’t wait to tackle them!!! Thanks for the info.!
thank you thank you! wondering how you did that black stripe on the front now.
It looks great. How did you do the stripe on the front, it’s beautiful. Is if wallpaper, or fabric. Thanks so much.
Am wondering about the striped front Panels also! Is it fabric? Thanks for sharing this info!
Yep! I just cut foam board into the shape of the insets and covered them in fabric…and glue gunned them on. 🙂
Thank you so much for posting this. Now I can show my boyfriend that we CAN paint our bedroom furniture. I have a bedroom set that I want to keep but just give a new paint job while I just buy a new bed. Your posting gives me hope that I can do what I’ve been telling my bf that I’ve been wanting to do for a year now. I’m so happy 😀
I have a laminate bookcase that I painted using your directions and sadly it looks horrible :(. I was cheap and didn’t apply any type of finishing coat after painting. . The bookcase is in my children’s room and they like to play cars and dolls on the bottom shelves and these have gotten all scratched up. I would like to try to piant it again though . Do you think that if I put a coat of polyurethane on it the paint would stay on with no scratches? Do you have any advice for painting laminate furniture that will get A LOT of wear? Also, the laminate coat on the piece was originally white, not a wood color, does this make a difference in how well the paint stays? Thanks, I would appreciate any advice you have!
Thank you for this. I have two laminate/wood combo dressers that are cherry in color, and I want them to be white. I will try out this technique and I can’t wait to see the results!!!! Your armoire turned out fantastic!!
Hi,
I just found a cabinet that I want to buy and paint but am pretty sure it is a wood laminate as I can see a chip in the “wood” on the back edge exposing pressboard. The piece will go into the master bath so there will be a fair amount of moisture over time. Will this affect the paint and maybe make it ripple at some point?
That’s a good question, Dorothy. I really don’t know. I would think you would definitely need to poly it in that case.
Lindsay,
Thank you for this great information. I have been wanting to paint some white cottagey looking pieces one of the blue greens I love!
Hi. I would like to know if you have ideas for my desk.
It is in my study where I will be seeing people, But is is a funny orangy-wood-colour. And it doesn’t suit anything else. My desk chairs are black…
Maybe White? And make the office white, grey & black?
I’d appreciate your opinion. Thanks!
Thank you!
I have been looking for a yes and all I have found is don’t try it.
With this information I am going to start the project I have been wanting to do for months 🙂 I am so excited!
I know this thread has been inactive for awhile, but thought I’d give it a try.
How critical do you think humidity is in the curing process of the Zinsser? I live in South Florida and would have to do this process outdoors (although covered).
Love the range of topics you cover in your blog. A wealth of information!
Laminate furniture is produced when a thin sheet of plastic laminate is adhered to a piece of particle board. The particle board is what gives the furniture piece its stability, while the laminate serves more of an aesthetic purpose.
If you’re painting the laminate white and looking to apply a polyurethane coat, be careful which one you use. A majority of polyurethane will leave a slight yellow finish. Stay away from oil based polyurethanes
Thanks, that is exactly my project–from oak colored to white–headboard and footboard for my child. I would not be happy with yellowish:)
Does this work on white pressed particle board or laminate? The white, ‘inexpensive’, Home Depot kind?
Yes! I would think so! Just make sure you use that good primer and let it fully cure.
I’ve got some furniture I’d like to paint and this was the first sight I clicked on. Thanks for the instructions. I’m going to give it a try!
Just so you know, if you google ‘how to paint laminate’ your post is right up there – which is how I found you, which is why I included your post today. Thanks so much for all your informative tips and photos!
Thank you so much for your step by step instructions. I would’ve been lost without your information. Now I can paint some boring old white laminate shelves a lovely elegant black to go with my black desk in my home office. I am so happy I found your blog.
You’re a freaking GENIUS!!!! <3
I just found your blog by asking Google how to paint laminate furniture. I’m really excited to try this on an old dresser I have. I’m also really inspired by all of your decorating ideas – I’m about to graduate from college and will move into my first apartment and want to decorate on a budget. I have a feeling I will be doing a lot of shopping at thrift stores as well as in my parents’ basement! I look forward to reading more of your ideas!
I bought new black and decker wardrobes from Canadian tire this past weekend and a friend and I tried to paint them. We made sure the sand, prime twice and paint…however i’m not sure if we sanded enough…we didn’t sand as much as you mention to you….. Today some of the paint peeled off. Also we primed twice and painted within 4 hours. Do you think it would be a good idea to sand the whole wardrobe again (even after its painted) and start over again? I really love them white but i hate the peeling paint!! What can I do to fix this??
Thanks for your answer ahead of time!
Hi Chelsey-
Bummer! Yeah, I definitely think you need to sand it again and essentially start over. Since the paint is peeling, you may be able to scrape it off instead of sanding.
But, when you redo it, I recommend using the primer for slick surfaces if you didn’t use that the first time (Zinsser 123 is my favorite) and let it dry or “cure” for 7 full days. I really think that’s the trick!
Good luck!
Can I spray paint after sanding and priming. It’s a toddler bed and trying to figure out if it would be worth the money or not?
Another way to do this project and to avoid sanding is to use an oil based primer. The primer will stick to the laminate, you will avoid sanding through the laminate and still get the same results. I work in a major home improvement warehouse and work in the paint department so I have done this and recommended it to customers.
Thanks for the information! Always a question of mine, since I am starting to paint my own finds. I recently found a perfectly good “looking” pedistal table that someone had thrown out. It looked like they tried to re finish it with a varnish. I sanded it down and repainted and it looked beautiful……but had this weird chemical smell that was bothering me and was “bubbling” under the viner on top. I finally had to leave it outside. Have you ever heard of this? I want to continue to find these great finds and paint them, but am not sure what was wrong with this piece. (Have a feeling this may have to do with why it was thrown out :>)
Thanks!
p.s. I’m in Round Rock, right up the road! :>)
Hi Sharon!
That is so weird! So the bubbling wasn’t on the very top, but instead under the veneer? If I was on top, I’d think maybe a previous owner had used a chemical stripper that wasn’t completely removed from the table. I have to say that I’m stumped!
So fun that you live right up the road!
Thanks, Lindsay! I agree. After I sent the question, that thought occured to me. Your answer confirms it!
thanks again!
p.s. Maybe it is the veneer “bubbling” and it just appears underneath to me…..I’m not that familar with veneer yet :>) Anyhoo….I bet that’s it! Thanks again!
Thank you so much. I am helping my daughter redo her bedroom in a greek temple theme and we could not figure out how to use her existing laminate bookshelves. Will send pix when done……
Thank you so much for this tutorial! It was very helpful to me in taking on my first laminate revamp… I don’t think I would have had the nerve to attempt it without a few great tutorials including this one! You can see my project here, if you like: http://www.craftster.org/forum/index.php?topic=387698.0
Sara 🙂
I’ve often wondered how to do this! Just might have to give it a try! Since it’s been awhile since this was posted I’m wondering how the paint held up.
I am also wondering that. Now, after 2 years, how is the paint holding up on the armoire, Lindsey?
Hi Kristy and Tina!
It’s actually holding up wonderfully – and I never got around to polying it. Now, I’ll caution that it holds a TV in the playroom, so it doesn’t get tons of use. But, the paint is holding up way better than the drawers (they are loaded down with puzzles and about to fall apart)!
Thanks for sharing. I hate the ugly laminate, but the furniture under it is usually still good, cant wait to get my next 2 projects started!
Thank you, I will use your tips to paint a sink vanity cabinet that is custom made. To replace it, it will not be necessary also to replace the two sinks that it support and that are still in very good conditions.
Hola,
Después de ver este tutorial me animo a preguntar, tengo unas baldas enchapadas de madera en tono medio y quiero que combine con un mueble de madera oscuro. que tipo de imprimación y barniz o pintura puedo usar?.
Gracias.
Thank you for taking the time to share how to do this. I had no clue about the sanding! We’re going to use these directions to paint a laminate dresser and nightstand for our little girl’s room. 🙂
Nice tutorial! I was paralyzed to start a project like this on my daughter’s new, used bed. I did lots of web research before starting & bookmarked your web site because of the clear, step-by-step instructions you gave. One change I made was that I used the Zinsser BIN shellac-base primer. It covers stains and the cure time is only 1 day. I then used a semi-gloss latex top coat. I coated the headboard with Minwax polycrylic but in some corners it turned yellow b/c I applied it too thickly. (The headboard has storage nooks.) It’s not very noticeable, though, with my daughter’s accessories. After gaining confidence with the bed, I painted her old white-washed dressers. I didn’t do the polycrylic & they’re holding up great. Thanks!
I am a novitiate in ways of social media, so I clicked on “google blog”. Your site is the first one I read, and low-and-behold, it’s exactly what I was looking for! Your tutorial is great — easy to understand. I think I can do this! Thank you! Oh, I am wanting to paint a 1960’s buffet black. Any specific tips for that?
RP
Fab tutorial! I’m a diy freak myself and may I add my two cents here:
A year ago I painted at least three large pieces of laminated furniture in my house — two massive second-hand bookshelves and one heavy laminated wardrobe.
Now that I’m reading your tute, I realize that I did follow your steps of sanding down the whole thing using a sheet sander, wiping the whole thing down thoroughly, keeping things as dust-free as possible and then getting on with the paint job. However I was too impatient to prime and wait seven days. I simply put on two coats of my preferred indoor wood paint according to the instructions on the tin. I must say, my furniture still looks great despite being used regularly. I was wondering how the primer would’ve helped things further… ?
Really, I like your information. If your laminate piece is one that can be easily taken apart, go ahead and do that. DH offered to take apart the armoire for me to paint, and it made it much easier in the long run since the piece was so big and heavy. There was no way that DH and I could have gotten it from the upstairs playroom down to the garage by ourselves. If you can’t take your piece apart, at least try to remove any doors, drawers and shelves.
The reason no one answered your question about laminate furniture is because when it’s furniture it’s called Veneer. Plastic photo adhered to wood. Flooring is called laminate BUT furniture, cabinets & cupboards & counter tops are called veneer. Hope this helps with you future projects. 🙂
Not true. Veneer is a very thin sheet of wood applied to the surface of furniture that can be stained or painted. Laminate for furniture and especially cabinets is most definitely the correct term — you can do a search at any box store website that sells this type of furniture and they call it laminate furniture or state that it has a laminate finish.
You just saved me soooooo much money. I was about to buy my son a new dresser but this changes everything. Cant wait to paint it. Didnt read the comments so not sure if this was covered but are the panels covered in fabric?
Just a heads up
There are many great new products out there, Home Depot carries an ‘all-in-one’ for painting laminate, but can only be tinted to light tones; Rust-Oleum also has a new kit out for this, but you have to use their colors
Sherwin Williams is your answer; they have a primer that can be tinted and will stick to just about anything, and can be used with all top coats; dry time is a maximum of 24 hours.
Proper prep is extremely important, and 2 coats of primer with a light sanding in between coats can make a difference on the top coat.
Just finishing my kitchen, in screaming red, and am very happy!
I have what seems to be miles of cheap laminate wall mounted bookcases that I’m stuck with and while I’m sure you’ll always get a better adhesion result by sanding first I don’t have the wherewithal to sand. A paint associate at Home Depot recommended Glidden’s Gripper as a primer which would NOT require pre-sanding the laminate to which it would be applied. I’m not sure whether you already answered a similar question already asked, and don’t recall you answering an interesting question from another reader about whether plastic spray paint (Krylon? Rustoleum?) would work on laminate. Could you answer both questions?
P.S. – Since the bookcases, aside from most of the shelves, can’t be disassembled I would be mostly brush painting. Cure times and a post-paint application or two of water-based polyurethane would not be a problem.
THANK YOU! THANK YOU! I, like you, had been Googling every form of “how to paint laminate/fake wood/press board/etc” and was having a heck of a time finding any worthwhile tips or information. Thank you SO much for this post. I’ve got two bookcases I picked up for super cheap and want to take them from light laminate to dark, rich chocolate – I was planning on going the spray paint route, but I like this idea MUCH better, AND, it means I can work inside and finish my project a lot sooner as opposed to having to wait until the weather is warm enough (until April!) to spray outside. Awesome post!!
Great article. You’re right, there’s not a lot of information about painting laminate out there. In addition to this tutorial, google books has some information and this article recommends some specific products.
http://www.washingtonpost.com/wp-dyn/content/article/2005/09/21/AR2005092100593.html
Thanks!
Thank you VERY much! There definitely isn’t much information out there and this is exactly what I needed to know – THANK YOU : )
My parent’s own a furniture refinishing shop, where they redo antiques, etc. We’re thinking about buying a new piece of furniture because of the functionality and then redoing it because it is just fugly, but what we need. He recommends a deglosser instead of the sanding, etc, before the priming as it *should* keep the original smooth surface.
I was just wondering if the primer is an oil based one? I hope its not. I recently used an oil based trim paint and it was awful. The smell and the cleanup. Just awful. Thanks,
Nope! It’s water based. 🙂
Thanks SO very much for sharing these tips! I’ve tried to find steps for painting laminate and have had no luck. Now I can finally paint a couple pieces that have been driving me crazy. You rock!
I could just *HUG* you for this post right now!! Thank you!
hey, thank you I really want to buy these pieces for my room as I am about to move out of home, I love the pieces but hate the colour. the colour is espresso and I want it to be white is there anything else i would have to do or do I just have to apply multiple coats of the paint
I think you’d just need to sand, prime and paint!
Nice. Thanks for the info. I knew it could be done. Can’t wait to paint my tv stand
Hi there, your cabinet looks lovely.
I really like the contrast with the stripes & solid white.
I recently attempted to paint a dresser that was laminated.
After reading numerous things online & confirming it with the seemingly knowledgeable rep at the hardware store, I came home & started. A few days later, I have a black dresser that is not quite what I hoped for & already has a few scratches on it down to the white primer.
I was hoping that it would be mor durable especially going in my Baby’s room & am fed up with all the work & have no idea what to do now.
Any ideas that will help me solve it real quick?
Hi Dona! Could you tell me what kind of paint and primer you used?
I just brought a three piece entertainment center from Goodwill. I believe the sides and inner are laminate, however, I think the fronts are wood….can’t really tell.
Can I still use the same technique? Also, however does the foam brushes do vs spraying the final color on. The idea of using several cans of spray paint on a large project is not appealing! Also thinking of renting a sprayer for latex paint.
Yes, you can definitely use the same technique. As long as you use a good primer, you can apply the color with either a foam brush/roller or spray.
Will that work on a black laminate? I want to take my small T.V. armoire and turn it into a small artist station. It’ just the right size, but the color is killing me!
Sure! The original color wouldn’t effect a thing.
I am so glad to have found your blog. I started looking for ways to paint a laminate bookshelf I have. I was googling like crazy and landed here. I had no idea this post of your was over 2 years old…that made me chuckle too! If you look here in the pic
http://1.bp.blogspot.com/-aI-kPCRXPSA/Tt1cKeC2ehI/AAAAAAAAA4A/8cgRpYgQkm4/s1600/Picture+185.jpg
you will see that in the very far right hand corner is the bookshelf I want to paint. I’m going for a beach theme look, so I’ll be going with a nice teal or light blue. I’ll get back to you once I take that project!!!
Nice! I can’t wait to see it!
Thank you so much for posting this! I’m rescuing a cheapo desk from my parents garage to put in our home office and was hoping to find detailed instructions for painting “Faux Wood” pieces – seems like you’re the only one out there! I have a ton of creamy white paint leftover from my cabinet redo I want to use and there was primer left in the garage when we moved into our house (Killz), I always keep sandpaper on hand (every DIYer does, right?!?!) so all I have to go buy is some poly! I plan on posting it on my blog too as I “transform” my room. Thanks!!!
That sounds great! I’d look into using the Zinsser primer instead of the Kilz, since it is made to adhere better to shiny surfaces. Your desk is going to thank you for it’s transformation! LOL
Yes, I ended up going to lowe’s and buying the bullseye primer – just started sanding as I had to clear space in the garage. I’m taking pictures to post to my blog and plan to link to your page as my inspiration. 🙂
Thanks for the write-up. It’s straightforward and the pictures are helpful. I just started repainting a laminate dresser for our new baby. Sanding and priming are definitely the two most important steps, but I found that the laminate still doesn’t absorb the paint as well as real wood. I plan to put 3 coats of poly on the top of the dresser once I’m done. So far the paint looks OK after 3 coats–I might put one more coat on certain areas. I have a lot of brush marks even though I used a new Purdy brush. That might be caused by the laminate not absorbing the paint well or because the temperature is too cold now (fall in the Mid-Atlantic) in my garage where I’m doing the work.
Thank you so much!!!!!! This is so helpful. I plan to paint some old laminated end tables. Would love to see some pictures of the items that you or others have painted. Thanks again!
Thank you so much for the tutorial 🙂 I’ve been wondering too for the longest time, but searches either return nothing og tell you it can’t be done.
This is great for renewing and customizing all the cheap Ikea furniture in my apartment 😉 I’ve been having a problem with thinking about how many others own furniture exactly like mine – it won’t be that way now 🙂
Hi there i was wondering can you paint mac tac. It’s on a vanity i just bought, want to paint it with glossy paint. Can you please help me thanks so much
Hi Audrey- I’m not sure what mac tac is. Let me know and I can give you a better answer!
i love this!!! wish i had found this last june, when i was trying to find a way to save my little bedside table 🙁 my question is, how did you achieve the pinstripe look? it’s so pretty& i bet would work with any colors. I have a houseful (no kidding) of laminate furniture that i’m dying to re-do. thanks!
It’s fabric! 🙂
Does the sandpaper have to be 220 grit, can I use 60 grit?
Hi Susan- I wouldn’t use the 60 grit, as it will probably go down too far into the plastic coating. Using 220 will give you a light sanding, which you are only doing so the primer has something to grab onto.
It looks like you have material on the doors, how did you do that?
Thannks
I am doing a kitchen table. Any suggestions for the top? To prevent scratches etc? Will polyurethane on the top be enough?
I have a huge 5 piece bedroom suite that I’d like to repaint. However, It would be impossible to sand as there is so much decorative parts to it! Can I still paint them? There is no way I could replace all of this cheaper.. I tried to sell it but, with no luck and I’m not about to give it away for nothing!!!
Thanks!
Try the Rustoleum Cabinet Transformations product – no sanding!
Hey I am hoping you can help me .I have just recently bought a hair salon and was wondering if I could paint the stations ? They feel and look like Formica.They are a beige and I want to paint them grey.What do you suggest? Cherri
Hi Cherri – I’d look in to this product if I were you! http://countertops.rustoleumtransformations.com/
Hi!I recently bought a home and the kitchen cabinets are laminated and one set is badly scratched to the pressed wood.I plan on sanding them down and painting but do I need to do something extra to the badly scratched set?Please shoot me a email.Thanks
Thank you so much for sharing. I have been looking for some way to paint my daughter’s dresser. I also did the google search and had the same luck. I think I am going to try the rustoleum product. Which do you think is more cost effective?
Hi Heather – great question! I think that my method may be more cost effective, but I think the Rustoleum product may be a lot more durable. I’d go that route if I were you since your piece will see a lot of use. Good luck!
That’s great, I always wanted to try and refinish my furniture, but I’ve avoided it because most of it is laminate, and I figured there wasn’t really a way to get paint to stick on stay on that cheap stuff. Nice work, and thanks for the idea.
[url=http://romeomiddlet1024.bravejournal.com/entry/76952]Buy Google Plus Followers[/url]
Love this! Did you cover the two front doors in fabric?
This is great! I have the worst laminate built-ins and now I’m not stuck with the same ugly color!
I never sand laminate furniture if it smooth. Just prime with Kilz, it will adhere beautifully. Sanding get into the finish, and you do not need to do this with laminate.
Hi! Te rustoleum product says no sanding is required! Did you still sand in preparation of using the rustoleum product? Thank you for you awesome post! 🙂
Cat
Hi Cat! I put together this tutorial before the Rustoleum product was released, so I sanded and painted. You do not have to sand with the new product. I hope that helps!
Just wanted to let you know that your site was the first one that came up when I searched “Can I paint formica?” Your intro was too funny. I am going to stop searching and get to work. My mom is coming in a few weeks, and we are going to paint some furniture for our little girl’s room. I’ve just started blogging, but I do plan to write a post on how the furniture turns out. I will post a link to your blog when I do!
Thank you so much,
Jill
Thanks so much for the great advice! I have a closetmaid cabinet that has a textured surface. Do you think it will work on that? Getting really tired of the white! Thanks again for the info, Susan
I think it would work great, Susan!
Thanks! I’ll let you know how it works!!
Great tutorial, thanks!! I’m doing my first DIY painting a laminate bench project as we speak! I’m using Martha Stewart Primer and it’s working out well. Using foam rollers and brushes is the best advice for this, thank you
Oh, great! I hope your bench turned out well!
All can add is that I recommend using an oil-based paint after you use the primer. We’ve had our best results with melamine paint. It ended up looking sprayed. Absolutely no brush marks. The downside is the smell and the waiting for a day between coats, once the primer has had its seven days. But that is how to do it right.
Great blog :). Thanks for sharing x
I’m trying to sand down a cheap little desk, but the glossy layer doesn’t seem to be coming off, lol! Would I ruin it if I used a coarser grit than 220? Or am I just being impatient because this is taking longer than expected? (I’m doing it all by hand, by the way).
Just wanted to say thanks. I took all of your advice and now have some great looking “new” furniture for my daughters rooms. Thanks so much for the advice!
I’m doing this next weekend. You’re a genius! Thanks for sharing.
Hi
I just saw this on Pinterest, and while I know it has been quite some time since you’ve painted this piece, I am wondering how well this piece is wearing. Does it get a lot of handling? I am considering a paint job like this in my kitchen, but am reluctant to do so. Your post is the first I’ve read that I’ve felt that painting laminate can be done!
Thanks!!!
Hi Pat! I just got rid of this piece about a month ago since I no longer had space for it, but it was still in great condition! The paint job was over 3 years old, and I still had never put any poly on it. 🙂
Thank you SO much! very well written and good photographs!
I have a laminated dining room table w/ leaf. I used a striper to remove the top layer thinking that I could then stain the wood – WRONG!! It was like putting stain on wax paper! I want to save the grain in the wood – I don’t want to paint it.
My plan is to put a coat of Minwax – Helmsman Spar urethane on the table. What do you think?
Michael
Lindsay,
I’m restoring a 1950’s school desk with a laminate desktop for my baby niece. When I brought it home my dad screamed out in his normal, calm fashion, “What did you get that for? You can’t paint laminate!”
“To the Google!”, I thought.
Your site popped up, I read it, showed it to him, and he hasn’t spoken to me since. Nice job taming the Big Dawg, Lindsay. I told him that he doesn’t know everything. You just proved me right 🙂
Thank you.
-Gregg from South Jersey-
HA! I’m glad I could help. 😀
You REALLY are amazing! I’m looking to paint over ugly “the finish will never wear off (said by the salesperson)” which did wear off. It’s only 5 years old too!
Now, I’m really excited.
Thanks,
Lynne
I found this linked on a blog I found through..drum roll please….Pinterest! Who would’ve thought 3 years later you’d still be getting comments on this post, right? God bless Pinterest haha
To the point! I just did my sons bed this weekend. A white laminate captain’s bed. It was awful and complete with pink drawer pulls. We were given it for free…from a family member…and it’s been staring at me in the garage for months begging to be changed. It’s now completely black and looks perfect! The only step left is to get some poly coat on it for protection.
Thanks so so so much for this post, it gave me the confidence to tackle this hours long process!
loves this! googled it and you popped up! About to start a giant redo of some nasty laminate bookshelves we inherited. wish me luck!
I was just wondering how you applied the fabric on your armoire doors? Looks great, I’m bookmarking your page for future projects!
Hi Katie!
I cut foam core to fit into the insets, hot glued the fabric onto the foam core, and then hot glued that directly onto the doors. So, in other words, very professionally. Ha! It worked great and never came off.
this is awesome!! my son has a dresser in his room that is a dark gold tone with a laminate top…im moving it to my daughters room since it has a mirror and she is getting to the point she likes to primp….so i am going to sand it down real well and paint it and replace the dozens of knobs with something cute!!! thank you for the info!!
Oh, that’s great! I love that you’ll be able to reuse a piece of furniture with a little elbow grease. You go, girl!
My husband is convinced that the paint will just scratch off, despite all of your tips. So this post is a yearish old…..how’s is fairing with your children? Scratches? Laminate exposed? I would like to paint our sleigh bed. It’s laminate.
Hi Kara,
We actually got rid of the piece a few months ago just because it was taking up too much space. BUT…it was still in perfect condition when we got rid of it.
Have you looked at the Rustoleum Furniture or Cabinet Transitions products? They may be the perfect solution for you. I used the furniture kit on another piece (also for my kids’ playroom) and it is holding up gorgeously: http://livingwithlindsay.com/2012/05/rustoleum-furniture-transformations-review.html
I have laminate cabinets in kitchen. Apparently the laminate on these are not the kind on regular furniture. This laminate is “peeling” and I can’t imagine sanding, or anything making a difference. I so desperately would like to replace them but can’t do so right now. Am I deceiving myself thinking there is something I can do for them….or is my answer in these other posts SOMEWHERE?
This could not be explained in a better way than you did. Your images have made it easy to understand. Thanks a lot for this excellent piece of work.
This tutorial is so easy to understand. You have really inspired me to do the same.
Wow I am so jazzed. I mean it. I cant wait to start on my armoire. I now know exactly what its going to look like before i even start. You see, the armoire that I’m getting ready to redo is identical to yours. Oh and yes it is one heavy sucker to lift.
Thanks for the great tutorial!
Oh, yay! Good luck with it, Karen!
This is brilliant! I have two different laminate pieces in my living room and now they can match! for like…under $30 ?! And not just match each other, but they can be completely unique and even match my decor >.<
Totally! So exciting, right?
I am doing a room redo for my little Lindsay. It is involving painting a dresser, chair and a laminate book case. I am going to try a paint and primer all in one paint. Thanks for the helpful post. Hoping I can achieve the loveliness you did!
Aww, good luck! Make sure the can says that it can be used on shiny surfaces. Otherwise, I think the results won’t be ideal in the long term.
Wonderful tutorial. I just shared it on my blog with link back. Thanks for sharing the info.
Jeanne
I know this site provides quality depending articles and other
information, is there any other site which gives such data in
quality?
Hi,
Great tutorial.:)
I’ve been offered a dark cabinet with wood effect lamainate/contact paper on. I don’t like dark colours in my house & would like it to be white.
Do you know if If it’s possible to do this & if so should I follow your tutorial?
thank you for a great tutorial , but you didn’t include the very important part of the project where you covered the front panels with fabric. I would love to see how you accompliced that part of the project, as I have a similar piece. Thanks
Muy Interesante
Do you believe this could work from dark to light?
Excellent post. I was checking constantly this blog and I’m impressed!
Very helpful information particularly the remaining part 🙂 I deal with
such information a lot. I was seeking this certain info for a very long time.
Thanks and good luck.
I see your website needs some fresh content. Writing manually takes a lot of time,
but there is tool for this time consuming task, search for: unlimited content Wrastain’s tools
I like loοking through an article tһat will make
men and women think. Also, thanks for aⅼlowing for me to comment!
Amazing things here. I am very satisfied to peer
your article. Thank you a lot and I’m taking a look ahead
to contact you. Will you please drop me a e-mail?
Thanks for sharing tips, its informative and simple.
Great, detailed guide! Thank you for sharing your knowledge. Looking forward to more DIY tips from you.
Great, detailed guide! Thank you for sharing your knowledge. Looking forward to more DIY tips from you.