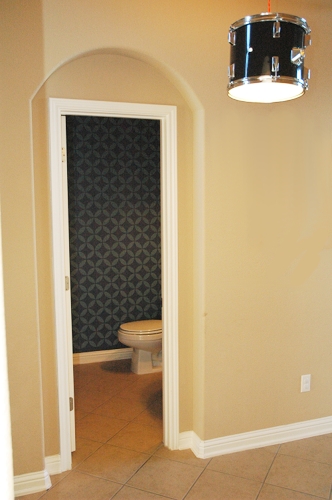
When you walk through the front door of my house, you are greeted by a nice entry way, a nice dining room, and this.
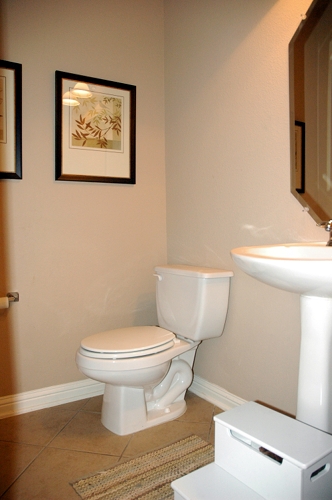
Yep. There’s a very functional, yet eye sore of a half bath right there in my entry way. It’s in the middle of the house, so there is no natural light whatsoever – just the two measly light bulbs in the builder installed fixture. I try to keep the door shut as much as possible, but with two kids in the house, it gets left open more often than I would like.
I have been wanting to redo that bathroom for sometime, but it hasn’t ranked high in the list of rooms I need to redo. I knew that I wanted to do something dramatic with the wall that faces the front hallway (the one with the framed artwork in the photo above), replace the pedestal sink, hang a new mirror and install a new light fixture. When the Royal Design Studio offered me a complementary stencil to review, I knew that the bathroom had to be moved to the front of my list.
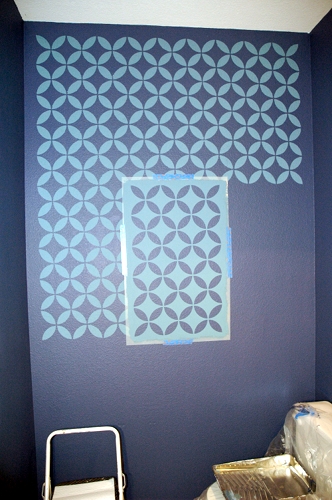
After I removed everything from the walls, I painted the ceiling white using Glidden’s EZ Track Ceiling Paint. I then painted the walls in Behr Ultra’s English Channel. Yes, the walls are very dark, but it helps this small room make a big impact.
I had selected the Moorish Circles stencil from the Royal Design Studio, and I set to work placing the first stencil. I measured the walls and centered the large stencil on the center/top of my wall. {Sorry for the poor lighting in these photos – I was working with a clamp-on work light!}
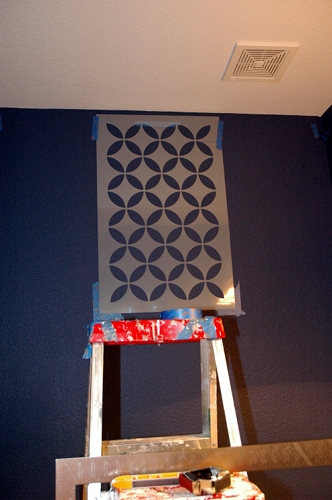
When it was ready, I loaded my paint roller with my favorite color – Smoked Turquoise by Glidden – and got to work. When I removed the stencil, my wall was a mess. I had to paint over it with the darker wall color and start again.
While the wall paint was drying, I practiced with the stencil and came up with the best way to stencil on a textured wall. It ended up working better than I could have hoped for.
I put together a video tutorial of me stenciling a portion of my wall. I had on my paint clothes, wore no make up, my hair was in a pony tail, the lighting left a lot to be desired, I had a sinus infection, and I had to be my own videographer. Even with all of that on the table, it’s still an excellent way to see exactly what I’m describing in the steps I lay out below.
Tips for Stenciling on a Textured Wall
- Spray the back of your stencil with spray adhesive before you apply it to the wall each time. It will stick closer to the wall and reduce the amount of paint that seeps under the stencil. I used a stencil adhesive that I bought at Hobby Lobby, but probably any temporary spray adhesive would work. Rub your hand over the entire stencil to make sure that none of the design lifts off the wall. The Royal Design Studio stencils are nice and thick, but even they need a little help not lifting off of a textured wall.

- Use less paint that you think you should. I dipped one side of my mini roller into the paint and then rolled it in the tray until the roller no longer looked wet and shinny. Then, I rolled it 6 or 7 times on a folded up paper towel. It will take 4 or 5 passes on the stencil to get the coverage you want, but you will have very few bleeds or fuzzy edges when you remove the stencil. Watch the video tutorial I posted above if that doesn’t make much sense.
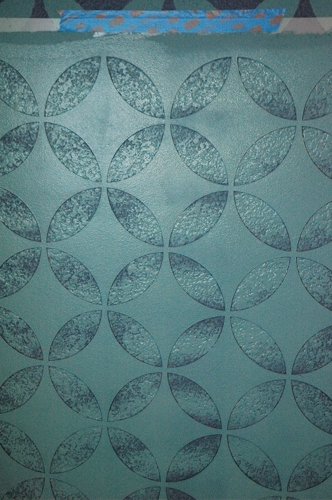
- Remember that you WILL have a few bleeds. There is simply no way around this on a textured wall. Once your wall is dry, take a small paintbrush (I like to use a small, flat artist’s brush from the craft store) and touch up the bleeds with extra wall paint. Stand a few feet back from your wall to see the areas that need to be touched up. If you stand too close to the wall, you will drive yourself crazy touching up everything in sight.
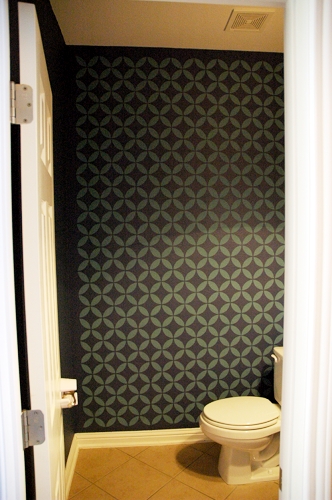
I’m very happy with the way my stenciled wall turned out. Once I have the rest of the changes made in this bathroom, I will no longer be embarrassed for guests to use it! Just adding that dramatic wall has made a world of difference.
Have you ever tried to stencil on a textured wall? What was the outcome?
Disclosure: Royal Design Studio supplied me with a stencil with the understanding that I would write about my experience with it. No money exchanged hands, and there was no encouragement to review the product in a positive fashion.
That wall looks AWESOME!!!!!
While I do not have textured walls, I will be pinning this just as a go to source for the time I do try stenciling my wall. Thank you.
Dana
Thanks for the tutorial! I do have textured walls, and I’m terrified of stenciling them. But now that I’ve seen you do it, it seems much easier. I’m wondering how long it took you to do your entire bathroom, and did you wait for each section to dry before starting a new one?
Thanks,
Michelle
I LOVE the look of that! Well done!! Totally ‘pinning’ this project! (just in case you can’t view your source pg….) 😉
wow, you are amazing!
Love the Tom Tom DRUM LIGHT! You should use bongos for dual lamped wall sconces! Just saying
Very nice! Your eye looks right past the toilet!
That looks awesome! I’m in the process of drawing a tree mural on my unborn child’s wall and I plan to make my own stencils for the flowers. Do you have any idea what type of stencil ‘paper’ that company uses or a suggestion of what to buy to use? I already got adhesive spray and I will definitely take your tips into consideration when working on it! What an awesome wall!
My studio is painted English Channel, and I have been wanting to stencil, but have those textured walls too. I wasn’t even sure if a stencil would look great, but you have inspired me! Thanks so much for this!!!
Hey Linsday! LOOOVE how you used my Royal Design Endless Moorish Circles stencil. The colors are fabulous and your video tutorial is super helpful. I hope this inspires a lot of other people to try stenciling-even on those dreaded textured walls! Thanks so much for a great review, and yeah-eyesore no more! 🙂
Looks great. I thought about doing one of those big wall stencils in our half bath, then chickened out (but get lots of compliments on my super easy decorating cop out… used 12×12 frames, spray painted silver to match the sink, towel bars, etc, then trade out scrapbooking paper to decorate with the seasons!)
When I stencil, I use a stipple brush. Would this not work – on textured walls? Is that why you decided to use a roller?
I rolled it because I figured using a stipple brush would have taken me 72 years. 🙂 I also wanted to make sure the my paint was opaque in coverage, and the roller made that easier.
Oh, and, Looks Great! Very mid mod!
It looks great. I used to cut my stencils out of contact drawer paper. that worked well. Also…saw something on pinterest about keeping paint from bleeding. This was for straight lines…but it might work. Once you have your stencil up…paint over it first with your background paint…let dry…then repaint over your stencil with the color you want your design to be. don’t know for sure if that would work on rough walls and with stencils…but the premise is the same….Might have to try that myself. Here’s the link…http://www.houseofhepworths.com/2011/01/11/what-everyone-should-know-about-painting-perfect-lines/
That’s definitely the best way to paint straight lines! I wouldn’t have the same effect on a thick mylar stencil like I used. It’s too thick to seal like the blue tape does. I thought about it, though!
Love the Tom Tom DRUM LIGHT! You should use bongos for dual lamped wall sconces! Just saying
Also…saw some info on using poly clay, rolled out thin between freezer paper (wax?) and cutting the stencil out of clay, but that would be a hassle for a repeatable patterned stencil.
I love the look! We just bought a house and I have been trying to decide how to use stencils. This will help me so much…plus I know where to find great ones now!
Great video ! i wander though ….if you have sooo much texture may be it will be easier to use a regular stencil brush , a little stippling , one shoot et voila !
Sorry been painting for 25 years and I am a big brush person 🙂
Love your blog…very inspirational !!
I LOVE it! It makes such a difference from the other room. I just did a stenciled wall in my living room and I was so happy with how it turned out. Beauty and cheap….that’s the way to go. Lisa~
I, too, have those textured walls. I’ve never tried stenciling them on a large scale, but I did do stenciling in an archway. I used a stipple brush, but I agree that doing a whole wall that way would take forty forevers. It looks like you’re basically using the roller the way a stipple brush works–getting barely any paint on it, getting some of the paint off, then pressing straight down on the wall. I’ll have to remember that if I ever get up the courage to do the large-scale stenciling I keep considering!
The room looks amazing!
Thanks for that! I have wanted to stencil, but also have textured walls. I think I’m going to have to give it a go!
I also have a textured wall where (lots of) sand was added to the paint. So, the wall is quite gritty. Do you think a stencil would work at all on my wall? Is this the kind of texture you have on your wall, or do you have that builder “blasted” texture? which is probably a lot smoother than my wall.
Thanks!
Mine is the builder applied kind, but I bet it would work for your faux finish, too. I don’t see why it wouldn’t!
Hallelujah!! I can not put into words how uninspired I have been lately. Everything has been blah, blah and more blah. Annnnnd theeeeen I found your blog. Breath of fresh air. Thank you thank you! I am starting on my bathroom re-do tomorrow.
Thanks for the awesome post and video! I started my wall stencil project on my slightly textured wall yesterday and was discouraged when I got bad seepage. After a google search later, I came across your blog post. I am excited to try again using your tips. I’m crossing my fingers my wall will turn out as nice as yours!
Yay! Just go slowly and you’ll be happy!
I, for one, cannot tell you how helpful this was to me! Our walls are very heavily textured, which I hate for the very purpose of trying to wallpaper, stencil or do anything different with. It always turns out icky and lumpy. I will definitely be using your tips on our next wall. Thank you so much. And I LOVE the dramatic impact of your colors!
Thank you so much for taking the time to do this video! How helpful you are to the rest of us! Thanks!