It seems I’ve teased you long enough about the flock of 250 birds on my coffee table. I’ve received a number of emails this week asking what I did with all of those little birds.
If you guessed that I put together a Pottery Barn knock-off with those little guys, using a glue gun, then you would be correct!
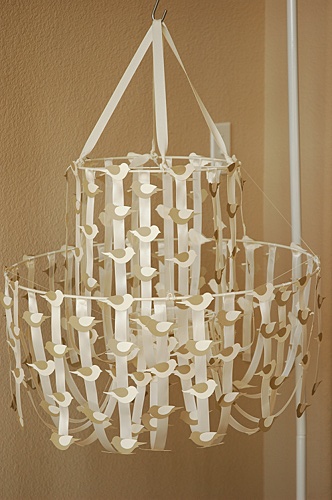
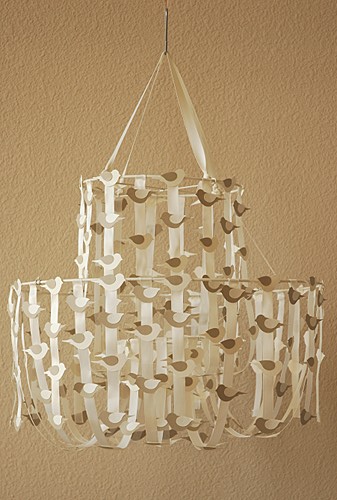
DIY Ribbon and Bird Chandelier
For some time, I have been inspired by this Paper Flower Chandelier from Pottery Barn. I really love how the ribbon forms a clean chandelier shape.
However, once I decided on a color scheme for my baby’s nursery, I knew that this particular chandelier wouldn’t work in the room. Never to let a little issue like that be a problem, I decided to recreate it using my colors and a different decoration on the ribbons.
Supplies
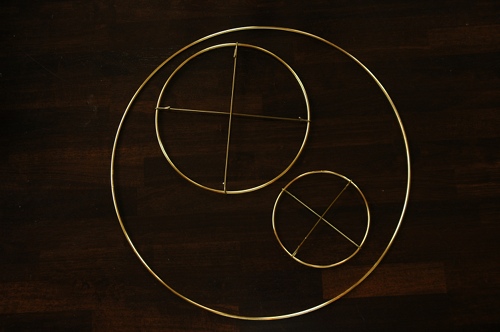
- Three Macrame rings (available at craft stores) – Mine were 19″, 12″, and 6″.
- Two wire coat hangers
- Lower gauge craft wire (available at craft stores or home improvement stores)
- Wire cutter and/or Dremel
- Invisible thread or fishing line
- Spray paint
- Ribbon (mine was 5/8″ satin)
- Glue gun
- Cardstock
- Paper punch or template in a shape you like
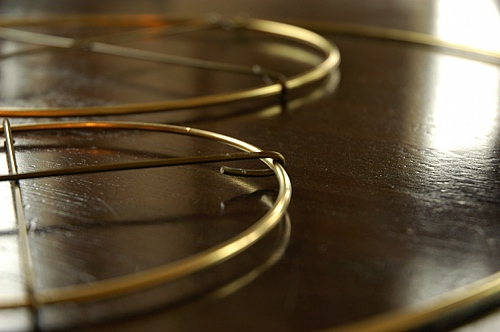
1. I began by cutting the wire hangers into several lengths that would fit the diameter of the two smaller rings. I actually used my Dremel to cut the hangers, but I’m sure you had a strong pair of wire cutters it would work, too (our wire cutters were somehow missing that day).
You can see that I just wrapped the edges of the hangers around the macrame loops. I pinched the ends as close together as I could so that the hangers wouldn’t slide.
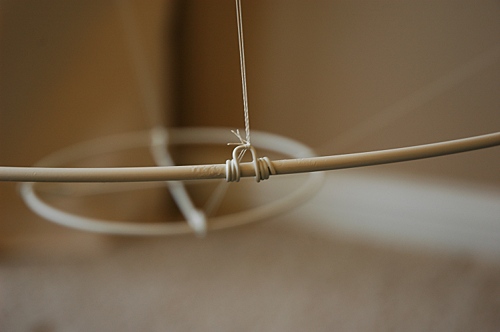
2. With the low gauge wire, we twisted some little hooks evenly spaced around the large ring. I forgot to take pictures of this part before I painted the rings, so you can see an example of them a little further down.
3. The next two steps I performed backwards. I’m going to tell you the way you *should* do it – not that way I did it.
Spray paint your rings so that they are the color you want them to to be. You will probably want to use a piece of sandpaper to rough up the shiny surface a little bit before you paint. I didn’t and they are holding up okay, but I do have a few little chips in the paint.
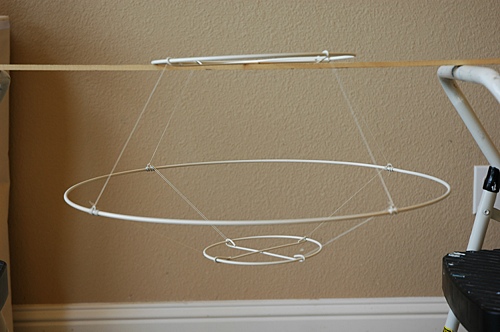
4. Using your invisible thread or fishing line (the fishing line is stronger), thread together the rings into a chandelier shape.
I began by tying the thread to the little hooks on the large ring, threaded it through the middle ring, back down to the same hook on the wire ring, and tied the thread in a knot. I did that on all 4 sides, and then repeated the process going from a hook, down to the smaller ring, and then back up to the hook.
It took me a few tries and a lot of frustration to get this right to make sure that the hoops were balanced. You’ll want to try it on your own to see what works best for you. You just want to make sure that the hoops hang evenly.
You can see that I painted my hoops AFTER I had tied the thread, which made the thread white instead of invisible. Live and learn (and think ahead)!
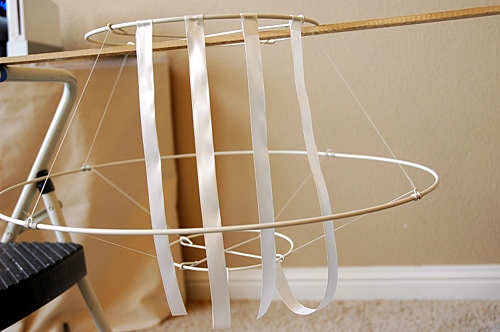
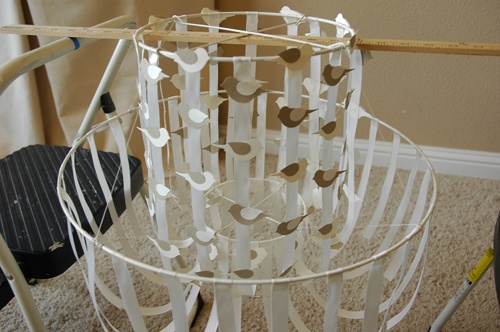
5. Hang the top of your chandelier in such a way that you can work with it. I put a yardstick across two step stools and it worked great for me. It looks kind of like a little UFO!
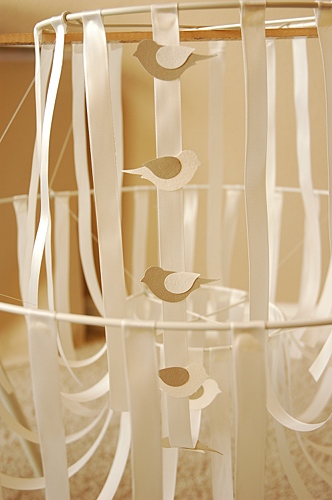
6. With my glue gun, I attached a section of ribbon from the top ring down to the bottom ring. I just looped a piece of ribbon around the hoop and used a touch of glue to secure it in place.
The next piece of ribbon I placed about 3 or 4 inches over. You will see that it just hangs straight down to about the point where the first ribbon curved.
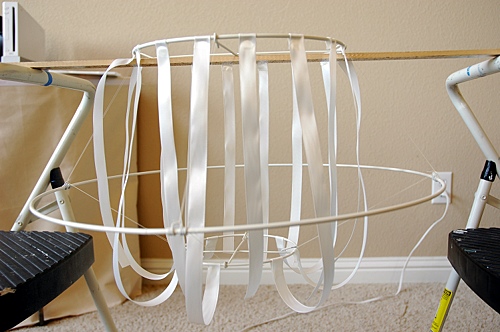
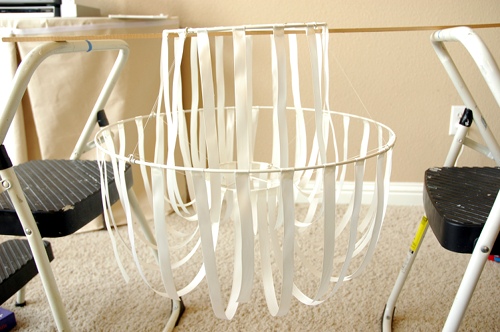
I alternated my looped and hanging ribbon all the way around, ending up with an even number of ribbons.
Then, I did the same thing with the middle hoop, alternating connecting the ribbon to the bottom hoop and letting the ribbon just hang. You will want to let the loops hang kind of low to create the chandelier shape.
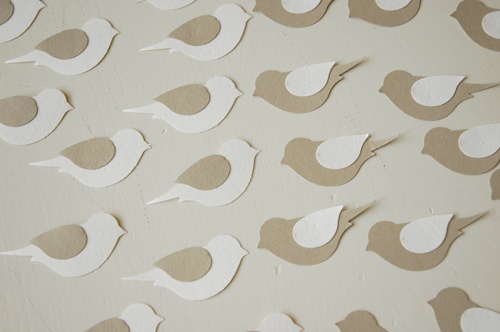
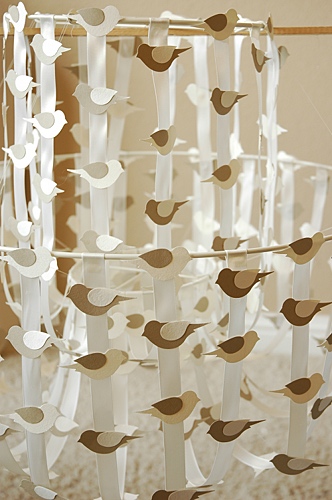
7. Next, I turned to my flock of birds! My birds were actually cut from two colors of cardstock paper from the scrapbooking store using a paper punch from Stampin’ Up. The bird and wing were two different pieces, so I actually had to glue all of those bad boys together. I wanted the birds to alternate the side that they faced, so that’s why all of the cream birds face one way and the tan birds face another.
I cut 250 of them, and used just about every one. I may have had 20 or so left over.
8. With my glue gun, I started attaching birds to the ribbons. I glued them to the inside once the ribbon looped.
I also alternated the height on each ribbon so that the birds formed an interesting pattern. For the ribbons that were left hanging, I made sure the pattern ended up so that a bird would be glued to the very bottom of the ribbon to hide the raw edge.
Continue gluing the birds all the way around the top layer of ribbons.
9. Next, I glued the birds around the bottom layer of ribbons.
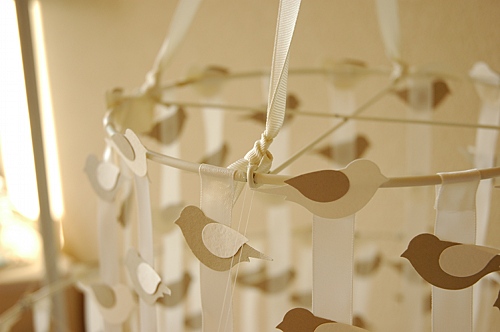
10. The last step was to tie the chandelier hanger to the top. I tried a few times with invisible thread, but it kept snapping off (maybe finishing line would have been better). I ended up using ribbon instead. I tied a knot through one of the bent wire hangers on the top loop and then tied it off on the bent wire directly across from it. I repeated that step for the other two sides. I just had to be sure that when the ribbons where held taught, they were both the same length. It’s a lot easier to do than it is to explain.
Now, all you have to do is step back and admire your work! Because this will probably be the very last thing we add to the nursery (once furniture is placed and drapes are hung), I have it hanging on my rolling laundry rack right now.
I couldn’t be more pleased with the way it turned out! I’m thinking of hanging it near my recovered rocking chair, but we’ll have to see when I’m finished with the rest of the room.
Does this look like a project you may attempt for the little girl (or big girl) in your life?
This post has been added to Kimba’s DIY Day.



Beautiful!! One of the best Pottery Barn knock off’s I’ve seen. You are very creative!
That is AWESOME! I love it, and I feel for you and those 250 birds. I really, really love it, though.
Have a super Monday!
Laura
Oh Lindsay it is absolutely gorgeous. I cannot imagine how much time it too, but it was well worth every second!
Thanks! You know, the gluing of the wings on the birds took a long time, but the rest of it really didn’t. I love projects I can do while sitting in front of the TV!
WOW! You are so so so awesome! I am redoing my 8 yr olds bedroom and would love to try this with something super girly. Like maybe butterflies or flowers. Thanks foe posting!
Wow, that turned out great!
That is all kinds of wonderful! Great job!
Hands down the best PB Knockoff ever! I am totally amazed and loving this! I just wish I had a reason to make one!!!
Oh, wow! That’s so pretty. I love it, Lindsay! It’s so sweet with all those little birds. 🙂
What a fantastic addition to a nursery! I think it looks even better than PB, great job!
I adore this!!! I am about to begin a redo of my 2 year old’s room … turning it from a baby room to a big girl room and I have been admiring that chandelier at PBK for a month now, but really NOT admiring the price tag! I am so happy to see how easy it is to recreate! I love your version with the birds … it will be gorgeous in the nursery!
Wow! So impressive! That must have taken a LOT of patience.
That is gorgeous! Great job!
just lovely! Just one question tho- is it “like” a chandelier, but not really a chandelier? I am assuming it will not be attached to a light source? Where will you hang it in the nursery? Don’t ya just love it when you do so good? You must be so proud!
Joanne
You are correct – no light source. Pottery Barn calls their’s a chandelier, so I did, too. 🙂 I’m assuming it is because it takes the shape of a chandelier.
Way to go! I adore this 🙂
That came out beautiful!! Great job!!
Kelly
Wow, that’s one of the best knock-off’s I’ve ever seen. It turned out beautifully. Makes me wish I had a nursery to decorate. Or maybe not. haha. But the chandelier is lovely. 🙂
This is absolutely stunning! What an impact it will have on your child’s nursery! I think yours is better than Pottery Barn’s and you should give yourself a nice pat on the back for this one!
So sweet. It turned out perfectly.
This is stunning! I like your version better than PB’s version. Those birds are just so sweet! I assume it was pretty inexpensive too, what a great addition for a nursery!
This is so pretty; I never would have guessed it was ribbon if I had just looked at the picture. Your version with the birds, as painful as they were to make I am sure, far surpasses that of Pottery Barns. Thanks for sharing!
Cute, cute Lindsay! I don’t think I have the patience for something like that, but I admire you doing it.
That turned out so beautiful. I can’t wait to see the rest of the room. I’m sure it’s just gorgeous!
LOVE this. Wow. Your talent never ceases to amaze me!
LOVE IT!!! I like yours even better than PB!
GORGEOUS!!!
Absolutely adorable! Your take with the birds instead of the flowers is super cute! Can’t wait to see the whole room.
AMAZING!! I’m (again!) so impressed! What an awesome project. It really turned out beautifully!
Love it!! I definitely need to add this to my idea file. I hope to be decorating a nursery sooner rather than later (wish me luck) and this would be a great addition. One of the best PB knockoffs I have seen. Thanks for sharing and for being such a great inspiration!
Bravo, Lindsay!!! I don’t know if I’d be able to hold onto my sanity long enough to cut out 250 birds, but you have done an amazing job!
Love it! (I really should re-sign-up for Pottery Barn catalog, if only for the ideas!
I’ve been into ‘ceiling’ art and have been pondering what to do in both my living room over a bare corner, and my little girl’s ‘almost big girl’ room. The PB one would actually work in there, since it’s white and purple, but I bet it’s more economical your way too!
I love how your ribbon/bird chandy turned out. You always come up withe best projects! I can’t wait to see it hanging in your little gal’s nursery soon.
Breathtakingly beautiful Lindsay. I was wondering when you were going to tell us what you did with all of those paper birds!
I love it.
This is fabulous and I think it is BETTER than Pottery Barn – not only is it gorgeous but it is handmade…
love it love it love it!
Alyssa
Lifeoflyssie.com
Love it. Thank you for figuring out how to make this mobile. I have wanted to make a butterfly one for my girls room (after seeing the PB flower mobile) but couldn’t quite visualize how to make one. I’m definitely putting this on my project list!
Wow, wow, wow!!! That may be one of the prettiest chandeliers I’ve ever seen. I don’t know that I would have stuck through the cutting & gluing of the birds but you did a beautiful job! I love it!
That is so pretty –what a labor of love –I browse your blog all the time -you never disapppoint 🙂
I loove this! I’m definitely going to attempt this, or maybe have my husband attempt this ( I have a lot of other projects to do before our little one arrives…EDD is JUL 1. ) this would look awesome centered above our white crib. I have to say I’ve followed your blog for a while and when I found out u are expecting a little girl like me I was soo excited because I knew any “baby girl” nursery project you would do would directly benefit me lol. Thanks Lindsay. 🙂
It is so freaking fantastic I can’t even begin! That is beautiful! I hope this lil lady knows how talented her momma is!
So that’s why you cut out so many birds! I really like your version better than the PB one. What a special edition to the room!
Adorable! Simply adorable!
OMG, I can’t believe your patience cutting all those out (watching TV or not)….but the end result is really, REALLY cool!
very, very cool! It looks awesome! I bet it took forever, but the finished look is worth it 🙂
That’s awesome! Wonderful job! I actually was going to copy the same one for my daughter and blogged about it! So fun! I had even cricut cut the flowers for it, but ended up doing something else. It looks so great, almost wishing I had done that! I love the birds! Thanks for sharing!
I was wondering what you were going to do with the birds!? Very neat! Can’t wait to see the whole room:-)
Wow, it’s beautiful! You did an amazing job. I’ve also been eyeing the Pottery Barn Chandelier for a while now but after reading your tutorial you’ve inspired me to make my own! Thanks you so much for your awesome tutorial.
How very beautiful and special that is! What a patient and clever mom you are!
could this be more fabulous?? i think not.
one of the best PB knock-offs i’ve ever seen, too.
This is outstanding. I am absolutely challenging myself (more likely my wife) and sharing with my own PuzzlingPosts followers. Thanks for the idea.
That is so gorgeous. and BTW I like yours better than the Pottery Barn one, really nicely done 🙂
I am vey keen to try something like this, & I’m off to send my sister the link to this so she can get inspired for her little girls room! Thanks so much for taking the time to tell us how you did it (& how you’d do it differently)
Thanks!!
love your birds… do you have a template i can work out of? about how big is your bird? thanks.
Tammy- I used this bird punch from Stampin’ Up. http://www.stampinup.com/ECWeb/ProductDetails.aspx?productID=117191 It made it really easy to cut them out. The birds are about an inch or so tall.
You are so talented. I love checking your blog. You always have fun ideas.
I LOVE this! It turned out beautiful! 🙂
Thanks so much for sharing this! I’ve been eyeing the same PB chandelier for over a year and a half but couldn’t justify buying something that looked easy enough to make. Now that this post is up I just might actually attempt a version that compliments my baby’s room!
Wow. Just wow. That is so gorgeous!
This is adorable! I actually think I like yours better than the PB version, which is amazing! Great work!
Thanks for this tutorial!! I had tried making the exact same project for a baby shower and it was NOT working for me. I might have to start over and give it a try your way!
Whoa… I love it! You could use this for so many things… decor, showers, weddings… YAY! Thanks so much for this, I’ll be linking.
Wow…LOVE it. You did a great job! Thanks for sharing!
Wow! This is beautiful! My brain is working thinking of what I could add to the ribbons for my ocean resort themed master bedroom. Great job and thanks for the tutorial 🙂 If I end up doing it I’ll link to this post!
Totally amazing!! I want to share this on my blog as I tend to share chandeliers often (since I LOVE them!).
Really neat project!
Love this tutorial and I’m linking it to my blog. Thanks for sharing!
How did I miss this before? Awesome! I have been doing chandelier projects the past 2 days too (not ready to post yet, though!). xoxo
I really love this. Thinking of making it for my daughters room…. but i would want to add a light… have to figure that part out…
I love this! I can think of so many cool things to do with one of these! Thanks for sharing so many cool ideas!
I love this. I was going to make one myself but couldnt find a 24in ring anywhere. And I am so glad you had this tutorial because I completely missed the 6 in ring and the criss cross wire hangers when looking at the website. I would have completely screwed it up!
PS yours IS better than PBs
OMG! I was going to attempt to make this myself and decided to do a google search and found this! Thank you for the time and energy you put into replicating this item. It turn out beautifully and I hope mine does as well! I’m off to the store!
Just made one of these for my second daughter’s mobile. I used strips of fabric rather than ribbon. Thank you so much for documenting your project. I would not have had the patience to do the project AND take photos step by step. It was definitely a labor of love with the fabric. I hope your daughter (or your son) enjoy it!
Welcome to Ceramics and Crafts! We offer a huge selection of
ready to paint ceramic bisque at Wholesale and retail prices. Below you will find our different product types. We offer Bisqueware and Greenware ceramic products at prices that blow the competition out of the water. We have 30+ Years of experience with pottery and are spreading our services all over the united states with free shipping for orders over $75.00. We also offer tools, paints, brushes and crafts at amazingly low prices!
I LOVE it! We are saving up the $ to have wiring done so we can have a light in my LO’s ceiling. I think I will be making her one of these to hang until then. It’s so pretty!
Wow this is pretty! I know it must have taken forever but it was well worth every minute :o)
My three little girls share a room with one of those awful builder light fixtures. It’s about 14″ in diameter, in the half-round shape mounted flush with the ceiling. Do you think I could make one of these type chandeliers and hang it flush with the ceiling, around the existing fixture? Any ideas on that?
That would most definitely work! I suggest making the ring that is close to the ceiling about 16″ so that is not to close to the light fixture! and for hanging skip the step that you use ribbon to hang it and go for making tiny hooks that could fit a screw of some sort to attack it to the ceiling!
I hope all that made sense lol.
Rachel
This is so beautiful! It doesn’t look too difficult to attempt either. I can see myself doing this but with images from my favourite books or movies or tv shows, to make it a little something personal for my room. I totally love these birds though, so simple and beautiful, wonderful idea! 😀
I just finished doing the structure. I knew balancing the rings were going to be challenging. It took me about an hour to do it but I didn’t go through the frustration of having to balance it, it turned out balanced/level. Below are the instructions of what I did.
I placed the loops on the largest ring to make sure they are all across from each other. I hung the first ring and then I laid the 2nd (largest one) one on something flat so it’s already level and at the height that I’d want it to hang. I laid the 2nd ring so it is centered with the first and also lined up the loops up with where the coat hangers are. I roughly measured the distance between each of the 4 points to make sure they were equal. If I had doubts or if I thought I moved the ring, I measured the distance again and do a birds eye view to make sure the rings are still centered. I did the same thing with the 3rd ring. Again, this was a slow process but I didn’t get frustrated so I was happy with the results. Hope this helps.
Beautiful! I want to make one for a baby shower and then put it in my daughter’s bedroom. Do you know how much ribbon you used for your project? I don’t want to buy ribbon in a certain color and then not have enough to finish the project!
Wow, it really turned out great, I’m sure its worth the effort! And even though the thread was covered in white paint, you would never know it was there unless you were right on top of it. Great job!
Wow! This is really beautiful! And wAAAAAAAAAy cheaper than PB’s version!
I’m in Canada and couldn’t find macrame rings anywhere – I guess Canadians don’t macrame (is that a verb??!) anymore…
But after searching craft stores, hardware stores, dollar stores, etc., I finally got creative and went back to the craft store and found a green wire wreath frame in 2 sizes. Each wreath frame had 4 widths of wire circles – just what I needed! Took them home and used pliers to take them apart and ended up with a 7″, 11-1/2″ and a 20″ (and some others size that I’m sure I’ll find another use for later).
Great project and awesome site – I’ll defiantely be back for more ideas!
Jen
Yay! That was a very smart workaround to not being able to find the rings. Kudos!!
Wow! What a great and creative idea! I discovered your website while ‘googling’ how to paint a laminate wood desk! LOL! Love the idea!! Keep up the great work
Thanks, Isabela! Glad you found this blog. 🙂
hai i’m abinaiya frm Malaysia….i wnt to tell tat nt easy to get a best blog like tis….i love it n i love all of the DIY projects tat mam share here thanks alot….
i love DIY projects sooo u r my inspire mam thanks again….i hope u will gooo on it more 10 q bye tc mam
wow, i am amazed with this project, its fab xxx
I love this… very nice job! I am curious as to what your total cost was for this project.
A really classic design, an admirable execution! Lindsay has always got something I enjoy reading about! Way to go!
I’m SUPER late, but that is so cute and lovely! I want to do one for my little one’s room. Her gee-gee (her dad’s mom) bought her bedding before I had a chance and *gasp… I don’t like it. I’ve been looking for ways to fix it up and personalize it.
How many yards of ribbon did you use? (apprx)
Hi Devon- I *think* I used about 3 or 4 rolls of Offray ribbon. Maybe 12 or 15 yards? That’s a really rough guess as I don’t really remember. 🙂 That seems like a lot of ribbon, doesn’t it? Hmmm…
Maybe but at least if I don’t use that much I will have some left over for extra decorations. I am planning on trying them for decoration at my spring wedding in April 2012, but I plan to replace the birds with cherry blossoms. I will post pics as soon as I am done.
This turned out great! I am making a more modern funky upcycled chandelier and the macrame rings are an awesome idea for the frame, thanks!!!
Hi ! This is beautiful! I am trying to make this for my friend who is a big girl but I am sure she will love this!! Thank you so much!
I am going to travel with this … is there a easy way I can pack this?
Love this Lindsay! As soon as I found out we were having a girl in April, I bookmarked this project to make for her nursery. I’m finally getting around to making it, and had a heck of a time spray painting the rings. I know it’s probably a simple answer, but I wanted to ask how you did it in case someone else has a problem in the future.
I found spray painting them on a flat surface to be annoying because you can’t get even coverage on the sides of the ring. I tried to think of a way to hang them up, but I was worried the rings would just spin as I sprayed. I ended up just spraying them flat, using an entire can of spray paint (4-5 coats per ring per side), on a cardboard box. That may have been a bit excessive, huh? ;o)
Hi Caroline! I actually hung them from a wire stretched across two step stools with clear fishing line. I was able to paint them hanging and then just had to turn them and touch up a tiny spot where the line was. I picked a calm day, and they didn’t spin at all (and I live in the windiest place on earth!). I spend a lot of time hanging things from wire so I can spray paint them. Ha! Thanks for asking, and congrats on your baby girl!
love it! will try it for my daughter’s room!
Wow, that’s really pretty. So generous of you to share how you made it. Thank you.