Makely

Let's Make Life Awesome

  • Home
  • Decorating/DIY
    • Create Your Decor
    • Decorate Your Home
    • Paint Your Walls
    • Transform Your Furniture
  • Healthy Living
    • Essential Oils
    • Family Wellness
    • Household Care
  • Project Gallery
  • Contact
You are visiting: Home » Decorating/DIY » Create Your Decor » Pottery Barn Style on a Budget: Halloween Edition

Pottery Barn Style on a Budget: Halloween Edition

by Lindsay Ballard on October 1, 2009 97 Comments

As soon as the Halloween-themed Pottery Barn Kids catalog hit our mailbox, Zack got busy pointing out all of the things that he “wished he could have.” Yeah, you and me both, Kid.

One of the things that he kept going back to was the Pirate Build-A-Pumpkin kit.


Pottery Barn Kids

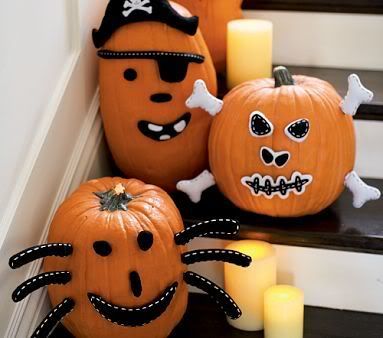
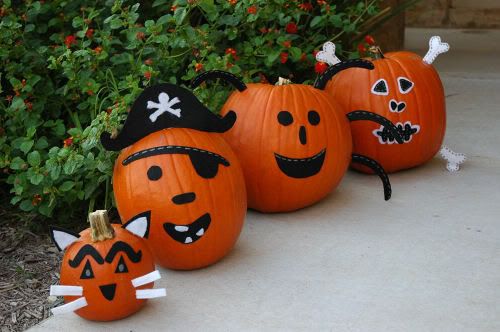
After looking at the photo in the catalog and reading the description, I figured I could make my own version of the adorable pumpkin accessories. Pottery Barn wants $12 each for the Pirate, Cat, Skull, and Spider sets, but I knew I could make all four of them for half of that.

Wanna know how? Yeah, of course you do. 🙂

Pottery Barn Inspired Pumpkin Accessories

1. I began by drawing out each of the pieces I wanted to add to each pumpkin.

Don’t fancy yourself an artist? No worries. I did the hard work for you and drew out everything you need for the four pumpkins. Click here to download the .pdf file of the artwork. The artwork is scaled for a medium sized pumpkin, so you will need to enlarge or reduce if you are using a large or small pumpkin.

2. Print out the .pdf and cut out the shapes for the pumpkin(s) you want to put together. For this tutorial, I am showing the Skull accessory kit.

3. At your local craft store, pick up some sheets of sticky-backed felt (about $1 each). You will need white and black for each set. I put all four sets together and only ended up using one sheet of white and two sheets of black.

I advise against using the “soft” sticky-backed felt. It’s a pain to peel the backing off of it.
4. Trace and cut out the shapes on each piece of felt. On the artwork, I labeled each piece with the color and the number of each shape you will need to cut out. Some are labeled front and back, which means you need to trace the front side (the side with the writing on it) and the back side (without the writing), so you’ll have mirror images of each piece.

Note: On the Cat set, you actually need to cut out 4 front and 4 back of the white rectangles, not 2 of each as noted on the artwork.

5. On the pieces that stick out of the pumpkin, I inserted a toothpick in between the front and back shapes to make a little toothpick sandwich. I just left a small portion of the toothpick sticking out to stick into the pumpkin. I had to break a few of the toothpicks in half so that they wouldn’t be too long. Once your little sandwich is put together, you will probably need to trim the edges so that the pieces match up nicely.

The pieces you will need to set up with a toothpick are:

  • Pirate – Hat (I put one toothpick in the center and one on each side)
  • Cat – Ears, whiskers
  • Skull – Bones
  • Spider – Legs

6. After assembling the rest of the pieces that layer on top of each other, draw in the faux stitching. On the white pieces, I used a thin black marker. On the black pieces, I used a silver metallic marker I found at the craft store for a few dollars.

Sorry that picture is so oddly lit. I’m not sure what’s going on there.7. Now, all you have left to do is to peel the backing off of the pieces and stick them directly to your fresh pumpkin or craft pumpkin. The pieces on toothpicks can be easily stuck directly into the pumpkin.

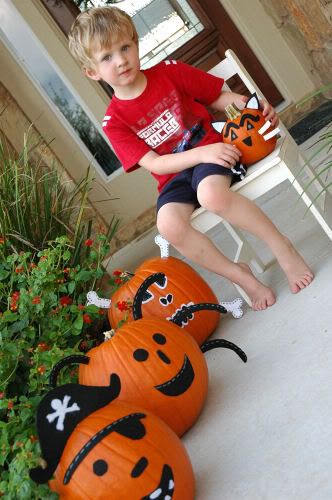
8. Display your new friends proudly!

I can’t believe how much my knock-offs look like the “real” ones!

You can create your own Pottery Barn-inspired pumpkin kits for under $5 for all four of them. The only difference between these knock-offs and the real thing is some polyester stuffing in some of the pieces and actual stitching instead of faux stitching. Oh, and $43.

Zack really wanted his picture taken with his new pumpkins. Here he is posing with his favorite, “Fat Cat.”

Our pumpkins will eventually be carved into Jack-O-Lanterns a few days before Halloween, but until then, we’re going to enjoy Fat Cat and all of his fun little friends.Will you create a set of your own?

***********

I’m in the mood to party! You can find this post linked to Rhoda’s “It’s Fall, Y’all!” party at Southern Hospitality and to Jane’s Frugalicious Friday party at Finding Fabulous!

About Lindsay Ballard

Lindsay Ballard is a former college mascot turned political geek turned roller derby playing, DIY fanatic.

Lindsay chronicles her projects, design ideas, and lifestyle tips here at Makely, where she shares tutorials and inspiration. Her DIY designs are bold and graphic, while her spirit is fun and full of color.

Lindsay lives outside of Austin, Texas with her husband (Tom), children (Zack and Emma), and dogs (Duke and Jill). She plays roller derby for the Rockin' City Rollergirls out of Round Rock, Texas.

« One Man’s “Oops” is Another Man’s Treasure
An Unconventional Use for Placemats in the Dining Room »

Comments

  1. Jenny@ L.O.T.s of Love says

    October 1, 2009 at 7:45 am

    Nicely done!

    Reply
  2. Runner Mom says

    October 1, 2009 at 7:51 am

    Just too cute! Love saving that 43$$! Your son and his pumpkin are precious!! Enjoy the day!
    Hugs!
    Susan

    Reply
  3. Amanda says

    October 1, 2009 at 8:32 am

    Awesome job!

    Reply
  4. Megan says

    October 1, 2009 at 8:33 am

    I love this! Definitely going to be making these. Thanks!

    Reply
  5. Jen - Balancing Beauty and Bedlam says

    October 1, 2009 at 8:34 am

    Whoot whoot whoot – you rock!! LOVE THEM!!

    Reply
  6. PHARES CAUSEY says

    October 1, 2009 at 8:42 am

    Perfect! Couldn't have been done better!

    Reply
  7. Kathleen says

    October 1, 2009 at 8:42 am

    Your pumpkins are adorable! I have a PB WSonoma Outlet near me, I can't afford the real sore, so I hunt down bargains at the outlet.
    In Monday's post I showed something you would like…and orig 19.00 for .25!!
    Thanks for sharing your works of art!
    Happy Fall!
    http://www.cuisinekathleen.com

    Reply
  8. Amanda says

    October 1, 2009 at 9:17 am

    Great job. I'm definitely going to try this.

    Reply
  9. Mrs. (not) the Jet Set says

    October 1, 2009 at 10:40 am

    You are the best! You just saved me a ton of time. I was wanting to do that with the kids at the Halloween party!

    Reply
  10. Beth@The Stories of A to Z says

    October 1, 2009 at 5:46 am

    These are adorable! What a fantastic idea.

    Reply
  11. Sheri says

    October 1, 2009 at 6:01 am

    Hey now, those are adorable!!!!!

    Reply
  12. Cathy says

    October 1, 2009 at 6:07 am

    Definitely going to try these! They are so cute!!

    Reply
  13. niartist says

    October 1, 2009 at 11:13 am

    Oh this is just beautiful! Definitely a fantastic way to ring in fall! Oh, and if you're going to be doing any spooky Halloween decor, stop by my blog for a how-to and a giveaway! I hope you can!

    Reply
  14. frugal farmhouse design says

    October 1, 2009 at 6:39 am

    You did an amazing job on these. I did not even know they made felt like that. Thanks for the tutorial. This is one of the projects I will be doing with my younger guy. All the best, Lori

    Reply
  15. duchess says

    October 1, 2009 at 6:42 am

    You're good! They turned out great.

    Reply
  16. Jenny Garland says

    October 1, 2009 at 11:48 am

    Freaking awesome!!

    Reply
  17. Shanty 2 Chic says

    October 1, 2009 at 6:50 am

    Your pumpkins are adorable and your right! They look exactly like the PB pumpkins! Great job! ~Ashley

    Reply
  18. lindsey@junkstyle says

    October 1, 2009 at 6:53 am

    These look so GREAT!! They are just like the 'real thing'! Good idea!!

    Reply
  19. Jane says

    October 1, 2009 at 6:53 am

    Very cute…your son looks adorable with his pumpkins!! Thanks for the tutorial and the patterns.
    Jane

    Reply
  20. pk @ Room Remix says

    October 1, 2009 at 6:53 am

    I can't believe how much they look like the real ones either! Great job Lindsey! They're adorable.
    pk @ room remix

    Reply
  21. Richella says

    October 1, 2009 at 11:54 am

    So adorable! I'd rather do it your way and keep the $43 in my pocket, thank you very much. And thank YOU very much for telling us how to do it!

    Reply
  22. tinycandi says

    October 1, 2009 at 12:48 pm

    cuuuuute! You always have such great ideas! 🙂

    Reply
  23. Marianne@Songbird says

    October 1, 2009 at 7:49 am

    Excellent! That will show them for asking such ridiculous prices. Job well done!

    Reply
  24. melissa * 320 Sycamore says

    October 1, 2009 at 7:57 am

    Adorable, Lindsay! I like yours better than PB!

    Reply
  25. Stephanie @ A Fine House says

    October 1, 2009 at 8:03 am

    omg! So cute! I love the "bones" one.

    Reply
  26. Courtney says

    October 1, 2009 at 1:05 pm

    Those are adorable! And much less messy and dangerous than carving jack-o-lanterns.

    Reply
  27. southerninspiration says

    October 1, 2009 at 1:06 pm

    What a lucky little boy who has a mamma that can give him all FOUR sets !!! Those are adorable, and he's pretty cute, too.

    Suzanne

    Reply
  28. Nikki Cogg says

    October 1, 2009 at 9:11 am

    You're amazing!! I don't have kids but my husband and I love to decorate pumpkins, so we'll definitely be making a few of these!

    Reply
  29. Isabella & Max Rooms says

    October 1, 2009 at 10:08 am

    My kids want to come over to your house…
    Janell

    Reply
  30. Lindsey @ Better After says

    October 1, 2009 at 10:22 am

    I'm totally going to do this! My three year old just wandered up and said "Hey! That pumpkin has BONES on it!" I asked him if we should make some, and his eyes lit up and he said "YEAH!"

    😉

    Reply
  31. michelle@somedaycrafts says

    October 1, 2009 at 3:25 pm

    These are awesome. I love the multi colored and multi-dimensional aspect of the felt. I will feature this on somedaycrafts.blogspot.com Thanks!!!

    Reply
  32. Cindy says

    October 1, 2009 at 3:40 pm

    Love it! And it lasts longer than carving. Very cute!

    Reply
  33. Kelly says

    October 1, 2009 at 4:17 pm

    i had no idea that sticky felt existed. how cute!

    kelly
    http://tearinguphouses.blogspot.com

    Reply
  34. Victoria says

    October 1, 2009 at 11:29 am

    Awesome! I saw these in PB and I too thought "I can do that". Thanks for sharing the template!

    Reply
  35. Annette says

    October 1, 2009 at 11:59 am

    That is fantastic! I love recreating higher priced items for less. Way to go!

    Reply
  36. Michelle says

    October 1, 2009 at 5:18 pm

    Fantastico! My little guy will love this! I love things that are already done for me! Thanks!

    Reply
  37. Blondie's Journal says

    October 1, 2009 at 5:31 pm

    Great job, Lindsay. I know you & Zack are both happy!! Take That PBK!!!

    Happy Fall!! 🙂

    xoxo
    Jane

    Reply
  38. Style Sisters says

    October 1, 2009 at 1:48 pm

    Hello!! Brilliant idea. They look as good as the originals. I love knocking off PB! 🙂

    Reply
  39. Lisa-Marie says

    October 1, 2009 at 2:07 pm

    Lindsay, these look AH-MAZING! I shall perhaps have a pirate pumpkin this year!

    Reply
  40. nopinkhere says

    October 1, 2009 at 2:16 pm

    So super cute!
    Will definitely be some at our house this year–Thanks for the templates!

    Reply
  41. Tina says

    October 1, 2009 at 8:02 pm

    Wow, great job! I think yours actually look better!!

    Reply
  42. Empty Nest Full Life says

    October 1, 2009 at 8:14 pm

    I think yours look even better! and I know that sweet boy is delighted. Jackie

    Reply
  43. Catherine Hansen Peart says

    October 1, 2009 at 3:18 pm

    These look fantastic!

    Reply
  44. Infarrantly Creative says

    October 1, 2009 at 8:39 pm

    Lindsay so cute…love it. If you son is like my Isaac I bet your son will change out the faces to make a pirate cat and a skull spider.

    Reply
  45. Sarah says

    October 1, 2009 at 9:53 pm

    Love it! I'm so going to try this.
    Thanks!

    Reply
  46. Amber B. says

    October 1, 2009 at 11:38 pm

    Those are adorable! I really can't tell the difference between yours and the PB ones. Very good job!!

    Reply
  47. adrienne says

    October 2, 2009 at 6:08 am

    fabulous lindsay! you rock!!! i'm on my way to hobby lobby!

    Reply
  48. Lynette says

    October 2, 2009 at 8:41 am

    I Loooooooooooovvvvvvveeee that idea! How cute, and how simple. Thanks for sharing the idea!

    Reply
  49. Rhoda @ Southern Hospitality says

    October 2, 2009 at 9:11 am

    Very cute, Lindsay! You are definitely ready for Fall & I bet your cute little ones loves it all too.

    Reply
  50. Marie says

    October 2, 2009 at 10:37 am

    Hello Lindsay – oh my, I'm lovin' your PB look-alikes! In fact, I really like yours better. Especially that sweet kitty! Great job and thank you for sharing the pattern. Emma would love to make one!

    Blessings,
    Marie
    http://emmacallsmemama.com

    Reply
  51. Kasey at Thrifty Little Blog says

    October 2, 2009 at 1:43 pm

    Yours are just as good… even better! (My favoite is also Fat Cat 🙂 )

    Reply
  52. nanny says

    October 2, 2009 at 7:28 pm

    those are some of the best pumpkins I have ever seen….great job!

    Reply
  53. Wendy says

    October 2, 2009 at 3:08 pm

    Love them!

    Reply
  54. Julia says

    October 2, 2009 at 3:38 pm

    Very cute. I cannot believe how similar they look to the pb ones!

    Reply
  55. sonia says

    October 2, 2009 at 4:43 pm

    i just received my PB catalog yesterday and these caught my eye. i love that you put a tutorial together. yours rock!!!!!! thanks from all the folks on a budget and think PB prices are crazy stupid!!!!!!!! hey, how about you make a tutorial for one of those $69.00 costumes featured. we would love it!!!!!!!

    Reply
  56. KellyH says

    October 2, 2009 at 8:17 pm

    Looks exactly like the pottery barn ones!!!!

    Reply
  57. Anonymous says

    October 3, 2009 at 3:26 pm

    I love the ideas of saving money on Halloween crafts. Especially ideas from the PB. I love that place. Keep up the good work. Keep the frugal ideas coming our way.

    Reply
  58. janadec9 says

    October 3, 2009 at 8:01 pm

    Thanks so much for figureing this out..and then posting so the rest of us don't have to!

    Reply
  59. little bird says

    October 3, 2009 at 6:21 pm

    i recently started a blog for nursing home activity directors. I search the web for great ideas for them to use. I used this one the other day. It really came out great

    Reply
  60. Mandy says

    October 4, 2009 at 1:51 pm

    Just discovered your site and love so many of your ideas. I would love to feature your "Pottery Barn on a Budget" over on our site Steals and Deals (www.stealsdeals.blogspot.com)! We have a day where we share with our readers how to save some $ and this piece would be FAB! Of course I would direct all of our readers to your site. 🙂 Please let me know, thanks!

    gasnb@msn.com

    Reply
  61. Sarah says

    October 4, 2009 at 8:33 pm

    Congrats on a beautiful job! I LOVE THEM!!! God's blessings, Sarah 😀

    Reply
  62. Anonymous says

    October 5, 2009 at 11:55 am

    Love it – I almost bought one but now am going to make them instead.
    Great site.

    Reply
  63. Meghan says

    October 5, 2009 at 9:43 pm

    I totally adore this!
    You are the Queen of all craftiness!!!!

    Love, love, love it!

    Reply
  64. Diane@A Picture is Worth.... says

    October 6, 2009 at 9:26 am

    Lindsey,
    I just discovered your blog through Gracious Southern Living…great project!

    Reply
  65. Valerie says

    October 6, 2009 at 9:26 am

    What a great idea! I have added you to my file box at thecraftersfilebox.blogspot.com.

    Thanks for sharing!!

    Reply
  66. Kristin says

    October 6, 2009 at 7:45 pm

    Lindsay, you are so ridiculously creative. LOVE the pirate! And your little man is adorable. p.s. You looked gorg in Leigh's wedding photos. : )

    Reply
  67. Misia Pepa Adventures says

    October 10, 2009 at 1:30 pm

    What a great idea. Thanks so much for sharing this tutorial. This pumpkins are so cute I can wait to do this.

    Reply
  68. Peanut says

    October 11, 2009 at 5:33 pm

    Just wanted to write and tell you that we made them! My kids had a great time. I posted my blog link, so you could see the pictures. I also credited your site to friends, who wanted to make the pumpkins for themselves.
    Thank you!

    http://arrowjones.blogspot.com/2009/10/i-have-to-have-to-have-to-share-fun.html

    Reply
  69. Anonymous says

    October 15, 2009 at 5:00 pm

    First time reader. Can I say I love you? This is such a cool tutorial. I think my son is going to love you too! THANKS so much!!! Will be doing this over the weekend!

    Reply
  70. bj says

    October 15, 2009 at 2:57 pm

    omgosh….I am a first time visitor to your amazing blog. I don't know how I've missed it all this time but I just became a follower so I won't lose you….:)
    Amazing pumpkins and they DO look just like PB.
    Please come by sometime…
    xo bj

    Reply
  71. Petit Debutant says

    October 15, 2009 at 4:01 pm

    I'll definitely be making these knock-offs too!

    Reply
  72. Anonymous says

    October 16, 2009 at 3:34 pm

    I came across your blog yesterday and found this project. it is super awesome. I had to make the pirate pumpkin today! My boys each made their own pirate pumpkin and loved it. Thanks for the DIY

    Reply
  73. Jamie says

    October 22, 2009 at 11:51 am

    I just printed out your pdf file to make my own PB project! What a cute, clever, and bargain idea. This will be a DIY project this weekend.

    Reply
  74. Jessica says

    October 22, 2009 at 11:54 am

    Ive linked you to my blog! your site is great 🙂
    http://myquarterlifecrisisjmu.blogspot.com/2009/10/halloween-round-up.html

    Reply
  75. Nicole says

    October 30, 2009 at 11:09 am

    You are soooo creative! Thanks for the great idea1 Me and my kids just made our own pumpkins following your instructions!

    Reply
  76. amber gariety says

    June 14, 2010 at 10:17 pm

    These are so cute! I can’t wait to try them this Halloween. We have been growing lots of pumpkins in our garden and will have lots to carve and decorate.

    Reply
  77. Tom Coleman says

    July 6, 2010 at 10:28 am

    Su-weet! You are amazing… it’s funny, we get so used to buying stuff, that we don’t realize that buying imitations is just that (imitating), and making it ourselves is the way to make lasting memories. When you’re a kid, you actually want to DO stuff, create stuff… not just buy it. Great job!

    Reply
  78. amanda pedro says

    September 30, 2010 at 8:17 pm

    awesome job! My kids will love it. Kinda like a large version of Mr. potato head. I think I’ll use foam sheets as that’s what I have on hand. Thanks again for sharing

    Reply
  79. Amanda says

    October 11, 2011 at 10:04 am

    We liked this so much over at Copycat Crafts that we have decided to feature it today! You can view it here
    http://www.copycatcrafts.com/pb-kids-inspired-pumpkins/

    We’d love it if you’d like to display a featured button! You can grab your button on the right hand side of your post. Thanks!

    Reply
  80. Kids Kitchen Playset says

    October 11, 2011 at 8:25 pm

    Thanks Lindsay for the ideas for creating a Pottery Barn Halloween on a budget.
    I love pottern barn’s kids range but you are right they can be really expensive

    Thanks again
    Katie

    Reply
  81. Lori says

    July 11, 2012 at 2:01 pm

    I ran across this post on pinterest and loved it!

    Reply
  82. Mary says

    October 3, 2012 at 10:45 am

    These are the most adorable pumpkins, ever!!! I love them! Great share, thank you!!!

    Reply
    • Lindsay Ballard says

      October 4, 2012 at 8:45 pm

      Thanks, Mary! They are SO easy to make!

      Reply
  83. cherryl says

    October 20, 2012 at 7:55 pm

    Thank-you, Thank-you, Thank-you, Thank-you!!!! This is exactly what I needed and you did such a good job. You are awesome for sharing your patterns with us and we are grateful. God Bless!!

    Reply
    • Lindsay Ballard says

      October 21, 2012 at 10:03 pm

      You are so welcome, Cherryl!

      Reply

Trackbacks

  1. Pottery Barn Style on a Budget: Halloween Edition · Felting @ CraftGossip says:
    September 26, 2010 at 11:10 am

    […] she knew she could make all four of them for half of that. She did and the results are amazing.  Check out Living with Lindsay’s complete tutorial with templates today and make a Halloween with y… You may also […]

    Reply
  2. Frog Prince Paperie » Halloween Day 14: Pottery Barn Style, Dollar Store Price! says:
    September 29, 2010 at 6:04 pm

    […] with paying for such a thing. Instead she sat down and drew up some templates and instructions that she shares here to make your own terrifying pumpkin […]

    Reply
  3. Fun and Unusual Pumpkin Decorating Ideas for Fall | FreeStuff4Kids says:
    September 27, 2011 at 12:49 pm

    […] Decorate a pumpkin with felt cutouts […]

    Reply
  4. PB Kids Inspired Pumpkins | Copycat Crafts says:
    October 11, 2011 at 6:03 am

    […] Pottery Barn Style on a Budget: Halloween Edition. // Filed Under: […]

    Reply
  5. Pumpkin-spiration! | Madison Moms Blog says:
    October 14, 2013 at 6:16 am

    […] {Photo Credit} […]

    Reply
  6. Easy and Creative Pumpkin Carving Ideas says:
    October 24, 2013 at 8:10 pm

    […] Pottery Barn Inspired Pumpkins at Makely School for Girls […]

    Reply
  7. Over 40 Pumpkin Decorating Ideas. With Video! | How Does She says:
    September 12, 2014 at 6:17 pm

    […] 21.  Pirate pumpkins.  Here. […]

    Reply
  8. The Best Pumpkin Decorating Ideas for Kids says:
    September 29, 2014 at 10:24 am

    […] Decorate your pumpkin with felt facial features – with printable (on Makely School for Girls) […]

    Reply
  9. Top 10 pumpkin decorating ideas | Top 10 Tuesday says:
    October 15, 2014 at 7:49 pm

    […] coolest kid- friendly pumpkin decorating ideas on Pinterest for a little inspiration! Adorable felt faces from makelyhome.com Kids will love making a mess with these Glittery Pumpkins from HGTV A […]

    Reply
  10. Top 10 Tuesday: Pumpkin Decorating with kids! | Top 10 Tuesday says:
    October 20, 2014 at 11:20 am

    […] coolest kid- friendly pumpkin decorating ideas on Pinterest for a little inspiration! Adorable felt faces from makelyhome.com Kids will love making a mess with these Glittery Pumpkins from HGTV A […]

    Reply
  11. Easy No Carve Pumpkins - CKD reset theme says:
    December 9, 2014 at 2:38 pm

    […] Sticky Back Felt Pumpkin – Makely Home […]

    Reply
  12. Dress Barn Near Me | clothingcharming.com says:
    November 22, 2016 at 8:57 pm

    […] Pottery Barn Style on a Budget: Halloween Edition […]

    Reply

Leave a Reply Cancel reply

Your email address will not be published. Required fields are marked *

This site uses Akismet to reduce spam. Learn how your comment data is processed.

  • Email
  • Facebook
  • Instagram
  • Pinterest
  • Twitter

About Makely

Lindsay Ballard is a former college mascot turned political geek turned roller derby playing, DIY fanatic.

Lindsay chronicles her projects, design ideas, and lifestyle tips here at Makely, where she shares tutorials and inspiration. Her DIY designs are bold and graphic, while her spirit is fun and full of color.

Lindsay lives outside of Austin, Texas with her husband (Tom), children (Zack and Emma), and dogs (Duke and Jill). She plays roller derby for the Rockin' City Rollergirls out of Round Rock, Texas.


Archives

Categories

PRIVACY POLICY
Copyright © 2009-2019 Makely School for Girls | All Rights Reserved | Posts may contain advertising content or affiliate links