What do you think of when you hear the word ‘drum’? I’d assume that most people think of their kids loudly playing a drum kit in the garage, high school football halftime shows, or their favorite rock and roll band.
But, most people aren’t us, are they? We DIYers and home decor obsessed people probably have a drum shade spring to mind instead. Or, at least I do.
I’ve been rolling around the idea in my head for the past few months on combining the best of both versions of drums. I’m glad that I let my mind wander down that path – it’s a lot of fun when I can dream up something pretty farfetched that ends up becoming reality.
Creating this fixture was actually a pretty simple process once I figured out what to do. I put together a tutorial so that you could do it, too.
DIY Drum Pendant Light
Materials Needed:
- Used Tom drum
- Short piece of scrap wood
- 4 finishing nails
- Drill
- Jigsaw
- Pendant light kit (I HIGHLY recommend the cloth cord kits from Shanell’s)
- Scissors or X-Acto knife, if needed
- Canopy
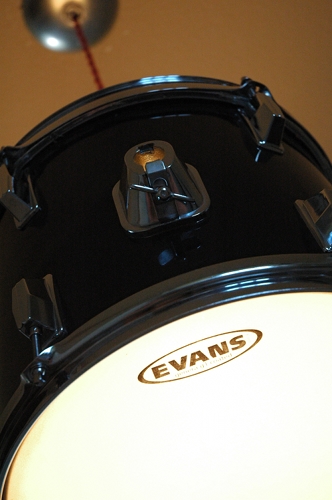
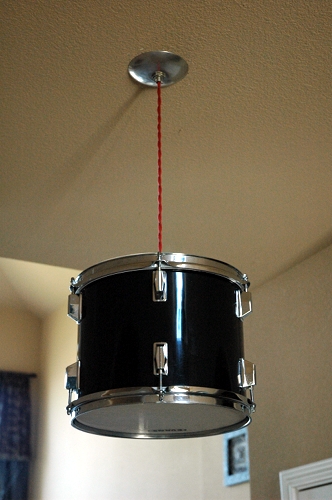
1. I bought a used Tom drum off of Ebay for under $30 shipped. I’m sure I could have found a better deal at a thrift store or pawn shop around town, but I knew what I wanted and was willing to pay a little extra so that I didn’t have to drag the kids all over town. This Tom is 12 inches tall and 10 inches wide. Any size will likely do – you’ll just want to make sure it will fit in your space.
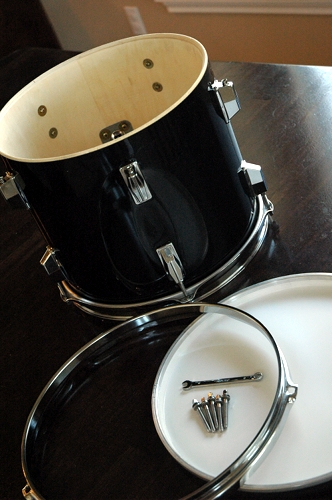
2. I removed the top and bottom of the drum by unscrewing the screws that hold it together. I was able to unscrew it with my fingers, but you may need a really small socket or “drum key.” Please note, I know not one single thing about drums, and I’m sure the top, bottom and little screws have a name. I’m going to just call them my own terms so that other non-musician DIYers, such as myself, can more easily understand the instructions. The top and bottom will separate from the chrome ring.
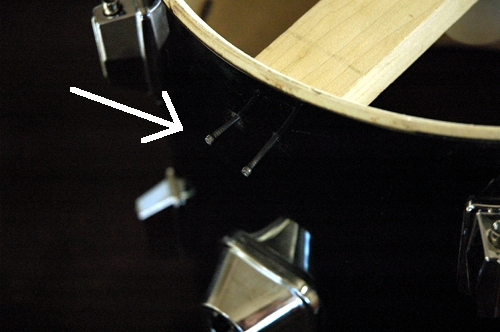
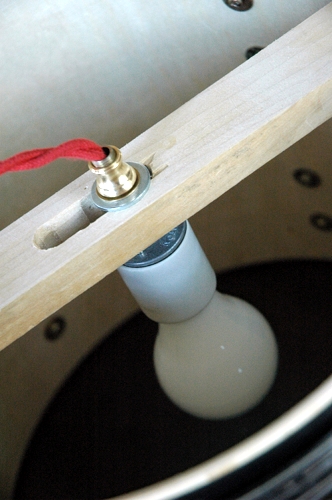
3. I cut a piece of scrap wood so that it would fit tightly inside the drum without distorting its shape. I didn’t curve the edges; I just cut it straight across. On either side, I hammered in 2 finishing nails to hold it in place (drill small holes first to make it easier). In the below photo, I hadn’t hammered them in all the way so that you could see them more easily in the photo. Obviously, hammer them all the way in. I colored the nail heads black with a Sharpie marker since my drum is black, but they are pretty well hidden by the chrome rings once you put the drum back together, so you might not have to worry about that.
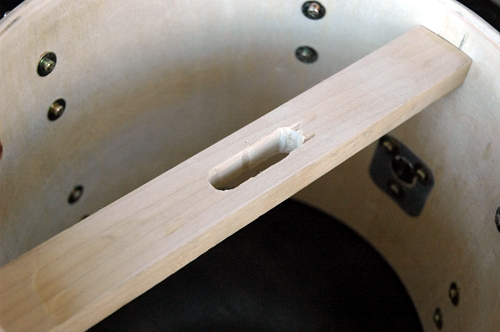
4. Once the strip of wood was in place, I needed to create a slot for my light fixture to thread through. I drilled three holes that were roughly the diameter of the the piece I needed to thread.
I used my jigsaw to connect all three holes into one long slot. The reason you need to do this is to be able to balance the drum. There is a clamp on the side of a Tom that attaches it to a drum kit, and it creates more weight on one side of the drum. The drum doesn’t hang straight from the center, so a slot gives you the ability to slide the fixture around to figure out its balance point.
5. Thread your fixture through the slot. You can pick up a light kit at a home improvement store, which you will hang by a wire and chain. OR, you can do what I did and use one of the Pendant Light Kits from Shandell’s. Instead of having the ugly chain, these kits are made from cloth cord. They come in several colors – red, gold, brown and putty – and in either nickel or brass finishes. These kits are $29 each and I couldn’t speak more highly of them. They definitely give a much more finished and vintage look to a fixture.
I have a 60-watt blub in the fixture, but that could vary by project. You will need to test it on your own drum, but mine does not get warm to the touch at all, even when left on for many hours.
6. Replace only the chrome rim on the top of your drum (where the light fixture is). You may find that you need to cut (with scissors or an X-Acto knife) the little silver ring off of the what was then the bottom head (they part you don’t play) and put that under the chrome rim. You’ll see what I mean when you start to put it back together – you want the top to be open, but you may need that silver ring as a spacer in between the drum and the rim.
Flip your drum over and attach the head (the part you actually drum) and rim to what is now the bottom of the drum. You can just screw the screws back in with your fingers.
7. Hardwire your new fixture to the ceiling. You’ll want to buy a light canopy to hide the wires. I got mine at Home Depot and spray painted it chrome.
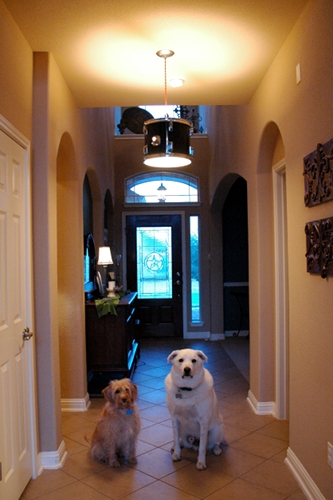
I hung my new drum pendant light in a small area of our entry way. I could not possibly be more in love with its quirkiness and originality. I bet you will be the only one in your neighborhood with this light fixture!
My favorite part about it is the amazing light it throws off at night. There is an almost ethereal glow that comes through the drum head, and the light that shines on the ceiling really highlights the fixture.
And yes, I totally bribed my dog boys with treats to sit right there. I sure love those crazy mutts, even if their constant barking makes my head feel like I’m actually living in a drum!
So, what do you think? Does the term drum shade have a whole new meaning for you now?



How cool is this?!!
This would be perfect for a music room!
That is super cute!!! Such an unexpected element!!! I think it would be fun to watch people look at it, and the really SEE it!!! 😀
I love this!!! What a creative idea! I have to go drum shopping now…
Adorable!!
LOVE THIS!!! Want to do this in my boys’ playroom now! Great job!
I just love this idea. I love to do this in my son’s room. It’s awesome.
Thanks for sharing.
Vanessa
That is amazing!!!!! I am going to have to try that, as I live in a loft and was thinking about changing my ceiling light. Great idea.
How clever are you?? I absolutely love it!!
I
LOVE
THIS!
What a unique idea! I love it! I always enjoy seeing what you’ll come up with next.
Oh my gosh – I really want one!
Totally fabulous! And the tips you give are amazing, especially the one about balancing it.
I was thinking “How did she get the dogs to sit like that?” You are sneaky with your treats!
Oh my gosh Lindsay, you’re seriously brilliant! I love drum shades, but have never imagined making one from an actual drum!! I’m going to feature this on my blog today…it’s way too cool not to share!!
K, I just posted about this! I love it!!
http://inside-outdesign.blogspot.com/2011/09/before-after-thursday_22.html
This is the best project/play on words I’ve seen in ages – I love it!
I LOVE it!! That’s about the cleverest play on words I’ve seen in a long time. Very timely since “drum” shades are so popular now. Also looks great & serves a purpose. How fabulous in a music room. And how, even with treats, did you get those 2 precious dogs to sit still for a pic? I want to hug both of them, can see why you love them so much!!
Genius! So creative Lindsay, but I wouldn’t expect anything else from you!!!
xo Jenna
با سلامÙÂایل نامبر ما Û±Ûµ Øç™ÂˆÙ„جی۲۰۱۱ می باشد و رشته همسرم Û¶ امتیازی است . مصاØÂبه ما ØÂدوداً چه تاریخی خواهد بود؟
Ho qualche perplessità sulla possibilità tecnica di utilizzare l’IMEI che è il codice del telefono (non legato quindi alla SIM)…Hai qualche dato in più?/Carlo
amboih. nak sangat menang ke nara? dapat ape kalau menang?jenis yang suruh org undi ni xsuka ni. xde keje nak undi tiap2 hari siap prinscreen, anta emel ape smua. xmenang ipad pon xpe. haha
Sad sad sad… I worked in the Italian film industry for 15 years and spent most of this time on the Cinecittà lot. Last week Teatro 5 burned up in flames, and now the place that I called home away from home is officially due to close. This breaks my heart. Some of my fondest work memories are linked to the Cinecittà microcosm. Gangs of New York, The Passion of the Christ, The Life Aquatic, Titus, HBO’s Rome…
A :A video game called FoldIt, created by University of Washington scientists, shows that people can be more effective than supercomputers — in some cases — when it comes to the difficult scientific challenge of folding virtual protein molecules for maximum internal energy.(probably a reporting mistake — the goal is to minimize internal energy)
This is such a great idea. My husband and I own a music shop and this is perfect for one of our window displays. Especially to light up at night. Thanks so much!
Lindsay I CANNOT believe you’ve done this! I thought I was so clever and original coming up with the exact same idea a few months ago. I even bought a little kid sized drum kit on Ebay (couldn’t find a single drum at a reasonable price) in preparation, and haven’t got close to completing it!
I’m both thrilled that you’ve done it (and helped me figure out how to go about it), and furious that you stole my idea 🙂
Absolutely fantastic. Well done!
Rebecca
http://www.pourameliorer.com
It looks so beautiful all lit up! Very creative. It really doesn’t even look like a drum now, just a really cool modern light fixture. Nicely done! Also thanks for the tip on pendant light kits. I like the look of the colored cord.
Dude, this is seriously creative and so awesome!
I have to say that I don’t know what a real drum shade it… so I like this version 🙂
Wow! it goes so well with the room.
Quite literally brillant play on words!!
Love the dog boys …. they are so adorable!
Great idea, really adds something different. And the dogs are hilarious, this is what my Christmas card looked like…you can see the anticipation in their eyes and a slight lean forward. Oh the things dogs will do for a treat….. =)
I saw this on Brooke’s blog! Way original and way cute. Good job!
Brilliant idea.
Oh my gosh! Love it! Hang a few more and you will give a whole new meaning to DRUM LINE!
That is so cool! How creative are you?!?!? I love that especially for a kid’s room who loves music, but it looks surprisingly sophisticated In your hallway. Well done!
How awesome is that??? What a great idea. Love it!!! So unique. Way to go
SO EXCITED about this! We are expecting a little boy and his nursery is a rockstar/music theme. This will be PERFECT!! THANKS!!
Hi Lindsay! You have just been awarded with the Versatile Blogger Award! Your blog is an inspiration. To find out more about this award check out this post: http://perfectimperfectionsbyjeanne.blogspot.com/2011/09/versatile-blogger-award.html
I am thrilled with this project ! My son is on his high schol drumline and lives/eats/breathes music ! He is even hoping for a music scholarship to UGA ! Can’t wait to get started on this first thing in the morning using the first tom he ever played ! This will look great along with his old drumsticks and framed music from previous shows !!!!!
i love drums…
Oh, this is AWESOME!!! I’m definitely going to build one for Eric’s music room renovation!
And for those who want to find cheap drums to use [in a variety of sizes/colors] without traveling around looking at flea markets and thrift stores, you need to visit http://www.shopgoodwill.com. That’s a great way to kick this project off to a perfect start!
that is really cool , i must to try this THANKS !!! : )
I love it. I have a music theme dining room with clarinet buffet lamps and music related artwork and this is just awesome. However, I need a better explanation on how you were able to hang this light fixture. The associated link works for a fixture with a chain. I don’t understand how the power cord is able to support the weight of the drum. Can you explain? Thanks for the great idea!
Hi Scott! The cloth cord I used is made to hold some weight without a chain. After I wired it to the ceiling, we tied the cord around the brace across the ceiling box, so it’s not just hanging from the wires in the ceiling. I hope that makes sense!
What a cool idea! I’ve been playing drums for over half my life… and never thought to use one as a literal drum shade. And thanks for the red cord resource… love the modern/vintage looks it gives.
Is it possible for you to make one of these for me? How much would you charge? my zip is 17313
Hi Stacey! I’m not able to make one to sell, but I bet you could do it yourself!
This is a fabulous idea. I have a large drum that will someday be used as a coffee table and your project will fit in with it perfectly! What a clever woman you are!!!
Thanks, Janet!
Wow! My awesome son, the drummer, is turning 16 on 12/12/12 and I am wanting something very special & unique for a unique birthday. THIS IS IT!! Thank you!!
This drum light totally rocks! Have to show this to my boys… You’re very talented and creative.
This looks great! I am planning to use a ‘drum’ shade for my son’s big kid room. I just need to figure out a way to work it with the ceiling fan (a much needed item in our home).
Thanks, Christine! Have you seen the different tutorials on using a regular drum shade on a fan? Here’s one from my friend Sarah: http://thriftydecorchick.blogspot.com/2011/04/prettying-up-ceiling-fan.html Maybe some sort of adaptation of that would work.
Yes, I have that seen tutorial, as well as others. Just a matter of finding something that also pleases my husband’s tastes. (He’s anti-drum shade on the ceiling fan.) Thanks for your reply!
Ha! Yes. Well, that’s always the problem, isn’t it? At least it is at my house… I can generally say to mine, “This is happening, so you can either help me or not.” I’m mean. 😉
This fabulous funky and you…Love it!!!
Thanks, Julia!
hey there and thank you for your information _
I’ve definitely picked up anything new from right here. I did however expertise some technical points using this website, as I experienced to reload the web site a lot of times previous to I could get it to load correctly. I had been wondering if your web host is OK? Not that I’m complaining,
but slow loading instances times will sometimes affect your placement in google and
could damage your high-quality score if advertising and marketing with Adwords.
Well I’m adding this RSS to my email and can look out for much more of your respective interesting content. Ensure that you update this again soon.
I made a different kind of drum shade light about a year ago…hubby kept asking me to use a real drum though. I didn’t think it would work Now I know better, and he can gloat a bit, lol. That looks amazing!
LOVE this! I’m TOTALLY stealin this idea for the studio my hubby is putting in our basement!
This is great! My hubby is a drummer, and this will be adorable in his drum room. Oh,..and those little screw things are called lugs. 🙂
Actually, they’re called tension rods – the lugs are the part connected to the shell that the rods screw into. Hope your project turned out well, I’m sure your hubby appreciated it!
(yeah, I realize this thread is two years old – just got sent the link on Facebook…)
i have a drum and was going to make a coffee table….but i have lots of coffee tables…now i will have a new light.i was trying to find a cool one online to put in my entranceway, now i wil! i wont be able to get my 2 dogs to sit for the photoshot though.they are not even able to be bribed…..as soon as the camera comes out they have to walk up to me to see it. grr thanks for the great idea,
As a musician, I really appreciate this idea. Plus it actually works. Great creativity.
Super cool. I love quirkiness!
Aquired a tom at the dump for free (score!), borrowed a drum key, planned on soaking the hardware in *name brand* cola, then was all like ‘how am I gonna??’ Ah, THIS. Thanks for making it not intimidating!! And taking the time to post it!
How did you put the drum hoops back on without them sliding down the drum? (As they have a larger diameter than the drum itself)
Im obviously a few years behind on telling you that this is a GREAT idea. So…this is a GREAT idea! Thanks for posting.
I build drums for a “living” and this is a perfect plan for some of my mistakes. NO!…Not mistakes, I meant ummmm…
“EXTRAS”. Ya – extras. I forgot that drummers don’t make mistakes, we blame the lead singer!
Thanks again!
This is awesome! I must admit, as a musician I am giggling at your terms from the drum parts. Great diy though, looks great!
Hi to every body, it’s my first go to see of this blog; this webpage contains amazing and actually excellent
information for readers.
That’s a cunning answer to a chgenllaing question
christian roulleau dit :Bonsoir tous,Si tous les pêcheurs sont respectueux, il n’y a rien à craindre pour les pêcheurs truites , ni de la part de la garderie .