Makely

Let's Make Life Awesome

  • Home
  • Decorating/DIY
    • Create Your Decor
    • Decorate Your Home
    • Paint Your Walls
    • Transform Your Furniture
  • Healthy Living
    • Essential Oils
    • Family Wellness
    • Household Care
  • Project Gallery
  • Contact
You are visiting: Home » Archives for Lindsay Ballard » Page 213

What to do When Temporary Shades Become Permanent

by Lindsay Ballard on November 10, 2011 1,890 Comments

When we moved into our home several years ago, we hung temporary shades on the five large windows in our bedroom.  Our intention was to use them for some privacy for the few weeks before we could hang some custom blinds or shades instead.

Well, those “few weeks” sped by fast.  And then a month passed.  And suddenly, I realized that those temporary shades had been hanging there for 9 months, and I could no longer refer to them as temporary.  Yikes!  I tore them down and hung curtains that we just opened each morning and closed each night.

This past March, I took those curtain panels down, too.  The old panels no longer fit the vision for my master bedroom, and they have been relocated to a friend’s church.  I turned to temporary shades…again.  And they are still there…again.  Do you see a pattern here?  Temporary shades are meant to be temporary, and apparently no one clued me in on that.

Our windows are very tall, which is wonderful for the natural light that pours into the room.  However, it’s awful when you have to buy blinds and shades because they have to be custom made.  As we all know, custom usually equals much more expensive.

I found a place online that had cordless Top Down/Bottom Up cellular shades for a great price.  But as with any purchase from an unknown online retailer, I was concerned that the quality or experience would leave a lot to be desired.  So, I just ordered one as a test.

Yep.  So now, instead of having 5 temporary shades in my bedroom, I have 4 temporary shades and 1 fabulously priced cordless Top down/Bottom up cellular shade.  I am getting ready to place my order for the 4 other cellular shades, because the quality is so top-notch.

I wanted to wait until I had my one test shade installed before I told you about Payless Decor, the online retailer where it came from.  They don’t know me at Payless Decor, don’t know that I have a blog, and certainly never asked me to write a post about them.  I just couldn’t help but share their site in case you are looking for new custom blinds or shades for your home.  Compared to the other retailers I received quotes from, I think I paid about 30% less than the other places (even when the other retailers were running 50% off sales!).  From the free sample swatches, to the quality of the shade, to the personal email I received as follow-up, I was very impressed with the entire process.

If your temporary shades have become permanent, I would definitely recommend you checking out Payless Decor.  I can’t speak for anything other than the cordless shades, but they also carry faux and wood blinds, roller shades, bamboo shades and drapery.  I’m looking forward to replacing those other 4 almost-permanent temporary shades.

Oh.  Are you wondering about that oddly hung chandelier in the photo above?  It has a whole back story which I’ll get to next week.  Obviously, it’s not staying where it is.  My five year old son has helpfully pointed out that it is too low and that I need to move it.  I can’t wait until he starts telling me how to dress.
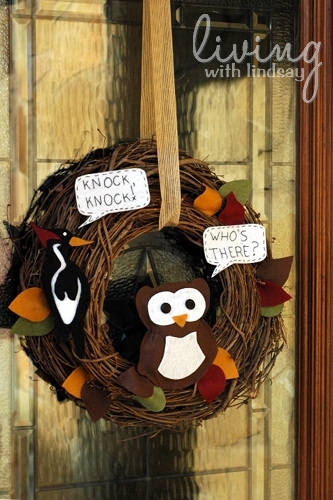
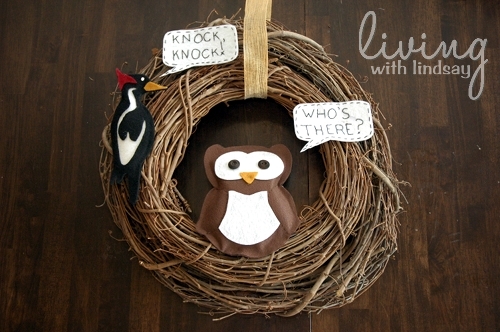
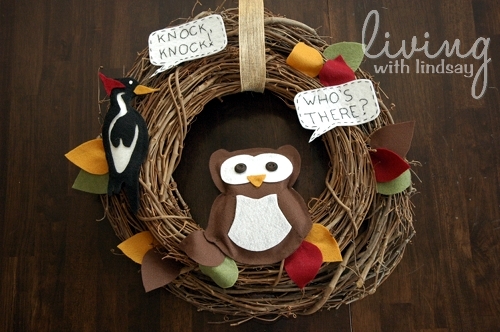
Knock, Knock! Who’s There? It’s a DIY Wreath!

by Lindsay Ballard on November 8, 2011 2,195 Comments

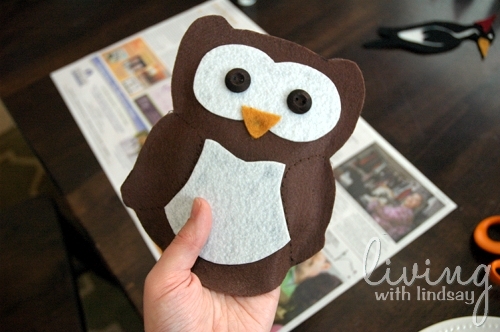
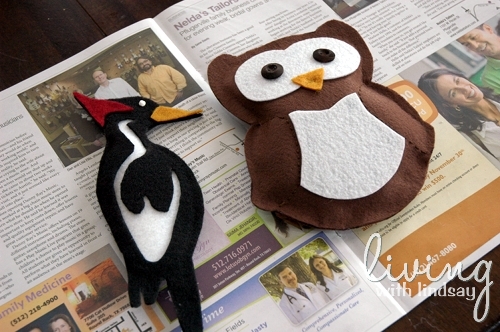
Back when Zack was about 3 years old, I created an adorable fall themed t-shirt for him.  On the front, there was a woodpecker saying “Knock, Knock!”.  On the back, an owl answered “Who’s There?”  I thought it was a clever play on words, and I hated that he outgrew it so quickly.

This past weekend, that shirt popped into my mind and it occurred to me that the idea would be so much fun on a front door.  I pulled out my applique patterns from my sewing archives (I sound like Rachel Zoe!), and a whimsical autumn wreath was born.


This wreath is incredibly simple to put together – if you can use scissors and a glue gun, you have all the skills needed.  I even turned my original appliques into a free, downloadable template, so it takes all of the “I can’t draw!” fears off the table.  Follow along and create your own.

DIY “Knock, Knock!  Who’s There?” Wreath

The owl and woodpecker wreath can be put together for under $2o, and likely less since you probably have some of the supplies on hand.  The list is long, but it contains very inexpensive items. You will need:

  • Scissors
  • Glue gun and glue sticks
  • Brown felt (9″x12″ size) – 2 sheets
  • Black felt (9″x12″ size) – 2 sheets
  • Olive green felt (9″x12″ size) – 1 sheet
  • Gold felt (9″x12″ size) – 1 sheet
  • Crimson felt (9″x12″ size) – 1 sheet
  • White stiff felt (9″x12″ size) – 2 sheets
  • Medium brown buttons (2) or brown fabric paint
  • Tiny white button (1) or white fabric paint
  • Needle
  • DMC Embroidery floss – black and brown
  • Polyfil
  • Craft wire
  • Ribbon (at least 1 1/2 inches wide)
  • Grapevine wreaths – 18″ and 14″ diameters
  • Sharpie marker
  • Pencil
  • Chalk or white paint marker
  • Printer
  • Barrette clips (optional)

Let’s get started on the wreath!

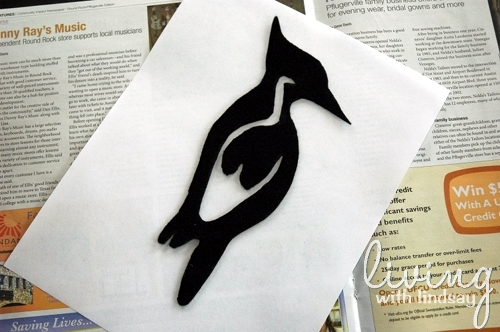
1.  Gather your supplies and download the free template I have put together for this project.  Click HERE for the templates, and the PDF will either open on your screen or save to your computer (depending upon how you have your browser set up to handle downloads).  Cut out each printed pattern.

2.  Trace your patterns onto the felt with a Sharpie marker (except for the black felt, which will need chalk or a white paint marker).  Cut out the patterns along the inside of the Sharpie line (do each shape won’t have a black outline). Each pattern tells you how many you should trace onto each color of felt.  Note: Per the template, the squiggly feather detail for the woodpecker is to be cut out of one of your black woodpecker cutouts.

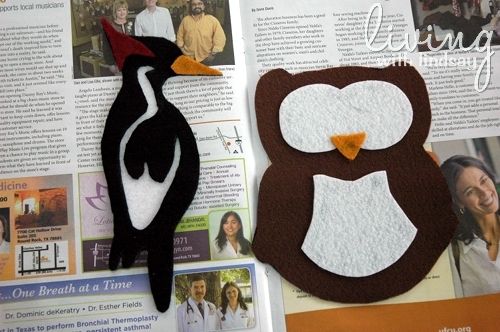
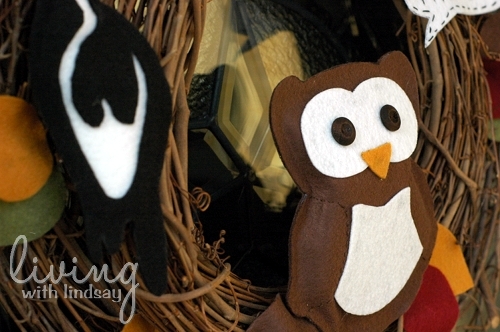
3.  Set aside the leaves, speech bubbles, 1 brown owl body and 1 black woodpecker body, and assemble the rest of your owl and woodpecker with hot glue.  Use a sparing amount of glue so that it doesn’t ooze.  The white portion of the woodpecker is glued behind the wing detail that you previously cut.

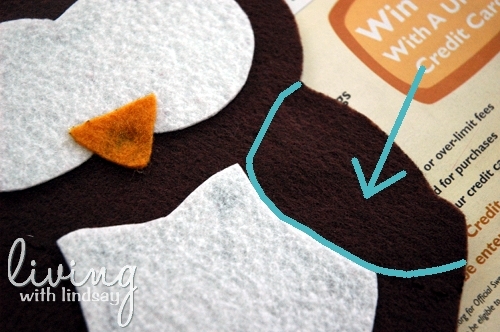
4.  Add the wing detail onto the owl.  I used brown embroidery thread and a needle to free hand stitch along the blue line below.  I tried to take photos of my stitching, but it’s the exact same color as the felt and didn’t show up in the photos.  I stitched along both of the owls wings.

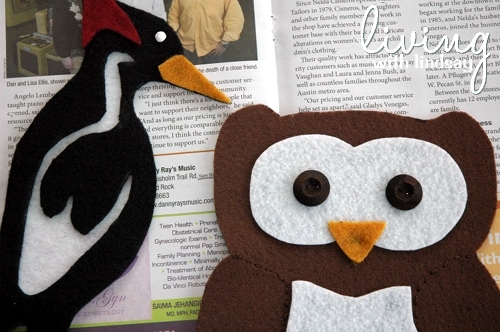
5.  Add eyes to both birds.  I had two brown wooden buttons in my button stash and hot glued them onto the owl.  I didn’t have a small enough white button for the woodpecker’s eye, so I just applied a dot of white fabric paint.

6.  Take the brown owl body cutout that you set aside and hot glue (along the edges only) it to the back of the owl.  Leave it open about 3 or 4 inches along the bottom.

In the open hole, stuff a bit of Polyfil to give the owl some shape.  If you can’t reach the top of the owl, gently push some Polyfil up with your scissors.  Once it’s stuffed, glue the hole closed.   Repeat the process for the woodpecker.

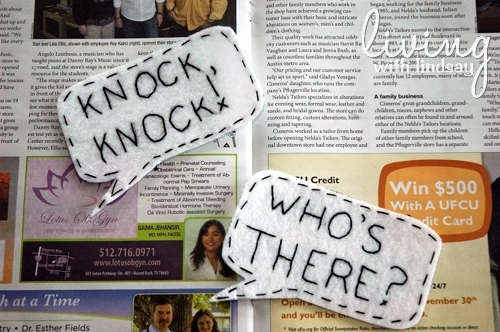
7.  Grab your speech bubbles.  With your pencil, write out “Knock, Knock!” on one and “Who’s There?” on the other.  Using your black embroidery floss and needle, embroider the phrases with a back stitch.  If you don’t know how to do that (and it is CRAZY easy once you learn it), check out this tutorial that Shelli from Needle in a Haystack shared with us a while back.  I also stitched around the edges of the speech bubble to give it a more whimsical look.  Remember, whimsy means that it doesn’t have to be perfect!

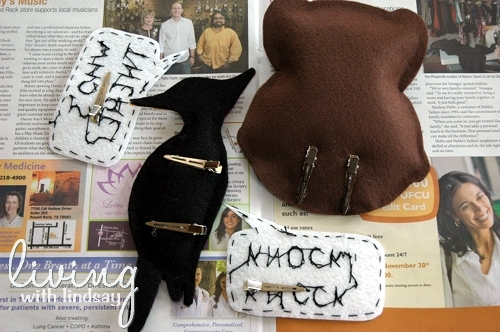
8.  Optional step: Hot glue some barrette clips on the back of your birds and speech bubbles. I used two on the birds (owl glued vertically and woodpecker glued horizontally) and one on each speech bubble (glued horizontally).  You could probably just hot glue the birds and speech bubbles directly onto the wreath, but I thought the clips would help them to stand up better (particularly the owl).

9.  Wire your two grapevine wreaths together with the craft wire.  Mine are wired in four places on the back of the wreaths.  Then, attach the birds and speech bubbles to the wreath using either the barrette clips or hot glue if you didn’t use the clips.  I always loop my wreath hanging ribbon around the wreath when I am attaching elements so that I know how it will hang.

10.  Lastly, hot glue your felt leaves around the wreath.  I put some around the owl to look like he was sitting in a tree (the grapevine represents the branches) and a few around the woodpecker.  The rest I added in clumps around empty parts of the wreath.  You can add more or less depending upon your own aesthetic.

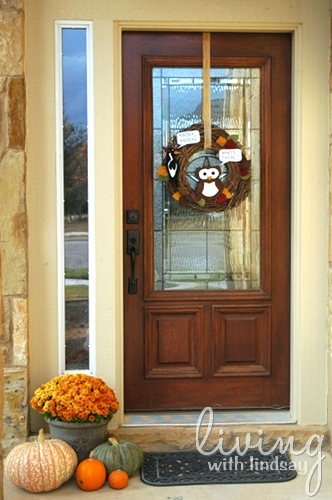
11.  Hang the wreath with the ribbon in the place of your choice.  If you hang it on your front door, please make sure that the door isn’t directly exposed to the elements – I’m not sure how it would stand up to getting soaked from the rain or snow.

I often get asked how I hang my wreaths with ribbon.  I loop the ribbon around the wreath and tack it with a finishing nail on the top of my door.  I have one little hole on the top of my door and just use it for every wreath I hang.

I think this wreath is such a hoot!  You knew I was going to go there at some point, didn’t you?

Do you think you have time to put one of these wreaths together before you haul the Christmas decorations out of the attic?  If you have any questions, let me know!

« Previous Page
Next Page »
  • Email
  • Facebook
  • Instagram
  • Pinterest
  • Twitter

About Makely

Lindsay Ballard is a former college mascot turned political geek turned roller derby playing, DIY fanatic.

Lindsay chronicles her projects, design ideas, and lifestyle tips here at Makely, where she shares tutorials and inspiration. Her DIY designs are bold and graphic, while her spirit is fun and full of color.


Archives

Categories

PRIVACY POLICY
Copyright © 2009-2019 Makely School for Girls | All Rights Reserved | Posts may contain advertising content or affiliate links