Makely

Let's Make Life Awesome

  • Home
  • Decorating/DIY
    • Create Your Decor
    • Decorate Your Home
    • Paint Your Walls
    • Transform Your Furniture
  • Healthy Living
    • Essential Oils
    • Family Wellness
    • Household Care
  • Project Gallery
  • Contact
You are visiting: Home » Decorating/DIY » Create Your Decor » Page 135

The Wonderful World of Wall-E

by Lindsay Ballard on February 12, 2009 8 Comments

If you have a child who is obsessed with Wall-E, you know what it’s like when he makes you call him Wall-E and he refers to you as Eve, not Mom.

If you have a child who is obsessed with Wall-E, you have hidden all of the fire extinguishers in your home.

If you have a child who is obsessed with Wall-E, you well know that Toby’s Windmill from the Island of Sodor is a perfect substitute for Auto.

Photobucket

If you have a child who is obsessed with Wall-E, you’ve had to buy a Rubik’s Cube because Wall-E has one.

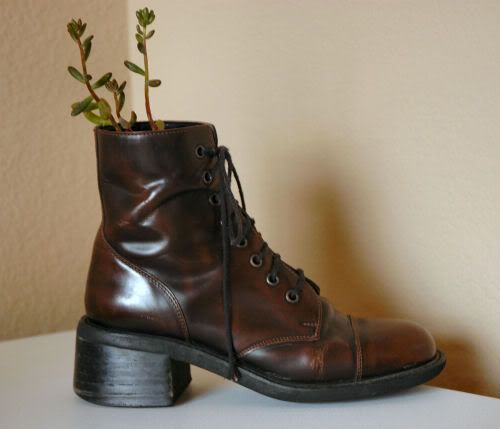
If you have a child who is obsessed with Wall-E, you have heard all you ever wanted to hear about the “Growing Shoe.”

And if you have a child who is obsessed with Wall-E, you now understand why I am the coolest mom on Earth.

Photobucket

You can make one, too! Just buy some old boots at a thrift store and a little plant from a home improvement store. Turn a paper cup upside down inside the shoe to prop up the little plastic pot the plant comes in, and voila! You’ll have to take the pot out of the shoe to water the plant and let it drain before you put it back into the shoe, but I promise that your little Wall-E fan won’t mind at all.

Are you like Zack and hooked on Wall-E? Hooked on something else? If not, check out Hooked on Houses and see if you can find a little inspiration!

I Heart My New Curtains

by Lindsay Ballard on February 10, 2009 793 Comments

Thank you, Dear Internets, for helping me select a color for my bedroom curtains. If you recall, I was trying to decide between muted green and light blue. You resoundingly said that blue was the way to go. Golly Gee, I think you were right.

Photobucket
Photobucket

I know you’ve been losing sleep wondering how the curtains were turning out. They are gorgeous, if I do say so myself…and I do. No one every accused me of being humble. 🙂

I’ve put together a little tutorial for you in case you want to try this at home. Really, it’s super easy. Just keep in mind that I’m not finished decorating the room, so the blank walls, ugly recliner, and decorator table will soon have some delightfulness added to them.

For the little valences, I measured the width of my windows and added 4″ to that measurement. Then, I figured out how tall I wanted them to be by playing with a scrap of fabric on my window and then added 2″ to that measurement.

I got out my iron and sewing gauge (Seriously, if you don’t have a sewing gauge, turn off your computer, get in your car, and go buy one.) and pressed the sides and bottom of the valence in by 1″. I sat down at my sewing machine and stitched a 5/8″ seam allowance on the pressed edges.

I decided to line the valences since they were white and I figured the sunlight coming through the back of them would really wash out the navy toile pattern. For the linings, I cut the width 2″ shorter than the valence fabric and the length 1″ shorter. I pressed in the seam allowances and stitched the hem on the sides and bottom in the same way that I did the valence piece.

Then, I lined up the top edges of the valence and lining pieces and pressed them under 1″ and stitched with a 5/8″ seam allowances. Now, the valence and lining are all one piece, with the lining being 1″ shorter than the valence on each side and the bottom. Are you following me?

Photobucket

You’ll notice that I put wrong sides together when lining up the valence in the lining. I didn’t want the raw edges of the lining to show from the outside of the window. That’s just me being insane. You don’t have to do that unless you are crazy like me.

I then sewed a wonderful navy blue tassel fringe to the bottom of the valence piece only (not the lining). You remember how I feel about fringe, right?

Then, I jumped up on my ladder and literally stuck the valences on the wall with upholstery tacks, a la Nester.

Photobucket

I used 5 tacks for each valence, but you may need to use a different number depending upon the width of your window.

Photobucket

Next, it was time to move on to the curtain panels. I knew that I wanted the top of the panels to line up with the top of the valences. I also knew that I wanted them to pool on the floor a bit. I measured from the top of the valences to the floor and added 6″ to that measurement (1″ for top hem, 1″ for bottom hem, and 4″ to pool). This was going to be the finished length of my curtains.

I had 2 fabrics I wanted to use for the panels – a light blue drapery fabric and a railroaded denim that I also used in my bedskirt and pillows. When using 2 fabrics for a panel, you want to use one for 2/3 of the length and the other for 1/3 of the length (it’s more pleasing on the eye this way). I divided my finished measurement into thirds to determine how much of each fabric I needed to use (don’t forget to add in your seam allowance for the joining seam!).

I wanted full curtains, so I just used the full width of my fabric for each panel. The denim fabric was actually a little bit wider than the blue fabric, so I just trimmed the denim to make it the same width.

The first thing you will want to do with these fabrics is join them with a seam. I just matched up the raw edges, sewed a 5/8″ seam allowance, and pressed the seam open.

I didn’t want the seam line to be visible on my finished product, so I picked up some trim at the World’s Best Home Dec Fabric Store (If you live in the Central Texas area, ask me where this store is located!). I was originally going to sew the trim onto the panels, but a) I was lazy, b) I was concerned that I wouldn’t be able to sew the trim on absolutely straight, and c) did I mention I was lazy? So, I just glue gunned it.

Photobucket

Tom calls that “half-assing.” I call it being smart. TomAto, Tomato. Whatever.

After that, I pressed in all 4 edges of the panel by 1″. Then, you guessed it, sewed it with a 5/8″ seam allowance. I think it took me longer to type those last two sentences than it took me to sew them. Well, maybe not, but it was super fast and easy.

Then, in my best Princess-y voice, I asked Tom to hang my curtain rods. I was using ring clips from to hang them on the rod, so he had to make sure that the bar was hung at just the right height so that the clippy parts of the clips lined up with the valence. Yes, I’m pretty particular.

A side note about the rods – people, they were $5.99 each from Ikea, including the rods, brackets, and finals. I could not believe it. And they are cute, not weird trendy like a lot of Ikea stuff. Run, don’t walk, to get some for yourself. I think the clips were $1.99 for a package of 10.

After the rods were hung to my liking, I jumped up on the ladder and hung my new panels! So much of window treatments is actually playing with the fabric – tucking here, poofing there – to make it look exactly right. Expect to play around with it to get it how you want it.

Photobucket
Photobucket

We have a big bay window (that doesn’t photograph well due to the sunlight), and I needed to devise a way for the curtain rods to join together at 45 degree angles in the corners. I took my rods to the home improvement store, bought 45 degree angle PVC pipe fittings from the plumbing department that fit onto my rods, and spray painted them with black Krylon Fusion spray paint for plastic. You can also do this with 90 degree angle pipe fittings if you have two windows close together in a corner. I think I’m a genius.

Photobucket

I absolutely love my new curtains and am so happy to be able to take the temporary shades down (Only 10 months after we moved in, but who’s counting?). We have SO. MUCH. LIGHT. in this house, so I didn’t really want to put blinds up in the bedroom. I wanted ALL the light to stream in.

I think Jackson likes all the light, too.

Photobucket
He’s the reason I have to have solid white linens on my bed. He’s a good reason, don’t ya think?
« Previous Page
Next Page »
  • Email
  • Facebook
  • Instagram
  • Pinterest
  • Twitter

About Makely

Lindsay Ballard is a former college mascot turned political geek turned roller derby playing, DIY fanatic.

Lindsay chronicles her projects, design ideas, and lifestyle tips here at Makely, where she shares tutorials and inspiration. Her DIY designs are bold and graphic, while her spirit is fun and full of color.


Archives

Categories

PRIVACY POLICY
Copyright © 2009-2019 Makely School for Girls | All Rights Reserved | Posts may contain advertising content or affiliate links