I have an addiction that I need to get off my chest. It’s stronger than my addiction to Facebook. Stronger than my addiction to Sons of Anarchy. It’s even stronger than my addiction to coffee, which says more than you know.
My name is Lindsay, and I am addicted to decorative glaze.
It all started about this time last year. I rehabbed an old dresser with a gorgeous yellow paint, but I thought it needed something more. So, I followed Mandy‘s and Mandi‘s advice and got some Ralph Lauren glaze from my local dealer (heh, “dealer”). He tinted it to Black Silk and the finished project brought me such a high.
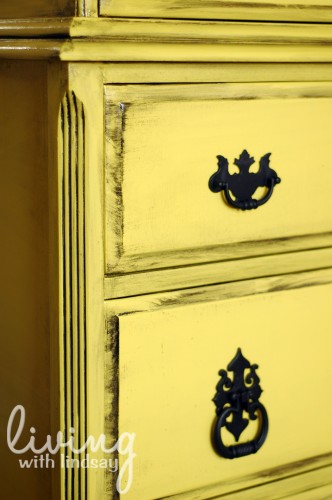
As a gal recovering from DADD, I knew that I shouldn’t try it just for fun. But, I did. And then again (on a gray dresser). And again (on a bed). And again (on some frames).

At first, the rush I felt was at the newness of putting on the glaze. I had to perfect my technique by removing the glaze with various combinations of wet and dry cloths. I felt like an artist. Then, I moved on from my gateway drug – wooden pieces – to a new world of glazing plastic and metal surfaces.

Now that my addiction has reached critical mass, I am simply unable to paint anything a single color without thinking that it’s dull and one-dimensional. My fingers just itch to open that can of glaze (yes, I’ve only used about half the quart after all of those projects – it lasts forever). I’m afraid I’m going to need to explore some sort of glaze related rehab.
Never glazed a piece before? Here’s a quick run down on the steps involved.
How to Glaze Wooden Furniture and Frames
1. Paint the piece your base color and allow it to fully dry.
2. Load a cheap paint brush (like a chip brush) with glaze and dab it onto your piece. I like to work in smallish sections of about 12 inches x 12 inches at a time. Make sure you really work the glaze into any details or imperfections you wish to bring out.
3. Lightly wipe the glaze with a wet (but not dripping) cloth. You can use any sort of clean rag to do this. I just buy the bags of wiping rags from Home Depot.
4. With a dry cloth, firmly wipe away the glaze that is left standing on top of the piece (i.e. not in the details).
5. Using a different wet cloth, wipe the surface again so that the glaze doesn’t look dingy.
6. Move on to your next 12″x12″ section using the same steps. However, when you are wiping, use clean areas of your various cloths. I generally go through 3 sets of cloths for a piece the size of a tall dresser.
7. Once you are finished and are happy with the results (keep adding glaze or keeping wiping off if you are not), let the piece dry. I usually add a protective finish, such as a polyurethane, to my painted pieces.
8. Marvel at your piece. Wonder why you’ve never glazed anything before. Become addicted. Know that we are in this together.
Anyone else need a 12 step program?

 Original source unknown
