Makely

Let's Make Life Awesome

  • Home
  • Decorating/DIY
    • Create Your Decor
    • Decorate Your Home
    • Paint Your Walls
    • Transform Your Furniture
  • Healthy Living
    • Essential Oils
    • Family Wellness
    • Household Care
  • Project Gallery
  • Contact
You are visiting: Home » Decorating/DIY » Page 5

Sometimes Refinishing Furniture Makes Me Want to Throw a Tantrum

by Lindsay Ballard on November 10, 2015 5 Comments

Back in April 2014, I found on bed on Craigslist that I just HAD to have for Zack’s room.  It had great lines and only needed a little work, which sounded awesome after just finishing Emma’s green bed.  I wasn’t quite ready to work on it, so I put it aside in the garage.

Two in a half years later, I decided that there was no better time than the present.  HAHA!  Procrastinators unite!

After I got the bed cleaned up, I could tell that the finish on the veneer was peeling and bubbling in places.  It wasn’t in perfect shape when I got it, but I’m sure that hanging out in the hot garage for a few years didn’t help its case.

No hassle update for a Mid-Century Modern bed

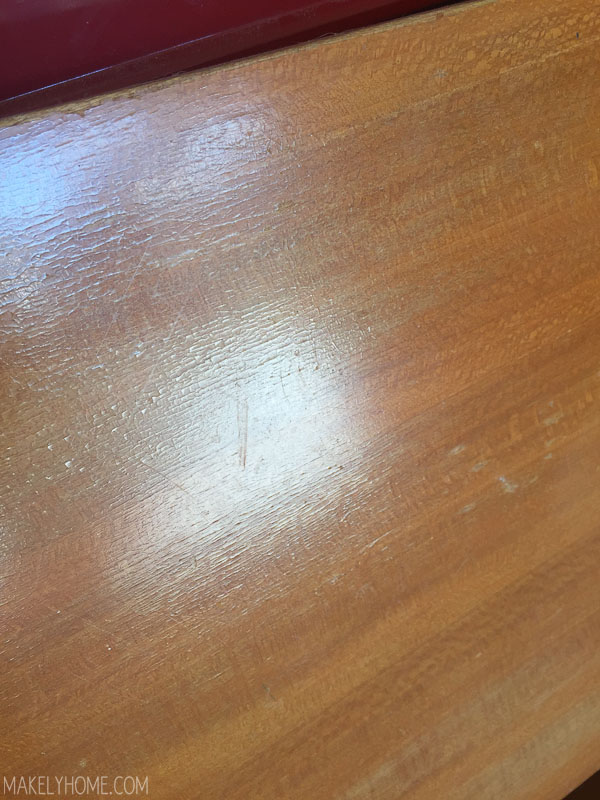
Well, it was time for me to get started refinishing furniture again.  I decided to do some light sanding on it to see what would happen.  It’s always touchy when you sand a thin veneer, because if you can easily go through the veneer.  Like this.

No hassle update for a Mid-Century Modern bed

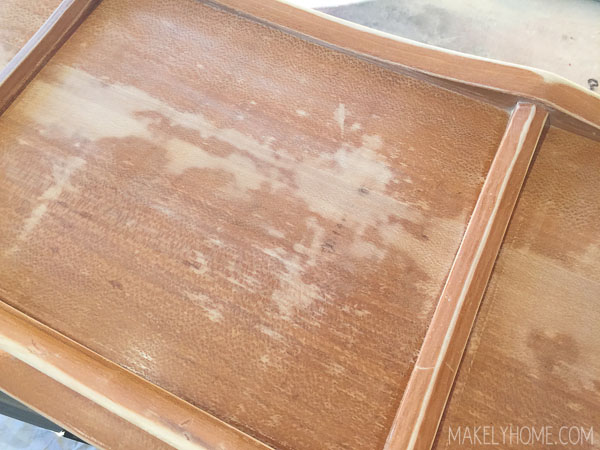
Okay, so that’s not EXACTLY what happened.  The veneer was pretty marred in these spots and felt really rough, so sanding it down was a decision that I made and not an accident.  But, it could easily happen if you aren’t careful!

Because I just couldn’t handle this turning into a multi-day project, I started thinking about how I could save this bed.  I could paint it, but I really didn’t want a painted finish.  My friend Marian suggested that I use a chemical stripper to take the stain off the veneer (which was actually the “right” thing to do), but that made me feel like Andy from Wet Hot American Summer.

So…that wasn’t going to be the right answer for me.

…

Read More »

Building This Adjustable Five Arm Brass Chandelier Basically Put Money in My Pocket

by Lindsay Ballard on November 6, 2015 2 Comments

As is the continuing saga of my life, I fall in love with light fixtures on a daily basis.  DAILY.  And if see a homeless light fixture, it comes home with me.  Some people adopt pets.  I adopt light fixtures.  Well, I do have two adopted dogs, so don’t throw things at me.

So, when I was planning for Zack’s new room, I desperately wanted a $350 light fixture from Shades of Light.  Y’all, that’s a lot of money to spend on a light for a bedroom.  I’m okay with that kind of cash in a living room, but not so much in a room that not many people will ever see.  However, I was obsessed and really considering it, but then I noticed that it took G9 Halogen bulbs and I CAN’T GET DOWN WITH THAT.

Back to the drawing board.  I knew I wanted a brass fixture that had room for fun bulbs.  After lots and lots of searching, I came across the Odyssey 4 Chandelier from Schoolhouse Electric.  ANOTHER $350 light fixture, y’all.

5 Arm 5 Arm Adjustable Brass Chandelier DIYAdjustable Brass Chandelier DIY

Okay, so hear me out.  This one is pretty cool.  The socket connectors are adjustable, so you can change the direction of the bulbs.  Fun, right?

Screen Shot 2015-11-06 at 10.47.05 AM

But, even though I think it is cool, it is still $350.  And the fact that it had an even number of arms really bugged me.

After some more searching, I came across this post from Mandi at Vintage Revivals and this post from Kelsey at Simply My Simple.  They both pointed to a website where they bought brass parts to build their own chandeliers.

Challenge accepted.

5 Arm Adjustable Brass Chandelier DIY

So here’s what happened.  I ordered a bunch of parts and was going to do a tutorial for you on how I built it.  But, my sweet husband put it together one day as a surprise when I was at roller derby practice. I actually really loved that he did that, so sorry that you don’t have a tutorial.  However, Mandi’s and Kelsey’s tutorials will walk you through the general things you need to know.  The rest is like Tinker Toys.

5 Arm Adjustable Brass Chandelier DIY…

Read More »

« Previous Page
Next Page »
  • Email
  • Facebook
  • Instagram
  • Pinterest
  • Twitter

About Makely

Lindsay Ballard is a former college mascot turned political geek turned roller derby playing, DIY fanatic.

Lindsay chronicles her projects, design ideas, and lifestyle tips here at Makely, where she shares tutorials and inspiration. Her DIY designs are bold and graphic, while her spirit is fun and full of color.

Lindsay lives outside of Austin, Texas with her husband (Tom), children (Zack and Emma), and dogs (Duke and Jill). She plays roller derby for the Rockin' City Rollergirls out of Round Rock, Texas.


Archives

Categories

PRIVACY POLICY
Copyright © 2009-2019 Makely School for Girls | All Rights Reserved | Posts may contain advertising content or affiliate links