Makely

Let's Make Life Awesome

  • Home
  • Decorating/DIY
    • Create Your Decor
    • Decorate Your Home
    • Paint Your Walls
    • Transform Your Furniture
  • Healthy Living
    • Essential Oils
    • Family Wellness
    • Household Care
  • Project Gallery
  • Contact
You are visiting: Home » Project Gallery » Page 47

Nancy Drew and the Case of the Ringing Doorbell

by Lindsay Ballard on August 23, 2012 2,633 Comments

Our planned neighborhood is now in Phase 4 out of like 75 phases.  New neighbors are constantly moving in to their newly finished homes, so even though we’ve lived here for over four years, we still meet new people every time we are outside.

If you’ve lived in a planned community under construction before, you know that door-to-door salespeople can smell new neighbors like a shark can smell blood in the water.  I honestly see them every single day walking up and down the streets, looking for fresh meat.  They are trying to sell their security systems, water softeners, pest control and lawn services.  In fact, sometimes they even ARE selling meat.

This is the part of living in a new neighborhood that I hate.  What’s worse is when they ring my doorbell to sell me a water softener (that I already have) and wake my napping toddler or make my dogs bark.  It just makes me crazy!

So, I decided to try to put an end to that.
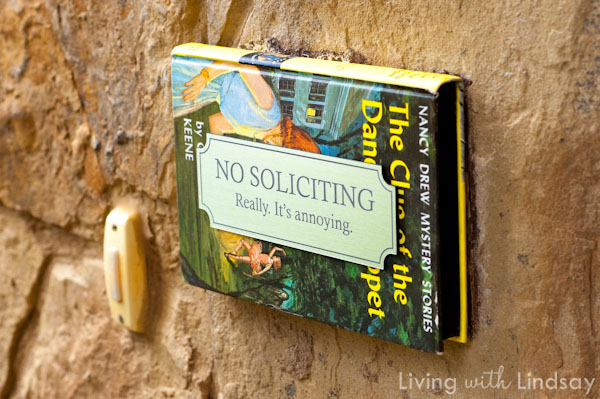
Since I’m not one to just put a typical “No Soliciting” business-like sign or even a Post-It Note over my doorbell, I had to get creative.  I found the “No Soliciting.  Really.  It’s annoying.” plaque for a song during a Fab.com sale.  Is it a little rude?  Perhaps.  Is it ruder than someone waking up my baby or making my dogs bark just to try to sell me something that I don’t want?  Absolutely not.  Plus, I find it funny, so hate me.

The plaque itself was pretty small, so I decided to make it a little more substantial.  I found this Nancy Drew book at Goodwill for $1.99.  Okay, I can feel the collective jaw drop of the Internet and I know y’all are ready to discend upon my house with your pitchforks.  Nancy Drew fans and collectors – PLEASE don’t give me a hard time about using this book.  Just know that I chose it because it made me smile, and I’m pretty sure that’s what Nancy would want.  Plus, there were tons of them at Goodwill (so look there if you are a collector!).

To make sure that the book could withstand the Texas humidity, I clamped the book closed and applied three layers of Mod Podge to the edges of the pages.  The Mod Podge sealed it shut really well.  I sprayed the edges, cover and spine with a clear acrylic sealer and then glued the plaque to the front.  I used Liquid Nails to attach it to the stonework on the front of my house and held it in place with duct tape overnight.  When I’m ready to take down the sign, the Liquid Nails can be removed with a scraper and mineral spirits, so the stone will be no worse for the wear.
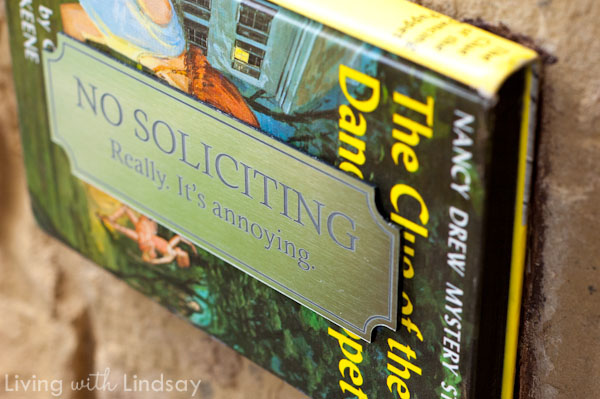
Will my book sign cut down on door-to-door sales?  I don’t know.  But, I can certainly say that there is no way that they won’t see the sign.  And on days when I’m feeling extra feisty, I can point at it and say, “Can you read?”

However, I just might have to put a “Girl Scouts are Okay” Post-It Note up when it’s Cookie Time.  I’d hate to miss my chance for some Thin Mints.

Do you have (or need to have) a no soliciting sign by your front door?

********************

Speaking of soliciting, did you know that you can advertise your small or large business right over there in the sidebar of this blog?  Craziness!

Over the years, I’ve gone back and forth on allowing and not allowing private ads in my sidebar.  After a lot of soul searching, I’ve decided that it is a go.  I’ve hinted around to some big, fat changes Living With Lindsay is going to go through in the coming months, so I thought I’d point out the opportunity if you’d like to get in while the getting’s good.  Just send an email telling me a little bit about your business to lindsay@makelyhome.com, and we’ll chat!
How to Make a Vintage Inspired Carnival Sign

by Lindsay Ballard on August 15, 2012 2,245 Comments

Have you ever had one of those project ideas that rolls around in your mind for months and months?  You can envision how the final product will look, but you have a hard time coming up with the steps to get there?  Yeah, me too.

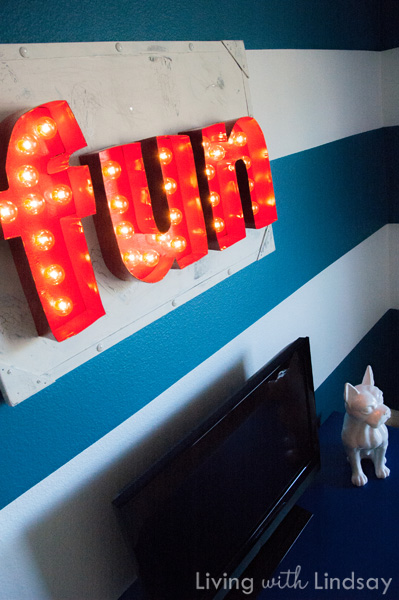
For several years now, I’ve wanted a vintage carnival sign lit with small, globe bulbs.  I’ve seen the real deal at antique shows for mega bucks ($500+), but I just knew there had to be a way to fake my own custom version for cheaper.  I much prefer an authentic product, but sometimes my budget won’t allow it.  My problem with building one on my own was getting the casing around the lettering just right.  I wanted it to be as real as possible, and every sort of tutorial I saw online used cardboard.  That’s a great budget-friendly solution, but it’s not very authentic looking.

One night, I woke up with a start and had it all figured out.

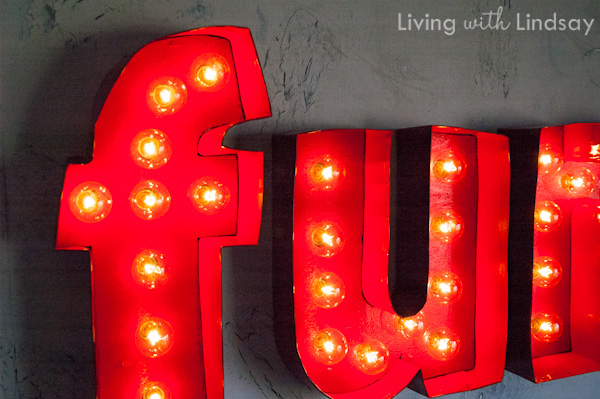
Once I figured out how to put it together, I knew the final result would be nothing short of awesome.  I’m pretty sure I was right.

It honestly took me about $100 to put this sign together since I bought all of the materials brand new.  I’m certain that I could have done it for cheaper using some things I already had (and buying my metal at a local metal distributor), but it is hot and I didn’t feel like rummaging in the garage.  I put together a tutorial so you can put together your own version, too.

Materials – Most items can be found at Home Depot, and I’ve linked the products below in case you want to see exactly what I purchased.

36″ x 24″ piece of sheet metal – 26 gauge, zinc plated
116 inches of aluminum flat angle bar – 1″ wide by 1/20″ thick
4″ corner braces – 4 total
24 machine screw with nuts and washers –  3/4″ long. These screws are flat on the end instead of being pointy.  Make sure they will fit into the holes of your corner braces.
10 carriage bolts with nuts and washers – 3/4″ long
Rustoleum “Clean Metal” spray primer
Delta Cermacoat Crackle Finish
Off white and gray flat paint – I used leftover latex paint, but you can also use acrylic craft paint
3/4″ thick smooth plywood – depending on your letters, you’ll probably want between 1/4 and 1/2 a sheet
String of clear globe lights
7/8″ spade bit
handful of 3/4″ sheet metal screws
7/8″ hole saw
roll of aluminum flashing
1/2″ or 3/4″ staples
Rustoleum 2x Cover Gray Primer Spray
Rustoleum 2x Cover Gloss Apple Red Spray
Drill and range of drill bits
Jig saw
Hammer and nail
Staple gun
Paint brush and/or foam roller

Whew!  That seems like a lot of stuff, doesn’t it?  Okay, let’s get started

Directions
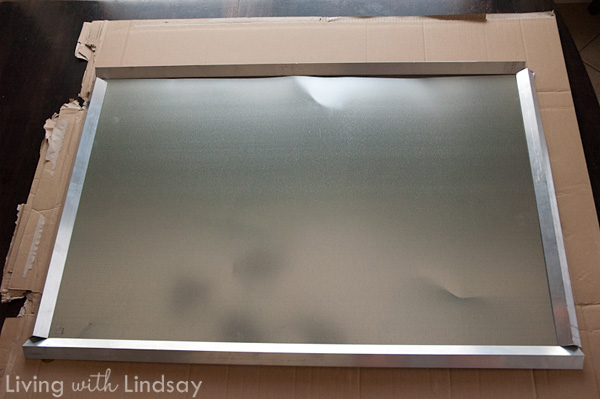
1. Cut four lengths of your flat angle bar.  You will want 2 pieces that are 36″ long and 2 that are 22″ long.  I just used a jig saw with a metal blade to cut my sections.  A jig saw is one of the easiest saws to use.  If you’ve never used it before, check out Brittany’s primer.

Lay them out around the edges of your piece of sheet metal to make sure they form a little frame.  The reason that you cut 2 lengths 22″ instead of 24″ is because the angle bar is 1″ wide.  Make sense?  Also, don’t worry about your sheet metal getting banged up and dented.


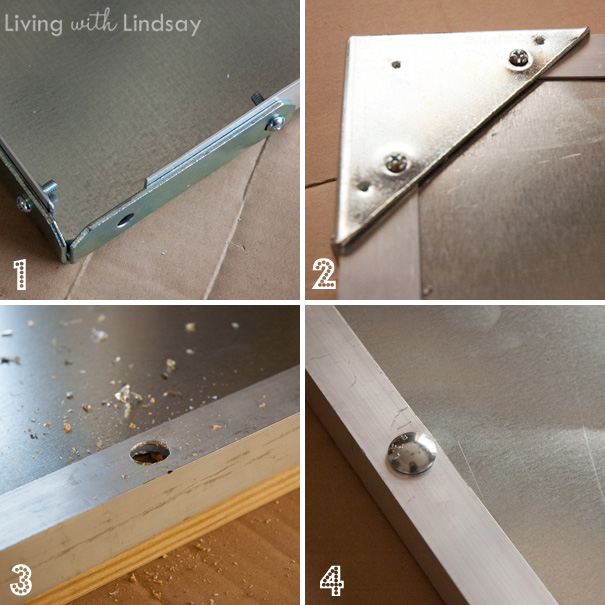
2.  (Photo 1) Flip your angle bars over so that they make a frame for the sheet metal (right side down).  Put your sheet metal inside to make sure that it fits, and attach the corner braces where the angle bars meet.  Mark the screw holes, drill a hole in sides of the angle bar, put your machine screws in the holes, and fasten with washer/nut.  You’ll notice that there will be one hole empty hole in the corner brace where the angle bar doesn’t reach, so you can just go ahead and fake it by putting a screw through that hole.

3.  (Photo 2) Turn your frame over so the right side is facing up.  Mark, drill, insert 2 machine screws into the top of each corner brace, and fasten with washer/nut.  These screws will go through the angle bar and the sheet metal.  You might want to put a block of wood underneath the corner brace to hold the sheet metal in place.

4. (Photo 3) Now you will drill holes for your carriage bolts along the edges of your angle bar.  I put two bolts on the 22″ side and three bolts on the 36″ side.  Measure and mark where you want the bolts, put a block of scrap wood underneath the frame for support, and drill the holes for your bolts.  You’ll really have to push to get the drill bit through the metal, so don’t get scared if it feels hard.

5.  (Photo 4)  Insert the carriage bolts and fasten with a washer/nut.  As you can see, I bought carriage bolts with the largest side head I could that would be smaller than the angle bar and still be 3/4″ long.  You could just use screws, but I prefer the look of the carriage bolt heads.

6.  Paint your metal frame with the Rustoleum Bare Metal spray paint.  I just painted the front and the sides of the frame and didn’t worry about the back.

7.  When the spray paint is dry, paint your frame a dark base color.  I wanted mine to look like old sheet metal, so I picked one of the 50 Shades of leftover Gray (kidding!) paint that I have stored in my laundry room.  I went with the Dark Granite (Behr) paint I used in my master bedroom.  I just painted it with a foam roller.

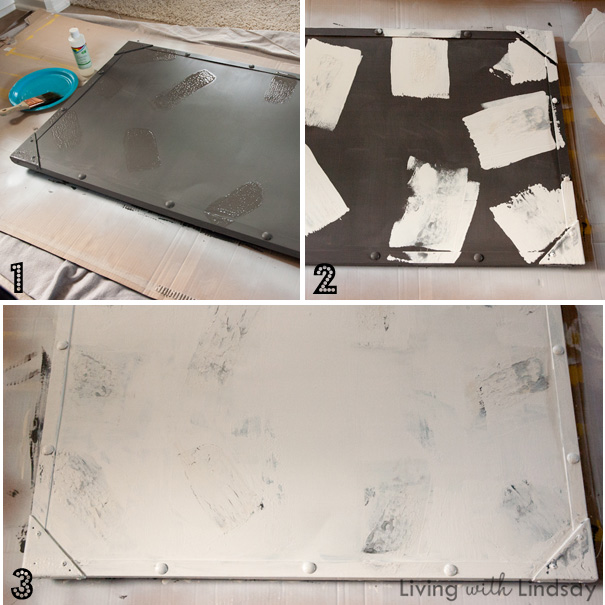
8.  (Photo 1)  When the base color is dry, apply the crackle finish in sections wherever you’d like the finish to look old.  Don’t just apply it over the entire surface, because that will make it look fake.

9.  (Photo 2)  When the crackle medium feels tacky (mine took about an hour), load a foam roller with a lot of paint and do one roll of flat top coat color over your crackle medium.  You have one shot to get this right, so don’t roll it more than once.  The good thing is that it’s supposed to look messed up, so if the medium is gummy you will still be okay.  The top coat I used was Oyster Shell (Glidden) that I had left over from my drop cloth rug.

10.  (Photo 3)  Paint the rest of the frame with your top coat, drying not to disturb where you painted over the crackle medium.  The end result will look like your worst paint job ever, but I promise it will be okay in the end.  Set it aside to dry.

11.  Draw your sign letters onto the plywood and cut out using a jig saw.  I printed my letters from my computer and traced them onto the plywood.  Try to use thick, chunky letters and avoid anything that’s too ornamental.

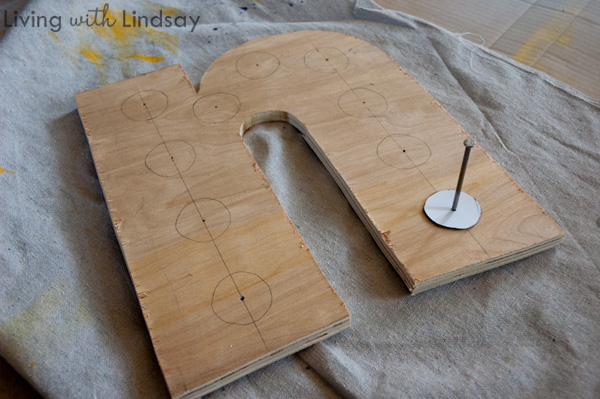
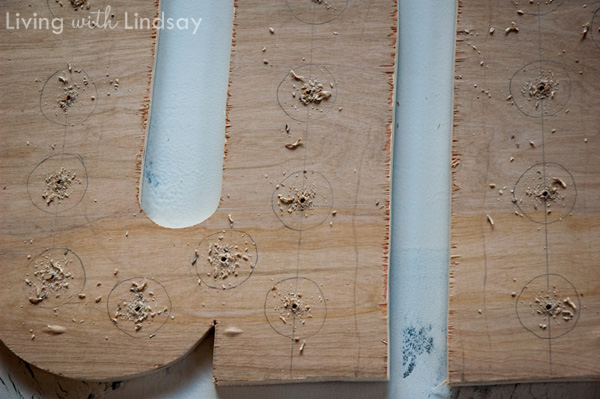
12.  Measure the radius of the blubs on your string light and cut a little circular paper template that size.  Using the template, space out where you will want the bulbs to be placed on each later.  If you are smart, you’ll only use the number of bulbs on one string of lights (25 on mine).  If you are like me, you’ll use four more bulbs, which will make you buy another set of lights and wire them together…which is annoying.  With a hammer and a nail, mark the center of each circle.

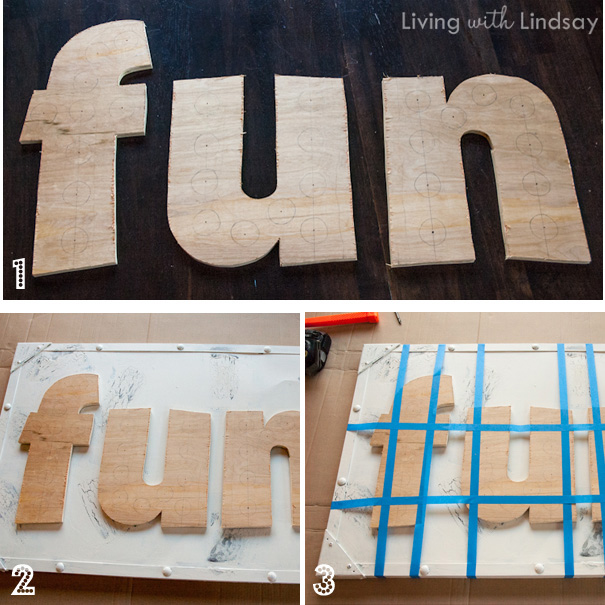
13.  (Photo 2)  Place the letters where you want them on your metal frame.

14. (Photo 3)  Use your sheet metal screws to attach the letters to the metal frame in 3 or 4 places per letter.  You can either just attach them through the top (the easy way) or measure where you want the holes, secure the letters to the base with Painter’s tape, flip the base over, measure and mark where you should put the screws and attach them from the back (my way).  Honestly, I’d go for the easy way if I were you.  My screws are hidden, but that was a lot of needless work.

15.    Using your little nail holes as a guide, drill a small pilot hole through the letters to where it makes a little mark on the sheet metal.  Unscrew the letters from the sheet metal and set those screws aside.

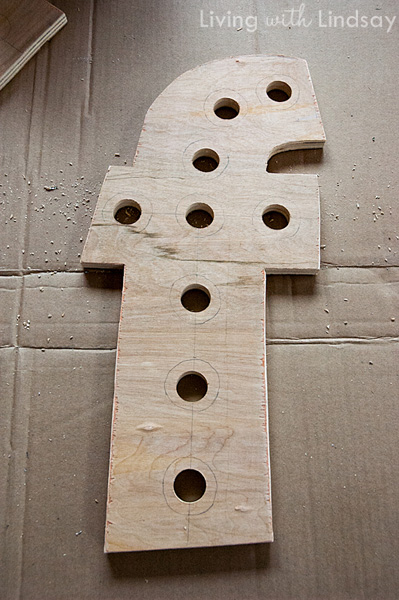
16.  With the spade bit, drill a hole all the way through your wooden letters using the small pilot hole as a guide.

17.  Drill a pilot hole all the way through your sheet metal, using the little mark the drill left as a guide.  Once the pilot hole is drilled, use your hole saw (my new favorite drill attachment!) to drill a larger holes in the sheet metal.  This will be a two person job – one to drill and one to hold down the sheet metal.  You’ll also want to wear gloves, because the drilled out metal pieces will be sharp and hot.

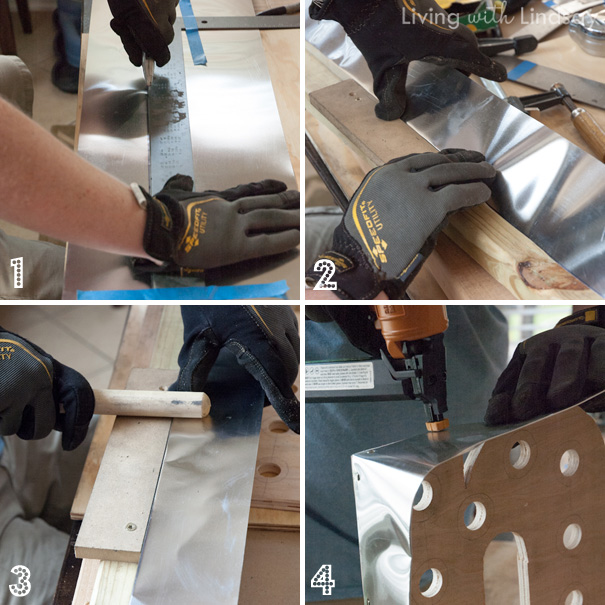
18.  (Photo 1) Cut your roll of aluminum flashing into three long even pieces.  We were able to score it with a box cutter and snap it apart.  Each piece will be about 3 1/2 inches wide.

19.  (Photo 2) Using a block of wood, fold over one edge of the metal strip about an inch.  We folded it over by hand using a block of wood, pressed the crease with another block of wood (Photo 3) and then pressed it flat by hand.  You’re basically just creating a straight, folded over edge so that you don’t cut yourself on a sharp piece of metal.  Tom came up with this technique, and I think it’s brilliant.

20. (Photo 4)  Staple the raw edge of the strip to the to the bottom edge of each letter.  We used a stapler attached to our air compressor, but you could probably use a staple gun as well.  Crease the edges to form corners where needed.  The flashing is pliable enough that it curves and bends well.  Once you have the metal stapled around the letter, you can fold the two raw edges together to form a seam.

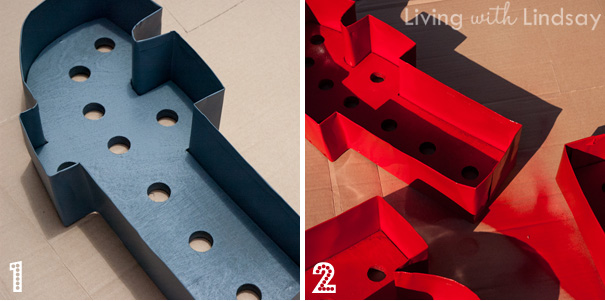
21. (Photo 1) Prime the metal and wood letters with Rustoleum 2x Cover gray primer.  (Photo 2)  Paint the primed letters with the color of your choice (I used Rustoleum 2x Cover gloss apple red).  I used one can of each total.

22.  Reattach your letters to the metal frame using the sheet metal screws that you set aside.  The big holes in your plywood and sheet metal should match up.

23.  Use some sandpaper or scraper or chain to rough up the metal base.  You want it to look beat up.

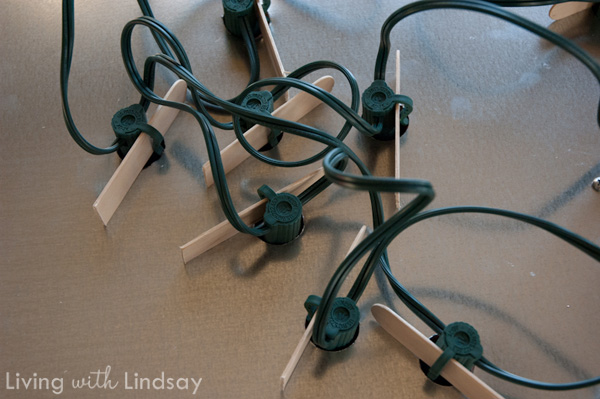
24.  Remove the bulbs from your string of lights and thread each base through a hole from the back.  My bulbs were a little smaller than the holes I drilled (but too large for a smaller drill bit), so I halved some craft sticks and stuck them through the outdoor bulb clips to keep the bubs from sliding through the holes.

25.  Screw in the bubs on the front of your sign and plug it in.

26.  Bask in your awesomeness.

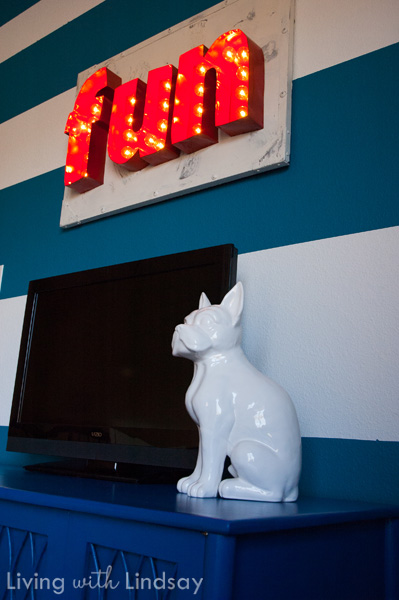
I strung a piece of picture hanging wire from two of the bolts on the back of the base and hung it by two nails in the wall studs.

We actually installed an inline touch dimmer to the wiring on the back of the sign so I could just touch the metal base for it to turn on and off.  We ran the cord behind the wall (like people do flat screen TVs) so the cord would not be exposed.  It comes out through a hole near the outlet, and that’s hidden behind the blue stereo cabinet.  The touch dimmer keeps me from having to plug/unplug it each time I want to turn the sign on/off.

It’ll take you a few days to complete this project because it’s kind of lengthy, but it will be one of your favorite things in your home.  Plus, it’s just plain FUN!

Questions?  Let me know!

« Previous Page
Next Page »
  • Email
  • Facebook
  • Instagram
  • Pinterest
  • Twitter

About Makely

Lindsay Ballard is a former college mascot turned political geek turned roller derby playing, DIY fanatic.

Lindsay chronicles her projects, design ideas, and lifestyle tips here at Makely, where she shares tutorials and inspiration. Her DIY designs are bold and graphic, while her spirit is fun and full of color.


Archives

Categories

PRIVACY POLICY
Copyright © 2009-2019 Makely School for Girls | All Rights Reserved | Posts may contain advertising content or affiliate links