Today I’m joining a group of fantastic DIY bloggers in showcasing easy projects we’ve put together using ScotchBlue Painters Tape with Edge Lock Protector. If you are a long time reader of this blog, you know that my husband and I use ScotchBlue Painters Tape for just about every DIY project – painting perfectly crisp lines on textured walls, caulking, holding together small components that we don’t want to get lost. Just Monday, I saw that my UPS man was using it to hold one of the small side windows onto his delivery truck. I’m sure that’s not an intended use, but whatever works, right?
This ScotchBlue Painting Party is actually a blog hop, so click around to the other bloggers to see what everyone created. Other than myself, participants include Kristen F. Davis Designs, Maison Decor, House Bella, and Craptastic.
DIY Ombre Striped Lamp Shade
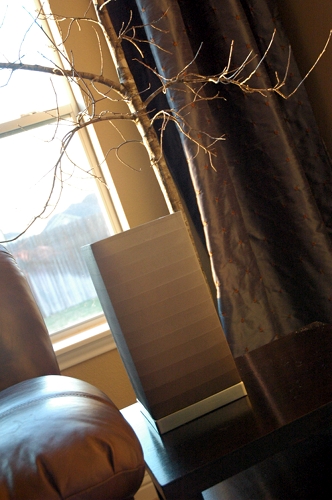
Supplies
- Lamp shade – it’s best to have one that’s rectangular or cylindrical (same diameter across the top and bottom). You can do this project with a shade that’s more conical in shape, but it is difficult to tape.
- Acrylic craft paint – choose a base color and a bright white.
- Paint brush – I used a 1″ all-purpose artist’s brush found in the acrylic paint aisle, and it worked great.
- ScotchBlue Painters Tape with Edge Lock Protector – I used 1.5″ width so I could be sloppy, but any width should work.
- Ruler
- Pencil
- Disposable plastic lidded bowl
- Teaspoon
- Straw or something disposable you could use to stir
Directions
1. I began with this little desk lamp I picked up at Target for around $15. I loved its shape and size, but it screamed trying-too-hard-to-make-my-college-dorm-look-cool to me. It needed a little update.
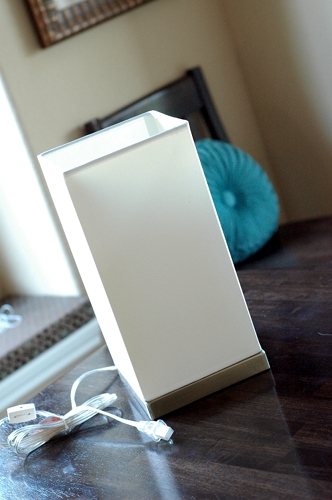
If you are going to complete this project, I definitely recommend using a shade that the top and bottom are the same widths. It will make you life much easier when trying to tape off your stripes.
2. Remove the shade from the base and mark little hash marks 1″ from the bottom of the shade. Use the painters tape to tape off a 1″ width stripe. Squeeze an entire bottle (generally 2 oz) of your base color into the plastic bowl and paint the stripe your base color with the paint brush. I used Vanilla Bean from Martha Stewart’s new line of craft paints at Michaels because I wanted to try it, but any brand will work just fine. You may also want to choose a lighter base color than I selected, since the light barely comes through the bottom of my completed shade (which could be fine with you, as it is for me).
Remove the tape while the paint is still wet.

Let that stripe dry completely. It will take about 30 minutes indoors or 10 minutes if you stick the shade out in the sun.
3. Next, use your pencil and ruler to draw little hash marks 2″ from the bottom of your shade. Use the painters tape to tape off that line, just like you did the first. Add a second line of tape ever so slightly above your first painted stripe. You want a little of your previous color to show under the tape so you don’t risk having any unpainted portions of the shade (see below photo). Use your thumb to make sure the edges of both tape lines are pressed down well.

4. Add 1 teaspoon of white craft paint (I used Martha Stewart’s Wedding Cake) to the bowl containing your base color and stir until it is completely mixed. Use that mix to paint the second stripe on your shade and remove the tape while still wet.

Let that paint dry, as above.
Your lines will not be absolutely perfect if you are painting on a fabric shade (like mine), since the fibers cause the paint to wick a tiny bit. It’s totally okay, though, because it gives it a bit of a fading effect. The ScotchBlue Painters Tape with Edge Lock Protector rocks on hard surfaces, but it’s too much to ask for it to completely block fabric fibers. 🙂
5. Continue the process of marking and taping lines and adding 1 tsp of white paint to your bowl for each stripe. You will quickly see the ombre effect created by adding the same amount of white paint to each stripe.
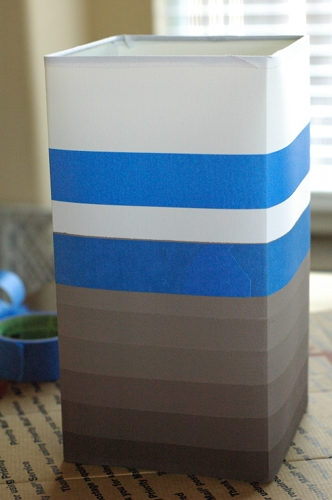
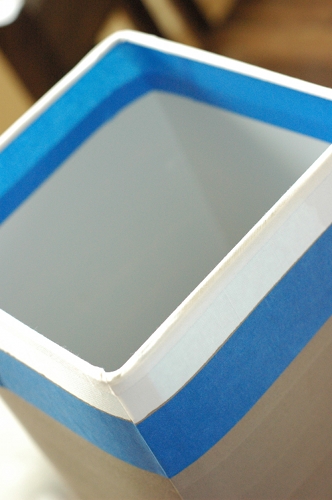
6. Once you reach the top of your shade, tape off the last stripe as you have been doing. You may want to also tape right under the bias tape trim on the inside of the shade. That will keep that trim looking nice when you look into the shade.
7. Once the last stripe is dry, you are ready to add the shade back to the base. Your lampshade is now a piece of custom art!
Would you like to win some ScotchBlue Painters Tape with Edge Lock Protector to try this project or any other project you can dream up? Three readers will win a sample from ScotchBlue! You have three ways to enter (and please leave a comment for each way you enter):
- Leave a comment on this post telling me how you would use your ScotchBlue Painters Tape;
- Tweet @ScotchBlueBrand “I want #supersharppaintlines for my next project!”;
- “Like” ScotchBlue on Facebook so you can see and/or participate in future painting parties.
Amy at Maison Decor is next on the ScotchBlue Blog Hop, so head over her way!

Disclosure: ScotchBlue Brand reached out to me to participate in the ScotchBlue Painting Party to celebrate the launch of their new ScotchBlue Painter’s Tape with Edge-Lock Paint Line Protector. My post represents my honest experience with ScotchBlue Painter’s Tape. I am not being paid for my answers, but I did receive ScotchBlue Painter’s Tape to assist in completion.