Makely

Let's Make Life Awesome

  • Home
  • Decorating/DIY
    • Create Your Decor
    • Decorate Your Home
    • Paint Your Walls
    • Transform Your Furniture
  • Healthy Living
    • Essential Oils
    • Family Wellness
    • Household Care
  • Project Gallery
  • Contact

How to Create Your Own “Grab My Button” Code

by Lindsay Ballard on June 13, 2011 1,859 Comments

At face value, I spend most of my time on this blog talking about easy DIY decorating projects and crafts.  These projects, be they small or large, are how I enjoy spending my “free time” during the week, and I really love being able to detail them for you here so that you can use some of the same ideas (or build upon them) for your own home.

What I really never talk about on this blog is what actually goes into blogging.  I probably spend a few hours each evening working on editing photos, writing posts, and generally updating backend stuff.  It’s not nearly as exciting as the projects, but it’s one of those necessary evils of blogging.  However, in the 2 1/2 years I’ve been writing this blog, I’ve learned a lot about computer nerd stuff that used to seem so foreign to me, like HTML and CSS, so I’m happily embracing my nerdiness these days.

Just like I enjoy passing along project tutorials to you, I’m happy to today be able to pass along a blogging tutorial with some of my new found knowledge.  I have joined Kristi at Creative Kristi in her “Spread Bloggy Love” series today.  I have put together a post on how to create your own “Grab My Button” code, like the one in my sidebar and the one shown below (thank you to my friend Cindy at Cinsarah for creating the gorgeous button for me):

Living With Lindsay

I know that all of you are not bloggers yourself, but perhaps you have a friend or family member who would be interested in learning a little bit of easy HTML to add something fun to their blog – just pass along this post to them!  And if not, I’ll be back tomorrow with some more decorating DIY tips and tricks.

Have a great Monday, friends!  🙂
How to Paint Perfect Stripes on Textured Walls

by Lindsay Ballard on June 9, 2011 2,164 Comments

Painting textured walls can be a challenge.  Every time we paint, we think that we have the walls perfectly covered, until a few days later when we find tiny little dots that we missed due to the “knock down” texture.  It’s become such a routine with our painting that touching up a few days later is one of our expected steps.

So, you can imagine how nervous my husband was when I told him that we were going to paint huge zig zag stripes on two of our master bedroom walls.  Textured walls can be a bear to paint when you need lines with perfectly crisp edges, and Mr. Perfectionist wanted it to be 100% perfect.  Perfect, perfect, perfect.  Marsha, Marsha, Marsha.

Luckily for him, he has perfected (heh) his crisp line painting technique over years of my crazy decorating schemes.  He agreed to let me photograph the process so that I could help you create the most perfect lines ever.

1.  Paint your entire wall the base color.  If you don’t know which color should be your base, always go with the lightest.  In our room, our stripes are dark gray and white, so we painted the walls white as the base color.

2.  Tape off your stripes with the blue Scotch 3M Delicate Surfaces with EdgeLock painters tape.  No, the company did not ask me to say that, nor did they give me anything for saying that, but it is our tried and true tape.  You can pick it up anywhere that sells interior paint.  We generally just buy the 1″ width.  We’ve used the more expensive green tape before, but I’m going to tell you right now that we do not think it is worth the extra expense when you use this method (and it certainly doesn’t work on textured walls without using this method).

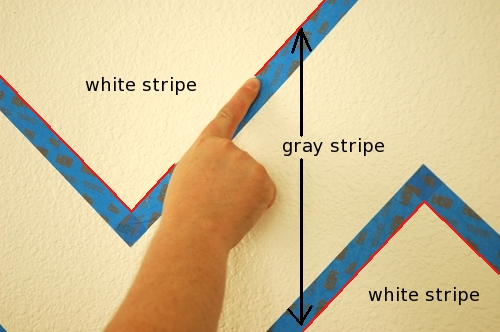
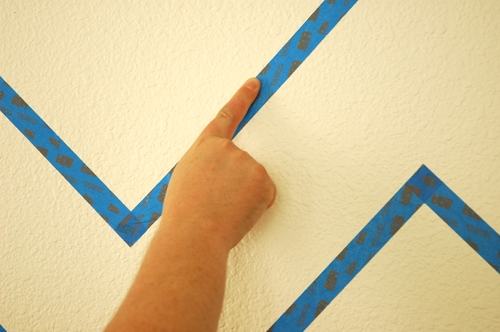
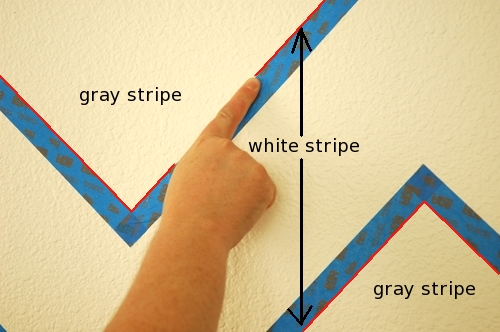
3.  With your finger, press down on the inner edges of the tape on the stripe that will be your secondary color (gray) to make sure that it adheres to the lower portions of the texture.  When I say inner edges, I mean the edges that will come in direct contact with the alternate paint color.  In my example, you’d press down on the areas highlighted in red.


how to paint perfect stripes on textured walls

Don’t just use a straight edge, credit card, brayer, or the like to try to do this.  It needs to be your finger so that you can reach down in the lower texture.

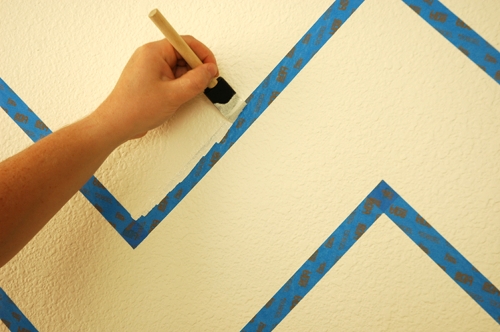
4.  Using a foam brush, dab your base color into the area of your tape you just pressed down.  What you are doing is letting a little bit of paint seep under the tape.  Once it dries, it seals the line, so that your secondary color won’t run underneath and ruin your line.

how to paint perfect stripes on textured walls

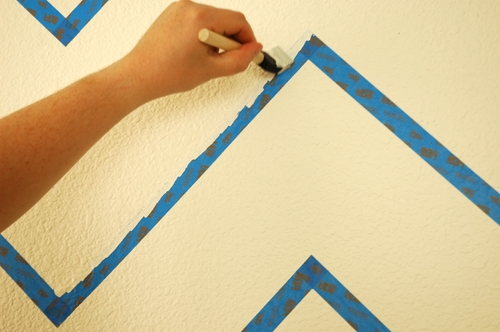
5.  After you dab the paint, run the brush back over your dabs to smooth the paint.  You don’t want it to dry all lumpy.

how to paint perfect stripes on textured walls

6.  Paint the edges of each stripe in the way described above and allow the paint to dry completely.

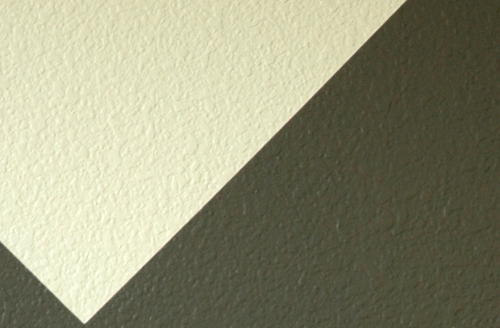
7.  Using your secondary color, paint your stripes inside the tape lines and carefully remove the tape before the paint dries.

how to paint perfect stripes on textured walls

Clear as mud?  It is a much simpler process than it seems.

For our chevron stripes with the silver accent line, we painted the walls as if there were only going to be white and gray chevrons, as detailed above.  Then, we retaped underneath each gray stripe and followed the above technique to add the silver line.  In that case, we dabbed the gray paint on the top tape line and white tape on the bottom tape line.

The process will the the same for any type of stripe you attempt – vertical, horizontal or zig zag.  In fact, this is a great way to tackle any wall where you need a perfectly, crisp line.

Do you have any painting stripes tips to add?  Let us know in the comments!

« Previous Page
Next Page »
  • Email
  • Facebook
  • Instagram
  • Pinterest
  • Twitter

About Makely

Lindsay Ballard is a former college mascot turned political geek turned roller derby playing, DIY fanatic.

Lindsay chronicles her projects, design ideas, and lifestyle tips here at Makely, where she shares tutorials and inspiration. Her DIY designs are bold and graphic, while her spirit is fun and full of color.


Archives

Categories

PRIVACY POLICY
Copyright © 2009-2019 Makely School for Girls | All Rights Reserved | Posts may contain advertising content or affiliate links