Makely

Let's Make Life Awesome

  • Home
  • Decorating/DIY
    • Create Your Decor
    • Decorate Your Home
    • Paint Your Walls
    • Transform Your Furniture
  • Healthy Living
    • Essential Oils
    • Family Wellness
    • Household Care
  • Project Gallery
  • Contact
You are visiting: Home » Archives for Lindsay Ballard » Page 156

How to Create an Urban Scarecrow Fall Wreath

by Lindsay Ballard on October 4, 2012 1,649 Comments

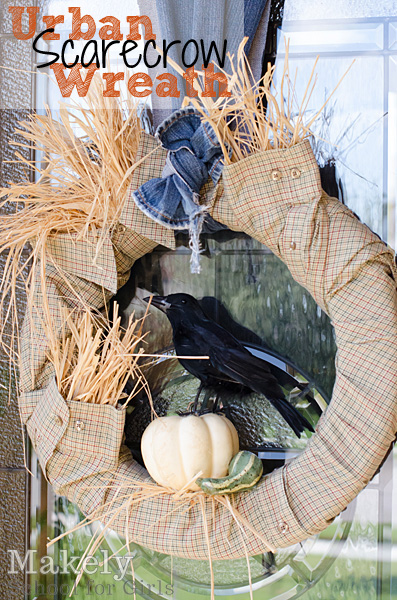
Urban Scarecrow Fall Wreath | Makely School for Girls


Not all of us have the opportunity to need a real scarecrow.  Sure, I live a stone’s throw away from corn and cotton fields, but in my little manicured neighborhood, we don’t have to worry too much about crows.

Scarecrows are always one of those quintessential signs of the Fall season to me, though.  So, even though we don’t have trees that change colors or real pumpkin patches down here in Austin, I figured that I could at least have my own version of a scarecrow – an Urban Scarecrow Wreath.  I think it’s so fun, so I put together a tutorial so this fall wreath could be replicated.  It is really simple to put together.

For this tutorial, you only need a few items:

  • Foam wreath form
  • Old shirt
  • Straight pins
  • Raffia
  • Fake crow
  • Fake gourds
  • Hot glue gun and glue

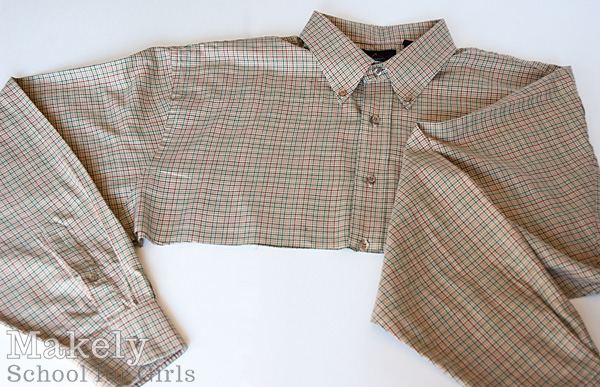
1.  Begin by cutting your old shirt across the body, underneath the arms.  Keep the extra fabric that you cut off.  I used an XL men’s shirt that I picked up at Goodwill.  I specifically wanted a plaid one in autumn colors, but any color or print would do.
Urban Scarecrow Fall Wreath | Makely School for Girls

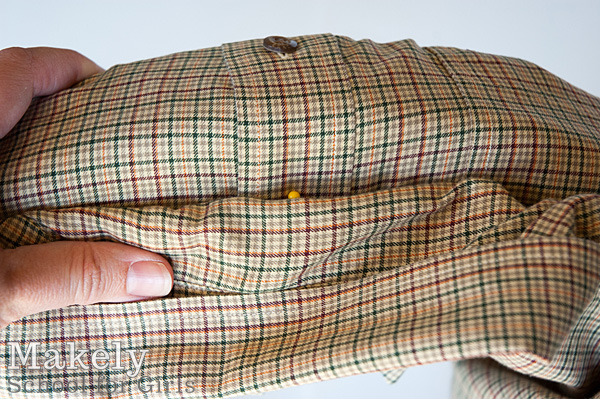
2.  Wrap the bottom center of your shirt (where the buttons are) around the back of your wreath. and put a few pins in the styrofoam wreath.
Urban Scarecrow Fall Wreath | Makely School for Girls

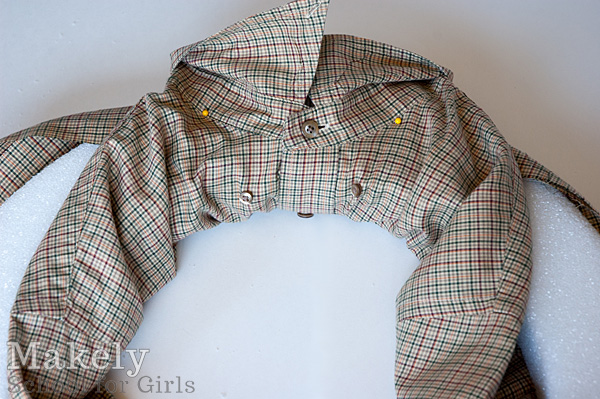
3.  Wrap the from part around the front of the wreath so that it covers the raw edge and pins of the bottom of the shirt.  Put a few straight pins under the collar so they are hidden when the collar is folded down.
Urban Scarecrow Fall Wreath | Makely School for Girls

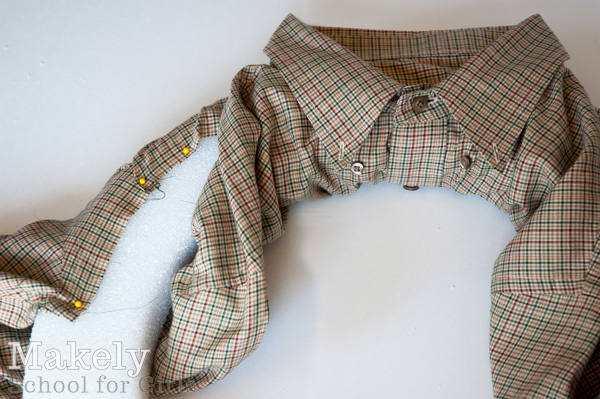
4.  Next, wrap the extra fabric up and over the back of the wreath, pull it tight and pin into place.  It should make sense when you do it, as you are trying to cover the wreath in the shirt fabric.
Urban Scarecrow Fall Wreath | Makely School for Girls

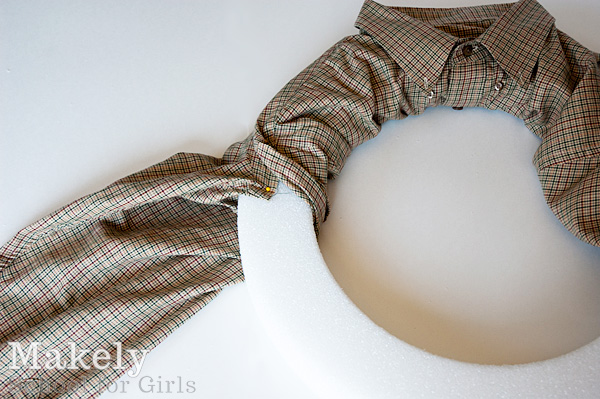
5.  Then, pull the front part of the shirt up and over where you just pinned, covering both the pins and the styrofoam.  Pin that into place with a pin right across from the sleeve.
Urban Scarecrow Fall Wreath | Makely School for Girls

6.  Repeat this process for the other side of the shirt.

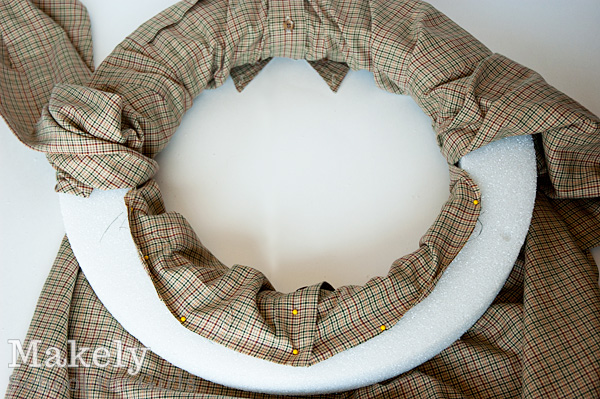
7.  Now, take that extra shirt piece that you cut off and pin it to the bottom of the wreath.  Make sure that the buttons on the top of your wreath line up with the buttons on the bottom.  I wrapped the top of mine around the back and pinned it (shown below).  Then, I wrapped the bottom around the back, pulled it tight and pinned it.  Cut off the extra fabric once it’s pinned on the back.
Urban Scarecrow Fall Wreath | Makely School for Girls

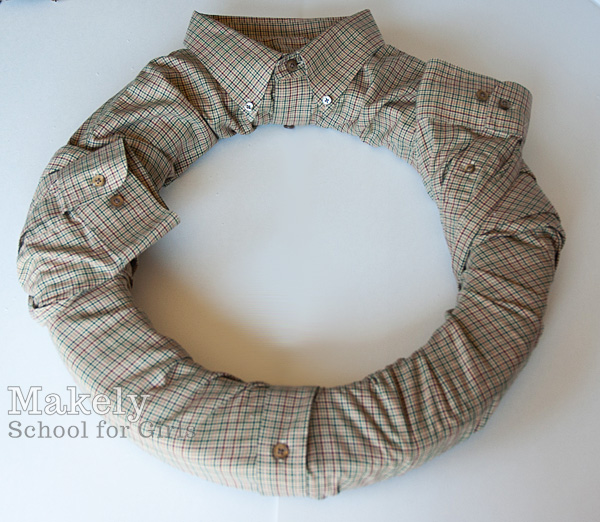
8.  Wrap the sleeves around and around the wreath so that all of the stryrofoam is now covered.  You can pin them on the back and inside the cuffs so that the pins won’t show.  On one side, I had to put a twist in the sleeve on the back of the wreath so that the cuff buttons would be facing out.
Urban Scarecrow Fall Wreath | Makely School for Girls

How cute would this be with a tie on the neck hanging down in the open part of the wreath for Father’s Day?  Adorable!

That’s the end of the detailed “steps.”  The next part is where you get to get creative!
Urban Scarecrow Fall Wreath | Makely School for Girls

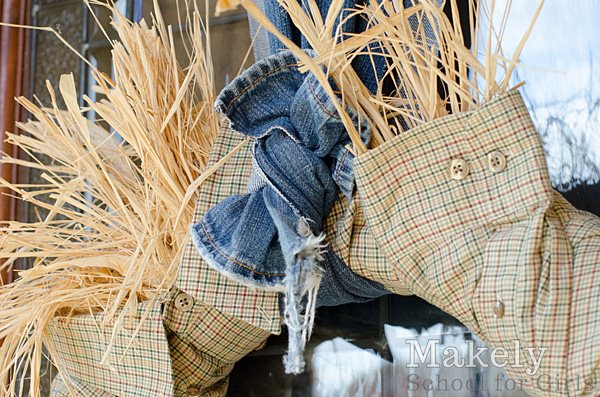
I took a pair of Tom’s old jeans and cut one of the legs off, right under the seat.  I cut that leg long ways so that I had 2 long pieces of denim.  I knotted them and then hung the long strip just like I hang wreaths with a long piece of ribbon.

I cut some handfulls of raffia and hot glued them inside the collar and cuffs.  Yes, you will likely burn your fingers a bit in the process – but it’s worth it.  The more haphazard your raffia “hay” is, the more awesome it will look.
Urban Scarecrow Fall Wreath | Makely School for Girls

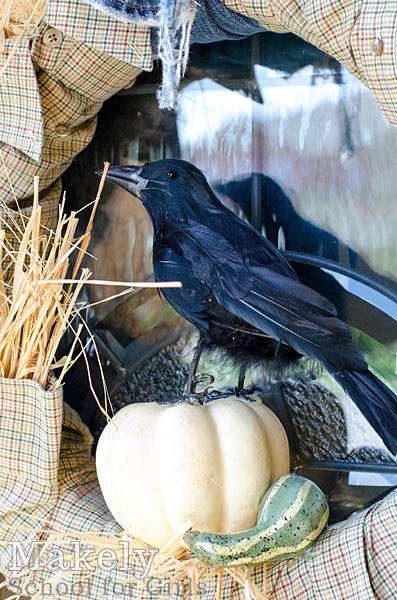
I hot glued a few more pieces of raffia on the bottom of the wreath and then glued a little fake pumpkin and a little gourd beside it.  Then, I hot glued this cute crow on top of the pumpkin.  I bought the crow and gourds at Michael’s.  The Dollar Tree also has crows, but all of the ones I found looked like they had mange.
Urban Scarecrow Fall Wreath | Makely School for Girls

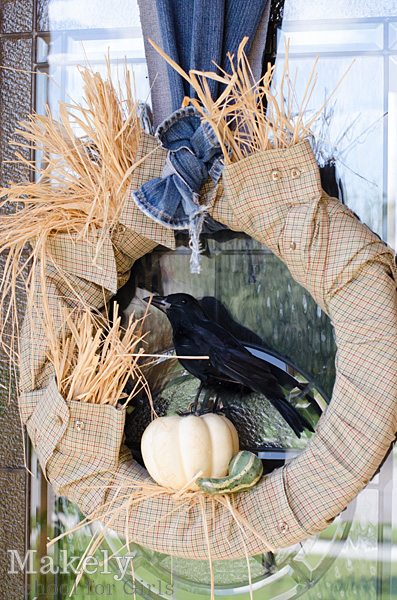
The end result is my urban scarecrow – Plaid shirt + jeans + hay.  Way more fun and funky than old clothes draped across a broomstick, right?
Welcome to Makely School for Girls

by Lindsay Ballard on October 1, 2012 2,834 Comments


Wait.  What?

Yep!  Living With Lindsay is now Makely.  This blog has morphed into so much more than its original purpose of chronicling how hard it is for my family to live in the midst of my project chaos.  Instead, Living With Lindsay became a resource for tutorials, projects, inspiration, and a place to see what random things I’d hang from my ceiling.

I’ve been contemplating a name change for quite a while now, as I honestly never really loved Living With Lindsay.  I did a lot of thinking on it while I was on my 3000 mile road trip with the kids this summer.  It was the perfect time to do some good, inward contemplation while the kids napped and I drove along the open road.  I don’t get that sort of quiet, alone thinking time very often, and it really helped me to bring some things into focus.

Somewhere between Memphis and Little Rock, the name Makely popped into my mind.  It struck me because it was a form of something that you and I do the most – we MAKE.  We make old furniture look awesome again.  We make confident decisions about our decor.  We make our homes fun, bold places for our families to live.  Makely is just a fun way to describe what we are – We are Makely.

The name of the blog, Makely School for Girls, is meant to be tongue in cheek.  I don’t have all the answers and certainly don’t pretend to.  Crap, I probably learn more from you than you do from me.  I just thought it would be fun and memorable since it’s a blog with a lot of home decor tutorials.  It’s not just for girls – boys, y’all are welcome to be here, too!

The content and focus of Makely is not going to stray from what you found on Living With Lindsay.  In fact, all of my old content has moved over here (thanks to my genius husband, Tom).  I think we managed to lose a few of last week’s comments somehow, but I consider that a win with everything we’ve been working on behind the scenes for the past several months.

Later in October, you’ll see two new contributors join us here.  My husband, Tom, will be writing occasionally about basic DIY stuff.  He’s been threatening to write some posts for you all these years, so I’m finally taking him up on his threat.  I’m also beyond excited to announce that Michelle Hinckley from 4 Men 1 Lady will be contributing her fantastically bold vision in occasional posts, as well.  I consider it such an honor that she would choose to join us at Makely.

There are a few little things that have changed.  Obviously, my url is different now.  If you go to LivingWithLindsay.com you will still get here, but if you have this blog bookmarked, changing your bookmark to MakelyHome.com will get you here like a second faster since it doesn’t have to redirect from my old url.  My email and social media addresses have also changed, but again, they have all been renamed or forwarded so that I haven’t lost any of you in the transition.  Those are now:

Facebook:  http://www.Facebook.com/MakelyHome  (This page still says “Living With Lindsay” as it’s title, but I’ve submitted the paperwork for the name change to the powers that be at Facebook.)
Twitter:  http://www.Twitter.com/MakelyHome
Pinterest:  http://www.Pinterest.com/MakelyHome
Email:  Lindsay@MakelyHome.com

If you subscribe to my blog via an RSS reader or by email, you should still get those delivered as usual.  I hope that you didn’t get the same posts re-delivered after I changed the name of the feed, but if you did I’m very sorry.  That was a one time thing.  If you’d like to subscribe by email or an RSS reader of your choice, you can do that here.

A mobile site will be ready in the next few days.

There’s also a pop up that alerts you that Living With Lindsay is now Makely.  Totally annoying, I know.  It will (or should) only show up 3 times in your lifetime.  You can click the X to dismiss the box the first three times you see it or click the bottom of it where it says “Never see this message again.”  I’ll remove it completely in a month or so after I feel like the name change is no longer “news.”


Can you help me spread the word?

I’d love for you to help me spread the word that the name of this blog has changed.  You can Tweet, Facebook or Pin this post or my new name so the word spreads.  There are little social sharing buttons at the end of each post that let you do that with just a click.  You can also invite your Facebook friends to join us on the Makely Facebook page if you think they’d like the blog.  If you have your own blog, you can add Makely to your blogroll or even put my new button in your sidebar.


copy and paste


Thanks for your support for the last few years.  I really appreciate each and every one of you more than you will ever know.

Alright, now let’s make some stuff!


« Previous Page
Next Page »
  • Email
  • Facebook
  • Instagram
  • Pinterest
  • Twitter

About Makely

Lindsay Ballard is a former college mascot turned political geek turned roller derby playing, DIY fanatic.

Lindsay chronicles her projects, design ideas, and lifestyle tips here at Makely, where she shares tutorials and inspiration. Her DIY designs are bold and graphic, while her spirit is fun and full of color.


Archives

Categories

PRIVACY POLICY
Copyright © 2009-2019 Makely School for Girls | All Rights Reserved | Posts may contain advertising content or affiliate links