Makely

Let's Make Life Awesome

  • Home
  • Decorating/DIY
    • Create Your Decor
    • Decorate Your Home
    • Paint Your Walls
    • Transform Your Furniture
  • Healthy Living
    • Essential Oils
    • Family Wellness
    • Household Care
  • Project Gallery
  • Contact
You are visiting: Home » Decorating/DIY » Create Your Decor » Page 91

The DIY, No Sew, Use What You Have, Knotted Christmas Tree Garland

by Lindsay Ballard on December 12, 2011 49 Comments

I’ve been pretty lackadaisical about getting our Christmas decorations up this year.  We normally decorate for the holidays over Thanksgiving weekend, but because I was working on stenciling our bathroom, it didn’t get done.  Our weekends since then have been jammed with soccer practice, visiting Santa and trips to Home Depot, so the decorations got pushed to the back burner.

Much to Zack and Emma’s delight, we brought home a tree this weekend.  It’s lovely and tall and full – and it needed more than just white lights and our collection of favorite ornaments.  I didn’t want to buy anything new to add to the tree, so I dug around in my craft room until I came up with an idea.  I gathered some burlap in natural and white, along with some bleached and unbleached muslin, and created a DIY, no sew, use what I had, knotted Christmas tree garland.

The garland could not have been more simple to put together.  I began by tearing my fabric into strips about 6 inches wide and ranging in length from a yard to 3 yards or so.  I alternated the fabrics in a random pattern and joined them by tying simple knots.

I really love the way the different textured fabrics look when they are joined together.  I also had some beige tulle in my craft room, so I tied some of it into the garland to add a bit of shimmer and even more texture.  I think it’s a nice contrast with the rough burlap.

If you still haven’t put your tree up or think it needs a little something extra, raid your fabric stash and see what you can come up with.  You, too, could have a no sew, use what you have Christmas tree garland.
Also joining The Nester and The Shabby Creek Cottage in their Holiday Tour of Homes.
{Handmade Holiday Gifts} Kitschy Kitchen Towels

by Lindsay Ballard on November 22, 2011 2,355 Comments

It’s time to start thinking about holiday gifts, if you haven’t already done so.  I usually don’t get my shopping done that far in advance, but this year I decided that I’d like to create a few of the gifts on my list…which means I need to get started now.

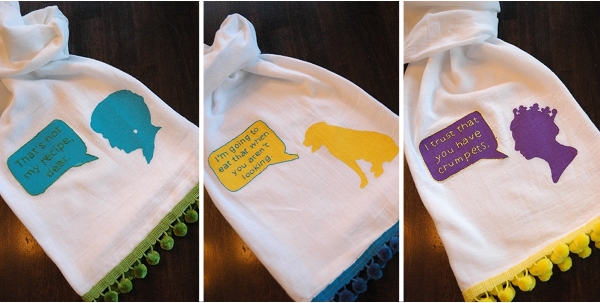
I am turning a few of my handmade gifts into tutorials for you guys.  The first one that I want to share with you is a set of DIY Kitschy Kitchen Towels.  This a great gift to give as a set, or you can break them up into individual towels to include in other gifts.  Per popular demand on my Facebook page, I put together another free downloadable template to make it easy to replicate!

DIY Kitschy Kitchen Towels

I always have a cute kitchen towel hanging from the handle on my oven.  My little decorative towel collection ranges from darling ones that I’ve picked up at Anthropologie to ones that I’ve made for $2 with items from the Dollar Tree.  We don’t use these towels to dry our hands and wipe up messes since we have a whole drawer full of junky kitchen towels for that, so I always want them to be something very special and quirky.  The set I put together I’m actually keeping for myself (the worst part about handmade gifts – I always want to keep them!), but I’m going to make a few more sets to give as gifts this year.

Supplies

  • Flour sack towels – 3
  • Fabric paint – 3 bright colors
  • Freezer paper
  • Craft paint brush
  • Decorative trim – 3 yards in bright colors
  • DMC Embroidery floss to match the trim – 3 colors
  • Washable fabric glue
  • Embroidery hoop
  • Sewing needle
  • Iron and ironing board
  • Scissors
  • Pencil

Directions

1.  You need white flour sack towels for this project.  You can find them at Dollar Tree for $1 each or buy a set of 4 at Target for $3.99.  I personally prefer the quality of the Target towels over the DT towels – I have found the ones at DT aren’t ever cut completely square.

Wash and dry the towels to get them ready to be painted.  I recommend ironing the towels when they are damp so that it’s easier to get the wrinkles out and make them crisp.

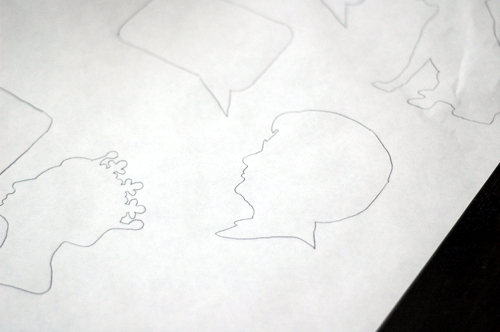
2.  Print out the free template download from here.  Trace the pieces of the template onto the non-shiny side of your freezer paper (I found mind next to the freezer storage bags at Walmart) by putting the template under the paper.  Don’t worry about tracing the words yet.

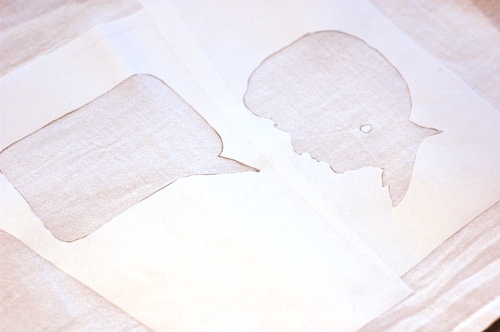
3.  Cut out the inside of a silhouette and speech bubble and iron it shiny side down onto a towel.  I centered my design and put it about 2 or 2 1/2 inches from the bottom edge of the towel.  Leave enough paper around the outside of the design so that you don’t have to be super careful with keeping the paint inside the stencil.

Ironing the freezer paper stencil to the towel is the biggest key to this project.  You need to make sure that every edge is firmly adhered to the towel.  I put my iron on the cotton setting and pressed down hard.  When you think it’s on there perfectly, iron again.  🙂  There were a few edges that weren’t perfectly pressed down, and I had some paint bleed.

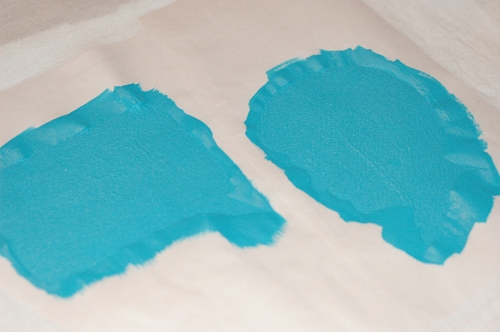
4.  Lay your towel on top of a piece of cardboard and put a piece of freezer paper (shiny side up) underneath your stencil.  With your craft brush (I LOVE my big flat brush like the one in this package), paint a thin layer of fabric paint onto the stencil, making sure that you cover all the edges really well.  Let it dry for a few minutes and then apply a second layer.  I used paints from the “So Soft” line from DecoArt, but I think the new Martha Stewart craft paints would work great, too.

5.  Carefully peel off the freezer paper and let the towels dry.  If you have a place to hang the towels to dry so that they don’t touch anything, that would be best – the paint will be wet on the back of the towel, too.  I let my towels dry overnight.

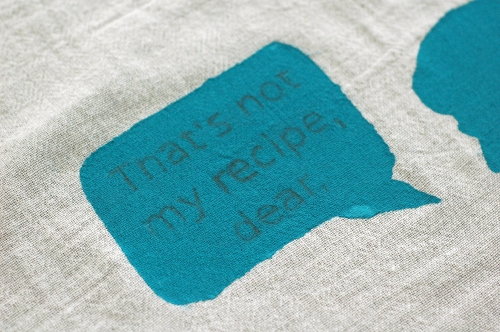
6.  Cut out the phrase from the template that corresponds with the silhouette you painted.  Pressing hard with the side edge of a sharpened pencil, color in the back of the phrase paper.

You can then center your phrase on the speech bubble and trace the word with your pencil.  You should be able to see that the phrase has transferred to your towel.  If you want to create your own phrase, you can obviously write it out by and with a pencil directly onto your design.

7.  In the photo above, you can see that I had a bleeding issue (because the stencil wasn’t iron down well enough), which we can mostly fix with this next step.  Put your towel in the embroidery hoop so that you can work on the speech bubble.  With embroidery floss in a contrasting color, embroider the words with a back stitch (tutorial here).  Also, stitch a back stitch around the edge of the speech bubble – you will be able to hide some minor paint bleeding with this stitch.  If you would like, you could also stitch around the silhouette, but I left mine plain.

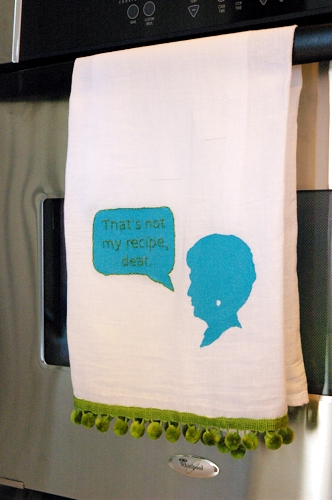
8.  With your washable fabric glue, attach a strip of trim on the bottom of the towel.  I chose a fun pom pom trim in a matching color as my embroidery floss.

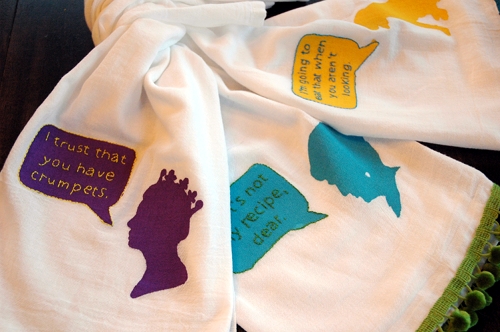
I created three different designs for this project:  1.) a Granny who says, “That’s not my recipe, dear.” 2.) A young Queen Elizabeth who says, “I trust that you have some crumpets.” 3.) And my favorite – a dog who says, “I’m going to eat that when you aren’t looking.”  That is so something that my dog would say.

These towels are washable and make perfect holiday gifts!  Which one is your favorite?

« Previous Page
Next Page »
  • Email
  • Facebook
  • Instagram
  • Pinterest
  • Twitter

About Makely

Lindsay Ballard is a former college mascot turned political geek turned roller derby playing, DIY fanatic.

Lindsay chronicles her projects, design ideas, and lifestyle tips here at Makely, where she shares tutorials and inspiration. Her DIY designs are bold and graphic, while her spirit is fun and full of color.


Archives

Categories

PRIVACY POLICY
Copyright © 2009-2019 Makely School for Girls | All Rights Reserved | Posts may contain advertising content or affiliate links