Makely

Let's Make Life Awesome

  • Home
  • Decorating/DIY
    • Create Your Decor
    • Decorate Your Home
    • Paint Your Walls
    • Transform Your Furniture
  • Healthy Living
    • Essential Oils
    • Family Wellness
    • Household Care
  • Project Gallery
  • Contact
You are visiting: Home » Decorating/DIY » Page 208

How to Create a Bed Crown

by Lindsay Ballard on June 28, 2010 1,942 Comments

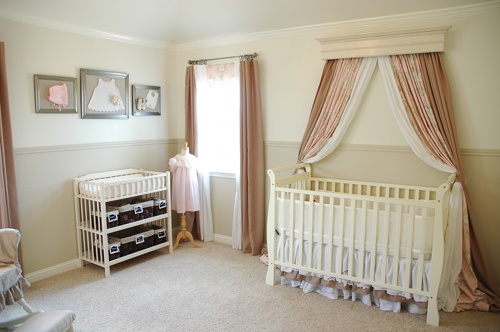
My very favorite part of Emma’s nursery is the beautiful bed crown above her crib.  The curtains are soft and flowy underneath a vintage mantel piece.
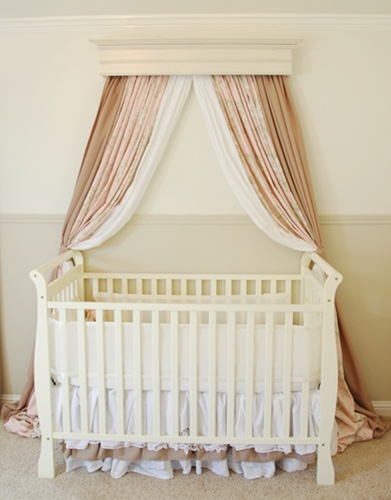
As luxurious as it looks, the bed crown as incredibly easy to put together.  I’ll show you how to put one together yourself using a found item and wood scraps you probably have cluttering your garage.  I’m sure there are many more ways to put a bed crown together, but we “over-engineered” this one since it will be hanging over the crib.

Materials needed:

  • Found wooden item to use as the front of the bed crown – mine is a vintage mantel, but you can use any wooden piece or create your own using a 2×4 and molding from the home improvement store
  • Scrap 2×4 wood – you’ll want 2 pieces as long as the bed crown front and four pieces as long as the distance you want it to project from the wall
  • Dowel as long as the bed crown front
  • Drill
  • L-Brackets
  • Screws
  • Paint

Directions

I won’t be using measurements here since every project will be different depending on what you use for your front and how far you want your crown to project from the wall.

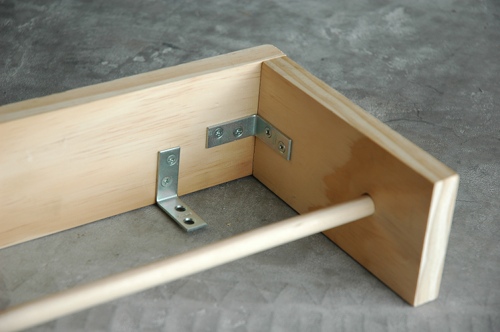
1.  Using the L-Brackets, screw two of the short pieces of wood to one of the longer pieces of wood, making a ‘U’ shape.  Attach several more L-Brackets along the top of the longer piece.  Drill a hole on each of the small pieces just large enough for your dowel to slip through.

Close-up of one corner:
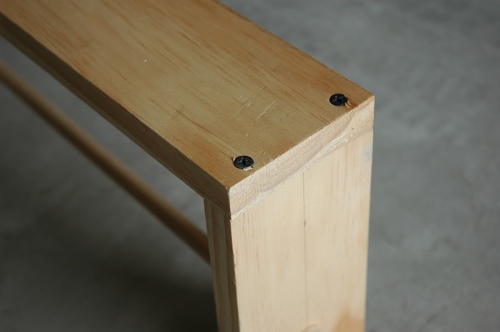
2.  To better secure the sides holding the dowel, put a few screws through the back of the long piece into the short pieces.
3.  If necessary, paint the bed crown front piece and the extra pieces of short wood in the color of your choice.  My mantel was already an antique white, so I just spray painted the short pieces in a similar color.

4.  Remove the dowel for now.  Using the L-shaped brackets that you installed on the top of the long piece of wood, screw the ‘U’-shaped piece onto the back of your bed crown front.
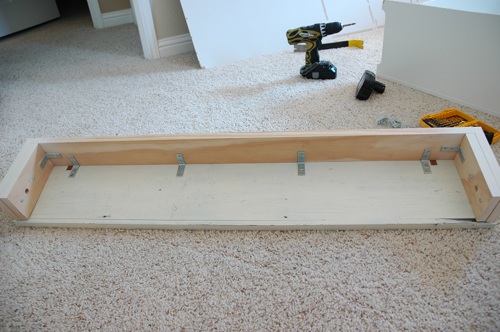
5.  Screw the two short pieces you still have left over the two short pieces of the ‘U’-shaped piece.  This will serve as a plate that keeps the dowel from sliding around.  When you want to remove or add curtains to your dowel, you just unscrew these pieces and the dowel slides right out.

6.  Screw your last piece of long wood (that should be slightly smaller than the length of the bed crown) onto your wall where you would like to hang your bed crown.  PLEASE, make sure you are screwing through the studs.  Let me repeat – screw this through the studs.  Do not just use drywall anchors, okay?
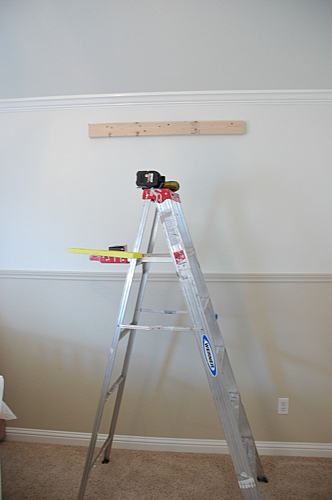
7.  Now, slide your bed crown over the piece of wood on your wall like a slipcover.  Get up on the top of your ladder (not the top-top, but you know what I’m saying), and screw the top of the ‘U’-shaped piece to the piece of wood on the wall.  Put in *at least* 4 screws so that it’s nice and anchored.

8.  All you have to do now is add your curtains!  I made simple rod-pocket panels out of the fabric I selected for the nursery, but you could just as easily use store-bought panels or sheers.  Unscrew the plates, slide the dowel into the holes, put your curtains on the rod and screw the plates back onto the bedcrown.
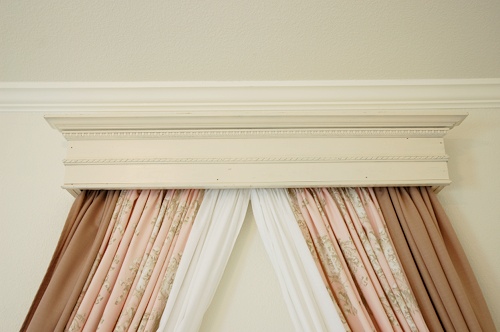
That’s it!  This project makes such a tremendous impact for the time spent putting it together – my kind of project!
********************

Time’s running out!  There are only 3 more days to order from my online Stella & Dot trunk show.  With a $50 purchase, you are entered to win a Soiree bracelet of your choice (a $29 value).  Right now, you have a really great chance of being that winner since we don’t have a ton of orders over $50 yet.  Go ahead and start thinking about birthdays and holidays, shop the sale page, and win something gorgeous for yourself!  They even have a darling selection of Mommy & Me jewelry.

To order and be entered to win, please visit Abby’s Stella & Dot website and place your order, entering my name (Lindsay Ballard) as your hostess.  Let me know if you have any questions!
The Nursery: Your Questions Answered

by Lindsay Ballard on June 16, 2010 2,058 Comments

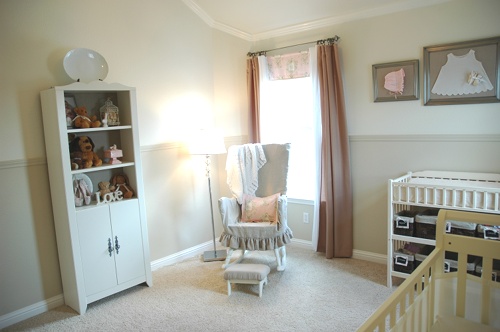
Thank you for such the wonderful response to Emma’s nursery! It’s truly my favorite room in the house, and I’ve been known to go sit in there with the door shut just to be in the calm surroundings. I hope they help her stay calm, too!

There were a bunch of questions left in on that post, so I will answer the most frequently asked ones here. If you have a question that I don’t answer, leave it in the comments below and I’ll answer it there!

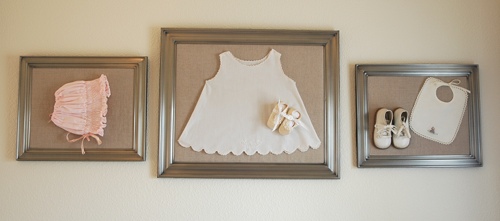
How did you frame the family heirlooms?

This is actually such an easy project!  I bought some frames on mega sale at Michael’s that would fit the dimensions of each little vignette I put together.  I took the class out of the frames and covered the glass in a layer of batting and then fabric (for mine I used linen).  I pulled the fabric tight and secured it to the back of the frame with my glue gun (of course).

Once I positioned each baby item where I wanted it in the frame, I used t-pins to just pin it onto the fabric and batting.  If you work with it, you’ll be able to figure out a way to pin it so that the pins won’t show.  For example, I pinned the dress from the inside.

If you have any pieces that flop over when you hold the frame up, you can use a little bit of double-stick tape or scrapbooking adhesive squares.  For my heavy toddler shoes, I actually glued them to the fabric on the soles.  Of course, I wouldn’t do that with something worth millions of dollars, but I didn’t mind doing it with these things.

If you want your items behind glass, shadow boxes are going to be your best option unless your items are extremely thin.  I considered this route but it was going to be a) a lot more expensive to buy large shadow boxes and b) I worried about the frames sticking out from the wall so much that I’d bump my head when I was changing the baby on the table.

Where did you hang the bird chandelier?

Well, I still haven’t hung the bird chandelier.  My original thought was to hang it in the corner near the rocking chair and lamp.  Now that I see the room completed, I don’t think that’s where I want it.

I’m going to live with the room for a few weeks to see if a spot presents itself.  If not, then it won’t be going up.  I’m one of those people who’s always on the borderline of overdoing it (ha!), so I’m trying to edit myself.

In the meantime, the chandelier is hanging on the closet rod is Zack’s huge walk-in closet.  He actually loves it there and comments on how beautiful his closet is every morning when he’s getting dressed.  The part of me that’s having a hard time knowing that he only has a few more weeks as an only child doesn’t want to take something away from him to give to the baby (Please tell me that the Mommy Guilt gets easier!).

We’ll see how it all shakes out.

What paint colors did you use?

I literally painted something like 10 samples on the walls before I found the perfect colors.  In the end, I chose two Sherwin Williams colors – the top white/cream is Dover White and the bottom beige/brown is Wool Skein.

The changing table, which used to be a natural wood, and peg shelf are spray painted with Valspar Porcelain.  The rocking chair is hand-painted Dover White.

It just so happened that the new crib, the Ikea bookcase, and the antique mantle turned bedcrown were the perfect shades of antique white to fit into the room.  When you are doing a room with soft colors like mine, just remember that every paint and fabric color doesn’t have to be an exact match.  The subtle color differences add a lot of depth to what could be a very boring room.

Let me know below if you have any other questions!

********************

Now, it’s time to announce the winner of the Cutting Edge Stencils giveaway!  Congrats to commenter #27…

…Jen at With Grace & Lace!  Congrats!  I’ll email you shortly so that you can get the details worked out with Cutting Edge Stencils.  Thanks to everyone who entered!

« Previous Page
Next Page »
  • Email
  • Facebook
  • Instagram
  • Pinterest
  • Twitter

About Makely

Lindsay Ballard is a former college mascot turned political geek turned roller derby playing, DIY fanatic.

Lindsay chronicles her projects, design ideas, and lifestyle tips here at Makely, where she shares tutorials and inspiration. Her DIY designs are bold and graphic, while her spirit is fun and full of color.


Archives

Categories

PRIVACY POLICY
Copyright © 2009-2019 Makely School for Girls | All Rights Reserved | Posts may contain advertising content or affiliate links