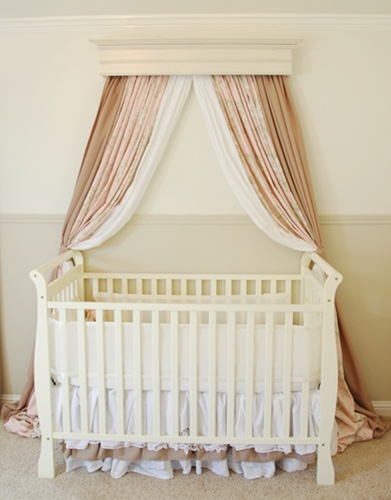
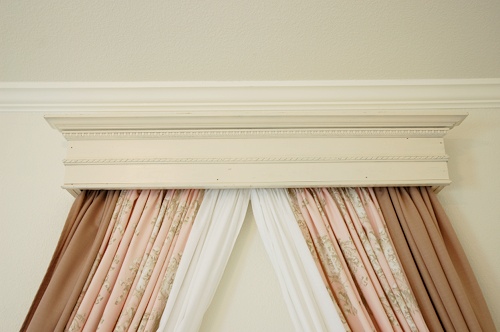
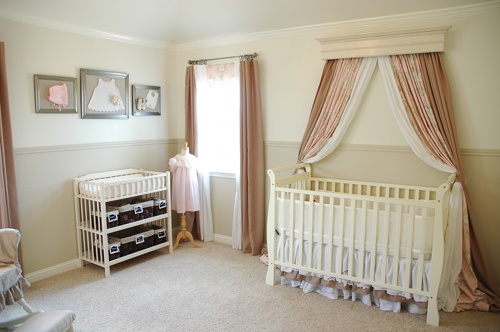
My very favorite part of Emma’s nursery is the beautiful bed crown above her crib. The curtains are soft and flowy underneath a vintage mantel piece.
As luxurious as it looks, the bed crown as incredibly easy to put together. I’ll show you how to put one together yourself using a found item and wood scraps you probably have cluttering your garage. I’m sure there are many more ways to put a bed crown together, but we “over-engineered” this one since it will be hanging over the crib.
Materials needed:
- Found wooden item to use as the front of the bed crown – mine is a vintage mantel, but you can use any wooden piece or create your own using a 2×4 and molding from the home improvement store
- Scrap 2×4 wood – you’ll want 2 pieces as long as the bed crown front and four pieces as long as the distance you want it to project from the wall
- Dowel as long as the bed crown front
- Drill
- L-Brackets
- Screws
- Paint
Directions
I won’t be using measurements here since every project will be different depending on what you use for your front and how far you want your crown to project from the wall.
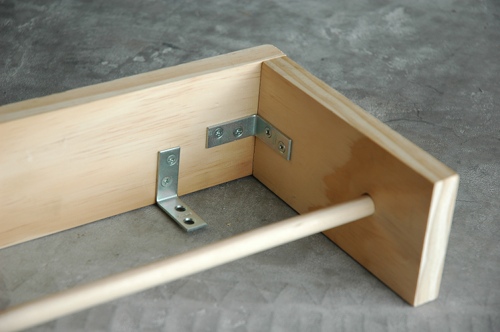
1. Using the L-Brackets, screw two of the short pieces of wood to one of the longer pieces of wood, making a ‘U’ shape. Attach several more L-Brackets along the top of the longer piece. Drill a hole on each of the small pieces just large enough for your dowel to slip through.
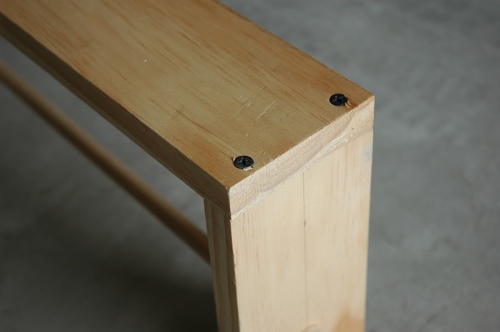
Close-up of one corner:
2. To better secure the sides holding the dowel, put a few screws through the back of the long piece into the short pieces.
3. If necessary, paint the bed crown front piece and the extra pieces of short wood in the color of your choice. My mantel was already an antique white, so I just spray painted the short pieces in a similar color.
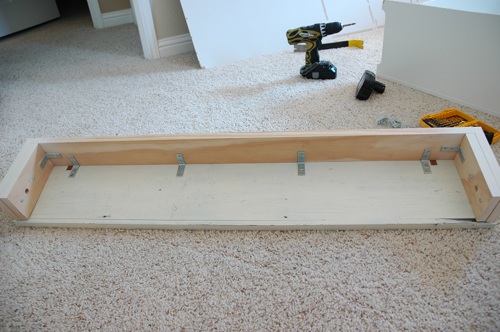
4. Remove the dowel for now. Using the L-shaped brackets that you installed on the top of the long piece of wood, screw the ‘U’-shaped piece onto the back of your bed crown front.
5. Screw the two short pieces you still have left over the two short pieces of the ‘U’-shaped piece. This will serve as a plate that keeps the dowel from sliding around. When you want to remove or add curtains to your dowel, you just unscrew these pieces and the dowel slides right out.
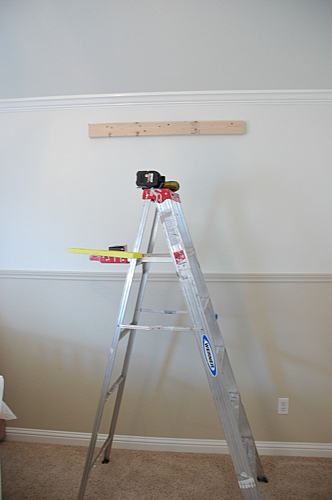
6. Screw your last piece of long wood (that should be slightly smaller than the length of the bed crown) onto your wall where you would like to hang your bed crown. PLEASE, make sure you are screwing through the studs. Let me repeat – screw this through the studs. Do not just use drywall anchors, okay?
7. Now, slide your bed crown over the piece of wood on your wall like a slipcover. Get up on the top of your ladder (not the top-top, but you know what I’m saying), and screw the top of the ‘U’-shaped piece to the piece of wood on the wall. Put in *at least* 4 screws so that it’s nice and anchored.
8. All you have to do now is add your curtains! I made simple rod-pocket panels out of the fabric I selected for the nursery, but you could just as easily use store-bought panels or sheers. Unscrew the plates, slide the dowel into the holes, put your curtains on the rod and screw the plates back onto the bedcrown.
That’s it! This project makes such a tremendous impact for the time spent putting it together – my kind of project!
********************
Time’s running out! There are only 3 more days to order from my online Stella & Dot trunk show. With a $50 purchase, you are entered to win a Soiree bracelet of your choice (a $29 value). Right now, you have a really great chance of being that winner since we don’t have a ton of orders over $50 yet. Go ahead and start thinking about birthdays and holidays, shop the sale page, and win something gorgeous for yourself! They even have a darling selection of Mommy & Me jewelry.
To order and be entered to win, please visit Abby’s Stella & Dot website and place your order, entering my name (Lindsay Ballard) as your hostess. Let me know if you have any questions!


You made it look so easy and it certainly is beautiful.
I have a cute giveaway going on right now, would love it if you would stop in and check it out!
Love it! Looks so simple and has such a great effect in the room!
Beautiful !!! Love this so much ! Her room is perfection, vintage chic and oh so sweet. Can’t wait to meet Emma !
The bed crown is awesome! Thanks for the great tutorial. Emma’s room is just lovely. 🙂
Now this is do-able and elegant. Love it. New project! Yay! Thanks for sharing.
Arlene’s latest blog Super Supper
Looking at this project without the step by step instructions seems impossible (at least to moi) LOL…however your tutorial really simplifies it…think I could do it now…Yay!!!
Very cute room! I love the Bed Crown–it creates quite the statement in the room. I also really like your choice of fabrics–toille is always a fave. I wonder if it would create a tad more drama and warmth if you let down the fabric from being tied back on either side? –Just a thought! Keep up the fab decorating. 🙂
Hi Kim! I did consider that, but I thought it may be dangerous for baby to have all of that fabric hanging behind her crib. I’ll still think on it, though!
I absolutely LOVE this. So beautiful — adds so much to the room. And you’re right, it does seem pretty simple (I might still need my husband’s help, but who needs to know that? 🙂
Thanks for the tutorial. I would love to use this sometime!
That is awesome! Thanks for the great tutorial- I think even I might be able to follow your directions:)
Great tutorial! I’ve been wanting to make a mantel headboard for my guest room (just using the top part and not the “legs”) but couldn’t quite figure out how to make it come out from the wall. (Duh!) I will just use your instructions and make the headboard a little bulkier.
Hugs!
Judy
LOVE this, absolutely love it! I’m due in a few weeks, but have no idea if Peanut #2 is a boy or a girl. If she’s a SHE, I NEED this bed crown. 🙂
We have a linky party on Fridays, we’d love it if you’d link to this (and some of your other fabulous nursery ideas!).
Wow, this is so gorgeous. Thanks for sharing!
Warmly, Michelle
Hi Lindsay,
I wanted to share a really cool tip! I also have a kind of wooden canopy over my daughters bed. The trick is that the curtains/dowel, is actually NOT attached to the heavy wooden piece, but screwed onto the wall separately, just behind the decorative piece, creating the illusion of it hanging from the crown, but being much safer for little ones. If you are interested, email me at laurenc213 (at) hotmail.com, and I can take a picture of the one under my wooden canopy thing, I imagine you could pick one up in the drapery/cheap hardware section at the home improvement store. Yours looks awesome, btw. have a great day!
Lauren
Hi, I show how to make bed crowns in my blog, check it out!! Decarlowoodworks.blogspot.com
Like Mike above me I also make bed crowns. We have shops on Etsy and are one of the few people who actually make bed crowns by hand. If you find yourself without the tools or the time to make a bed crown yourself, try our Etsy shops, we both have reasonable prices and beautiful products.
I love this idea! I was thinking about using 84 in long fabric, but for my windows that barely touches the floor and mine will be flared out like the one in the picture. what lengths did you use?
Gosh, I really have no idea! I think there’s about 3 1/2 yards on each side. I just used all of the fabric I ordered, which was 8 total I think. I also made some valences and a pillow with that fabric.
I have been looking at bed crowns and am amazed how expensive they are! This is great. I have two purple and two flower curtains my mother n law gave me and I want to use them for above my bed, but as I am looking for the mantles to use I am finding that I am having a hard time finding them online. Do you have any idea which kind of store I can go to or where t look online. I would like to find something in silver or dark cherry, any help would be great, I don’t think I am a good investigator!
Hi Jamie! I would definitely try a home improvement store, like Home Depot and Lowe’s. I did a quick HD search for you and a few came up. I’d get an unfinished one and paint/stain it whatever color you wish! http://www.homedepot.com/webapp/catalog/servlet/Search?keyword=shelf+mantel&selectedCatgry=SEARCH+ALL&langId=-1&storeId=10051&catalogId=10053&Ns=None&Ntpr=1&Ntpc=1
Hi Lindsay! This is GORGEOUS! Is there any way that I can convince you to let me pay you to make two of these? (Please…)
All Because of His Amazing Grace,
Nydia
You are sweet, Nydia! I swear you could do it yourself – such an easy DIY!
Hi, I’ve just made a canopy using an unused drawer. Unfortunately I cannot show it mounted to the wall as I live in a rental property.