Makely

Let's Make Life Awesome

  • Home
  • Decorating/DIY
    • Create Your Decor
    • Decorate Your Home
    • Paint Your Walls
    • Transform Your Furniture
  • Healthy Living
    • Essential Oils
    • Family Wellness
    • Household Care
  • Project Gallery
  • Contact
You are visiting: Home » Decorating/DIY » Page 238

Making Your Dream Room a Reality – Part Two

by Lindsay Ballard on August 11, 2009 3 Comments

Today (or tonight, as the case may be), we’re going to take at the next step to Making Your Dream Room a Reality.

Last week, we talked about Identifying Your Inspiration. I hope you have all had the chance to pull together your inspiration photos. I have mine all pulled together but not all scanned into the Flickr photostream, although my scanner is currently sitting on “the chair” waiting for more pages to be scanned. It’s had to be patient due to my single focus of this last week – the repainting of Zack’s room (which you’ll see in the next few days!!).

If you haven’t had the chance to pull together your photos, go ahead and do that before you move on to the next part of the series.

Part Two: Identify Why Your Inspiration Photos Are Inspiring

The next thing we need to do to in making our dream room a reality is to figure out what inspires us about our inspiration photos. There is most likely something in particular about your photos that draws you to them, although it may be hard to initially identify. You can look at the color schemes used, lighting fixtures, DIY projects, or even an exact throw pillow that you simply must have.

In my photos from the Flickr photostream, I can identify the following sources of inspiration:
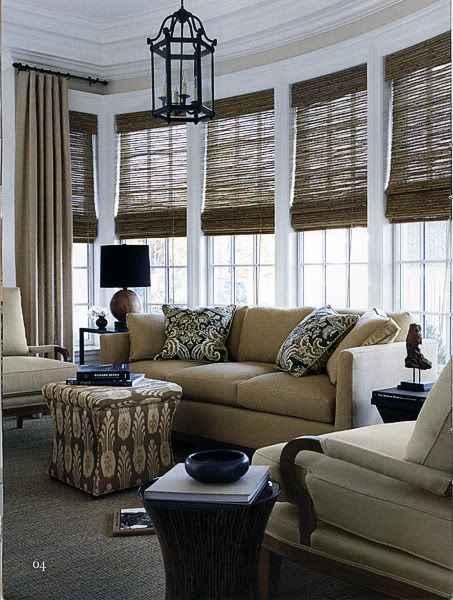
I love that the lighting fixture used looks like it should be hung on a front porch. I like to think of ways to bring the outside in and vice versa.
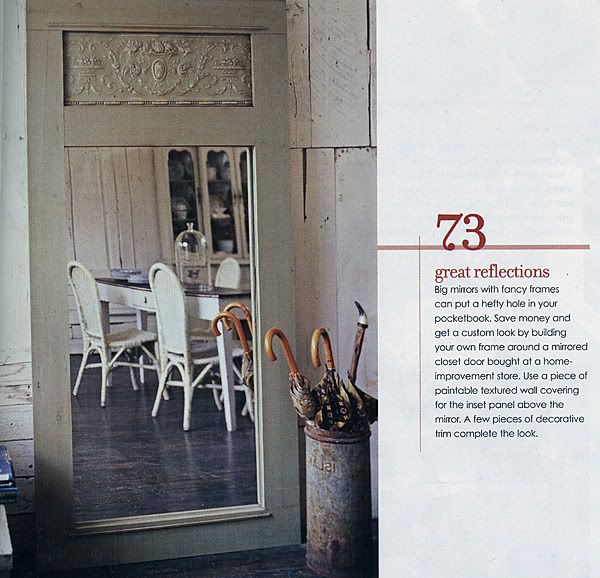
I am definitely going to recreate this project, as I love large mirrors but don’t like the large price. This is an ingenious idea from BHG!

Other than loving everything about this room, I like the wall color (I don’t know what it is, but everyone keeps asking me!), the mirrored nightstands, the window coverings, the lamps…okay, I love it all (except I think they need a rug or two) and some sort of throw to break up the white duvet.
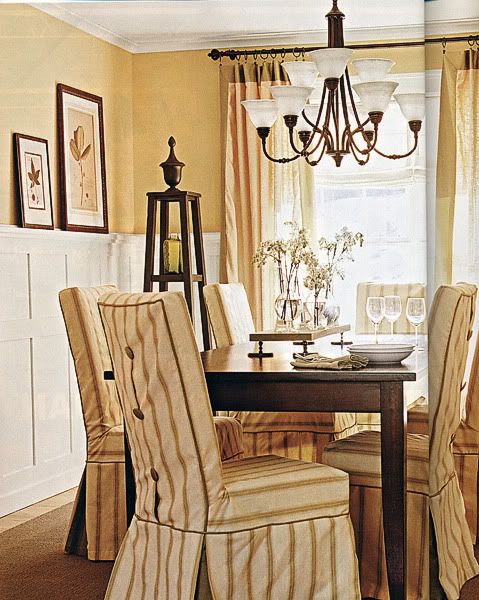
Not only do I love the paneling, but I love that they are using the top of the moulding as an art ledge.

Take a look at your photos and see what inspires you. Take note of those things, even if you don’t think it’s something you could do in your own home. We’ll address those items next weeks in Part Three of our series.

Do you notice a pattern? Share it with us in the comments! I’d love to know what specific things are inspiring to you.

A Primer on Primer

by Lindsay Ballard on August 7, 2009 27 Comments

Yesterday, I found myself covered in primer. From head…


Yep, that’s primer on my eye.

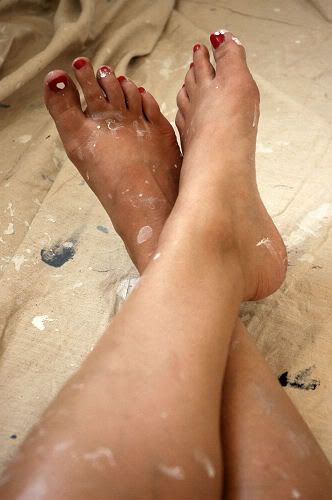
…to toe.


Yep, that’s primer on my pedicure.

I have taken on the big task this week of transforming Zack’s room. He’s on what he calls a “Lake ‘Cation” (aka visiting his grandparents at their lake house), so I am taking this opportunity to work on a little surprise for him.

I have never painted a room by myself before. Usually, my husband does the hard parts – like the ceilings, the trim, the cutting in, anything on a ladder and the touch ups. I usually roll the roller a few times on the walls and drink a Diet Coke. It pays to have a handy husband.

This project, however, I am doing alone. After spending three hours removing everything from Zack’s room and taping off all of the trim, priming seemed like a daunting task. But, I put on my big girl panties and just dealt with it.

As I was painting, I was thinking of you guys and wondering how many primer virgins we have here. I’d guess quite a few, but I really don’t know. Just in case, I thought I’d give you a little primer on primer:

1. Primer is a type of paint that you apply under your color coat of paint. It is a thinner product than regular latex paint, and is made from different properties than regular paint so that it will stick to the item you are priming very well. Most primer comes in white, but you can buy brown, black, red and gray primer if what you are painting is closer to those colors (it will be easier to cover). You can also have primer tinted close to the color of you paint, but that’s not really necessary with all of the different colored primers available today.

2. When painting your walls, primer is a MUST. Not only does it help cover a previous wall color, but it helps your paint color stick better. It’s possible that you will only need one coat of your paint color if you use primer. I also always use primer when I paint furniture. Don’t skip the primer or you’ll wind up spending more money on paint and doing more coats than you should have to.

3. Before you begin priming, make sure you tape off the parts of the room (doors, windows, trim work, etc) that you are not painting. I like to use the blue 3M painters tape.

I did buy some of the expensive green Frog Tape that’s supposed to be “the best” to use on one part of the room. I wasn’t impressed, so save yourself the expense and just get the blue tape. If you get some primer on the trim, just wipe it off immediately with a dry paper towel. It’s so thin that it will come right off.

4. Your coat of primer will not look good. This bears repeating, so I’ll say it again: YOUR COAT OF PRIMER WILL NOT LOOK GOOD. Because primer is so thin, it will not look like a coat of white paint on your walls.

Do not get discouraged. I always look at it and think, “Oh no! What have I done? This looks awful!,” and then I remember that yes, it does look awful. That’s just the way it goes.

5. Wear a baseball cap if priming the ceiling or anything above your head. Again, since the primer is so thin, it slings and drips off a paint roller (be careful not to use too much primer on the roller!) — more so than paint. I wish I could have shown you a picture of my entire body after my priming session. It literally took me 25 minutes in the bathtub to scrub it all off with a loofah…and then a friend found some on my ear later that night!

6. I know that you can now purchase paint that already has a primer mixed in. I’ll admit that I have not tried it. I will say, however, that I generally do not like products that do a double duty. For instance, when the embroidery part of my sewing/embroidery machine malfunctions, it means I can’t use the sewing part either (and led to me buying a new stand alone sewing machine). I’d like to hear your thoughts on the new paint with primer that’s available out there. Maybe I should just try it one time and see how it works.

Hopefully, I’ll be able to show you photos of the great transformation early next week. Keep your fingers crossed that I can get it finished and surprise Zack when he comes home!

How about you? Any good primer stories or lessons out there? Any newbie painters out there who have never primed? Any old pros who never prime?Let us know!

P.S. I can’t believe I’m posting a picture of my crazy-haired, crows feet laden, make-up free face for all of the Internet to see. The paint fumes must be getting to me. I need more Diet Coke.

« Previous Page
Next Page »
  • Email
  • Facebook
  • Instagram
  • Pinterest
  • Twitter

About Makely

Lindsay Ballard is a former college mascot turned political geek turned roller derby playing, DIY fanatic.

Lindsay chronicles her projects, design ideas, and lifestyle tips here at Makely, where she shares tutorials and inspiration. Her DIY designs are bold and graphic, while her spirit is fun and full of color.


Archives

Categories

PRIVACY POLICY
Copyright © 2009-2019 Makely School for Girls | All Rights Reserved | Posts may contain advertising content or affiliate links