I think the “I love of etched glass” bug that bit me originated over at Martha Stewart Living. Come to think of it, I think a lot of my love bugs have originated from MSL, but that’s a post for a different day.
I first noticed the delightful etching on these storage canisters.

I imagined replicating the design on little canisters for decorative displays of cars and balls and vintage baseball cards in Zack’s playroom. Then, I realized he’d always want to play with what was inside of them, and a three-year old and glass doesn’t exactly mix.
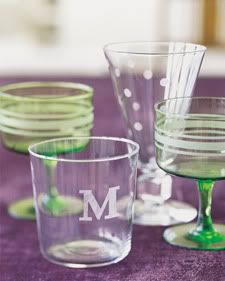
I really love these flea market glasses enhanced with etched initials, stripes, and polka dots.
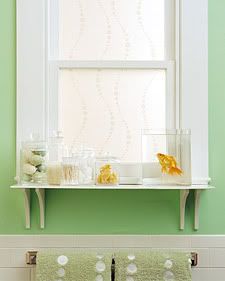
And can you imagine this gorgeous etched window in your bathroom? If I didn’t already have a glass block window in my master bath, I would definitely convince my husband to let me do it.
The thing is, I’ve never actually done any glass etching myself. There are some great tutorials out there explaining the process (try here, here, and here), but I’ve never taken the leap to actually complete my own project. I don’t know why I’ve resisted even though I absolutely love the look. Truth be told, I think I’m just scared of screwing something up. Even my own “What’s the Worst that Could Happen?” mantra hasn’t helped me over that un-Lindsay-like little hurdle.
In fact, when I saw Kathy’s wonderful monogrammed etching on her hand and dish soap dispensers on her blog, I commented whined to her about how I wish I could do that. She used a Cricut to cut her letters out of vinyl to make a stencil. I hardly ever use my old Sizzix cutter, so I haven’t sprung for a Cricut (although I do lust after them every time I visit a craft store).
Kathy came to my rescue via e-mail, explaining that I could use my Sizzix to cut vinyl. Woo-Hoo! Time to dust that baby off! She also gave me some other information about buying glass etching and vinyl supplies (you can also make those vinyl wall words and letters with these cutting machines), so I wanted to pass that information along to you. I’m sure I’m not the only one who hasn’t been quite sure where to buy these supplies.
- Vinyl sheets can be purchased in craft stores. The brand Kathy uses is by Provo Craft and comes rolled into a square container. It’s fairly pricey, so be sure to use a store coupon if you can. The sheets come in different colors, but there may be a limited selection at your craft store.
- Another source of vinyl sheeting is Sign Warehouse. You can purchase many different sizes and colors of self-adhesive vinyl, and you get more bang for your buck than buying the small sheets in craft stores. This may be a good resource if you wanted to make vinyl letters/words for your walls.
- Some crafters use regular contact paper to make their etching stencils. This would be a cheaper route if you only wanted to etch glass. You would just cut a stencil of your design out of it with a cutting machine (or an old school Exact-o knife!) and apply the sticky side to the glass to hold it in place. And yes, I feel like a total dork for not realizing I could just use an Exact-o knife to cut out a stencil, okay? Quit laughing at me.
- For the actual glass etching, Armour Glass Etching Cream is available at craft stores. Again, use a coupon when possible because it’s not cheap. Armour even has pre-cut stencils in several different fonts and themes available if you aren’t interested in making your own.
Man, after learning all of this, I’m totally ready to tackle this project. I’m also very embarassed at how much whinning I’ve done over something extremely easy. As I told my son just today, “Don’t say can’t, because can’t never could!” Now, I just have to figure out what to etch. Thanks for your help, Kathy!
Has anyone else used these products? How did your projects turn out? Feel free to include a link if you blogged your project in the comments so we can all check them out.