I’ve been a bit quiet this week, because I’m working really hard on my Procrastinators’ Party projects. I am so excited about how much work I’ve already done, and I can’t wait to share them with you next Thursday!
The largest project has involved some major priming and painting. Today as I was painting away in my garage in the 90 degree/90% humidity Texas heat, my mind started to wander. No, I wasn’t about to have a heat stroke (although seriously? So hot already? It’s only May for crying out loud!), although it felt like it could happen at any minute.
I actually started thinking of all the little painting tips I’ve learned throughout the years. It is all routine for me now since I’ve been painting for a while, but at one point painting was not so easy. In an effort to help you avoid my mistakes and to make painting a little easier for you, I’ll let you in on a few of my little secrets. I’m nice like that. You see, I didn’t read any of these tips on the Internet, a DIY book, or learn them from the guys at Home Depot. These are all lessons I’ve learned myself…the hard way.
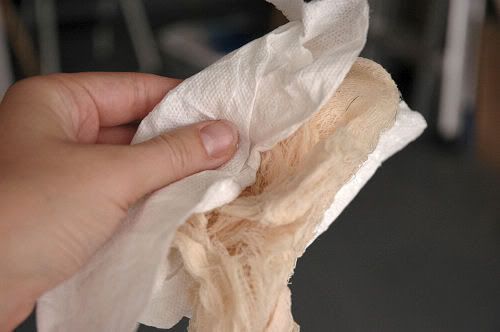
1. Tack Cloths Make for Sticky Hands – I really love using tack cloths on my projects after sanding and in between every coat of paint. Since I discovered them, I can’t paint without them. They really do remove dust and particles much better than a microfiber cloth or anything else I’ve tried. The good and bad thing about them is that they are sticky, so they make your hands or gloves very sticky, too.
I hate the feeling of sticky hands, so I used to go inside and wash my hands after every swipe of the tack cloth. Then, I realized I could put a paper towel on top of the tack cloth and save my hands from the curse of the sticky.
This technique saves a lot of valuable time when you only have a small Zack-Is-Napping-So-Now-Is-The-Time-To-Paint window.
2. Use Disposable Products When You Can – This tip is definitely not very “green” of me, but it makes panting 95% less of a hassle. I have ruined so many bristle paint brushes by not completely rinsing the paint out of them and almost ruined some projects by using old, crusty brushes.
Now, I use foam brushes, disposable paint tray liners, and plastic Solo cups. For large projects where I will be using foam rollers (the handle is easily cleanable, but the roller itself is not), I pour the paint into a disposable paint tray liner and work from there. If I’m just using small foam brushes, I pour the paint into a plastic cup.
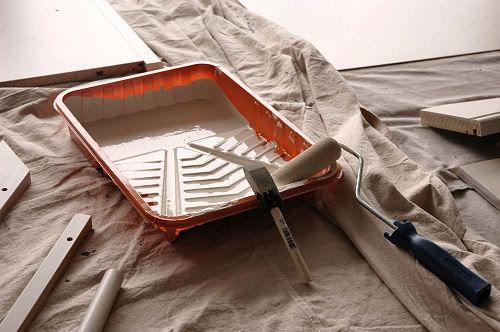
When I’m finished painting for the day, I put the foam brushes, cups and liners into a plastic grocery bag and throw the bag in the garbage can. The next day, I use a new brush and liner and start over. It really makes cleaning up a cinch.
3. Pouring Paint is Easier With a Spout – There is just something about pouring paint from a gallon can into a liner that makes me incredibly clumsy. I end up covering the entire side of the can in paint and scramble to mop up my mess with paper towels. I usually throw in a few choice words, just for the dramatics of it all.
We now have a few of the paint can spouts and they make pouring much easier. I still have to wipe up a few drips, but it’s nothing like before.
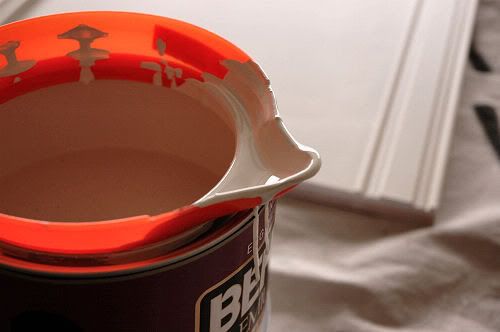
Spouts cost a buck or two at home improvement stores and can be easily washed (if you are using water-based paint) and reused. I think they also come sized for quart cans, but I don’t have any of those.
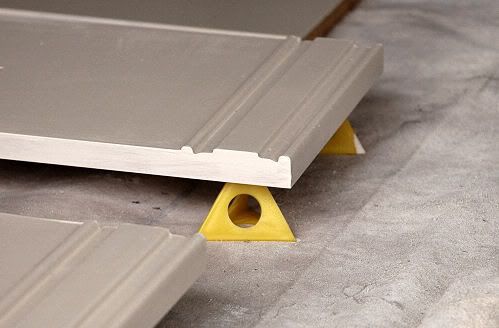
4. Paint as Many Sides as You Can at Once – A good paint job requires two things – time and patience. You need to take your time to make sure you get good coverage and avoid drips. You have to have patience because you have to let your coats completely dry before you can paint additional sides of the project. If you don’t paint a lot, just trust me on that last one. If you push it, you will ruin your project.
Meet my friends, the painters triangles. They elevate a multi-sided project so that you can paint several sides at once. They can be purchased at a home improvement or paint store for about $5 for a pack of 10 triangles.
Using these four simple tips has really made my love/hate relationship with painting swing to the love side. Do you have any painting tips to share? I’d love to hear what you do to take the “pain” out of painting!
I’m hooked on transforming furniture with paint! Visit Hooked On Houses to share what you are hooked on this week.
I need to get started on my project, but I have really been procrastinating.:) Great tips…I have lots of painting coming up, and will refer back to this.
I’m starting to paint every room in my house. Thanks for the tips. I’d appreciate any more you have to share that involve painting ceilings, rooms/walls, trim, etc.
Great tips. I wrap the brushes and rollers in saran wrap, to use them again the next day. It works great and is less wasteful.
I’m so curious to see what you do with your Proc. Project. Mine is yard work and it was 93F today and I have no desire to get out there and work. Thanks for the inspiration.
Hi Lindsay- Painting seems to take over my life as well. I have learned that if I plan to paint again later or even the next day I just tuck my nasty wet, full of paint brushes into a large ziploc bag, take out the air, and they are still wet and ready to paint when you are! Ziplocs are your friend… Also, I buy the large heavy duty aluminum foil and line my pans, then toss it when done with the project. Oh..almost forgot, I always cover the pan with more foil if I need to finish the job later.
Washing the tools are just too time consuming!
~Misti
I have been procrastinating on a painting job, but WILL do it tomorrow morning. Nothing like company coming for 5 days to motivate me!! 🙂 I am just worried about the paint drying. Since it has rained so much, it is pretty humid. And it is supposed to rain again tomorrow. The big issue is that it is the kids’ bathroom (the guest bath). We have 7, 6 that use a toilet and it will effectively take out 1 bathroom until it is dry. That means only 1 toilet or usable bathroom. Oh my!! I know I will feel so much better when it is done. I really hate having a project handing over my head….!! 🙂 I can’t wait to see yours!!
“90 degree/90% humidity Texas heat” . . . I had no idea you lived next door to me! LOL! (I feel yo’ pain, sista!)
You can put your tray of paint into a plastic bag in between coats so you don’t waste paint by pouring it back into the can and cleaning the tray each time you finish a coat. And as a couple of people mentioned, wrap your brushes in saran wrap between coats and pop them in the fridge till you’re ready for the next coat. They’ll stay for days in the fridge, even weeks!!
I have two tips for you regarding painters tape:
1. After you tape off an area, “seal” the edge of the paint. For example, you’re painting your wall, so you put tape along the baseboard where it meets the wall. Now, go along the the line where the baseboard and wall meet with the baseboard paint. Any paint the seeps under the tape won’t be noticeable because it’s the same colour as the baseboard. Now that line is sealed, so when you paint on the wall paint, it won’t seep under the tape and you’ll have a sharp, crisp line.
2. Remove painters tapes as soon as you’re done painting while the paint is still wet. This will minimize the chances of the fresh paint peeling off with the tape.
Good luck with your painting projects!!
Kelly @ DesignTies
Ooh, I’m going to look for those painting triangles before I start spray painting my kitchen cabinets. Thanks for the tip!
I’m loving your tips, guys!
I actually did the paint brush in the freezer thing today and it worked! I usually have so much paint on the brush that it’s gushy and I don’t want to reuse it, but today was the perfect opportunity for me to try it out.
I also have my paint tray sitting covered with saran wrap. I know that’s not what y’all said to do, but I’m lazy and thought I’d try it. 🙂
I love Kelly’s painters tape tips! My husband is a painters tape stud and he does what she suggested. It definitely makes a huge difference!
I am so going to buy those triangles…i usually use cans of pop/soda 😉
The title of this post grabbed me right away because painting IS painful for me. I know some people love it, but I always put it off as long as possible, and then beg my husband to do it for me. Ha. Great tips, Lindsay! And I like Kelly’s (Design Ties), too.
Have a great weekend! 🙂
My tip is to buy all of the disposable paint trays, brushes and drop clothes at the dollar store. I can’t believe how much money we have saved since we started to do this (we still have half a house to paint).
Great tips…I always want the paint to smell better…somewhere I heard putting vanilla in it. Ever heard that?
Another hint for the drippy paint cans…take a nail and punch holes in the rim…maybe one third or halfway around the rim. The paint drips back down into the can..I so love doing that!
I loathe painting. I absolutely hate it with all of my heart. But, it is a necessary evil. Thanks so much for the tips. I’ve never seen those triangles before but I think they would really come in handy.
Linda, I've not done it in a long time, but yes, you can add vanilla to the paint. Only takes a drop or two and really helps. I didn't do that and after curing for almost a week, my daughter's bed still smells 'painty' so I'm spraying vanilla/lavender in her room…we'd had unusually high humidity and rain here in the Rocky Mountains (everything is really green but I'm TIRED of rain and humidity–one reason we didn't move BACK to TX)
Great tips so far! Love the seal the tape edge idea from the comments. I'm going to try that.
Something I always do…. I have a package of diaper wipes with me while I paint. If I drip paint on the wall or get it on an edge (I'm too lazy to tape) I use a diaper wipe to wipe it off. Works perfectly!
I'm very interested in those painters triangles. I'm going to look for them.
Great tips! Here are a couple of my favorite:
1) As mentioned above, baby wipes are great to have. When I am cutting in wall paint against trim or baseboard (that is painted in a semigloss, or wipeable finish) I take the wall paint just barely onto the baseboard, then using a babywipe over my thumbnail, run my finger across to create a clean and perfectly straight cut line! No taping necessary!
2.) When painting furniture or trim, use a good quality enamel paint, and add an extender such as XIM latex extender. You only need a couple tablespoons. It extends the work-ablility and automatically smooths out brush marks!)