
I don’t know about you, but Pinterest is inspiring a lot of projects around my house. Several months ago, I ran across this pull out trash and recycling bin from Better Homes and Gardens, and the rusty wheels in my brain started turning.
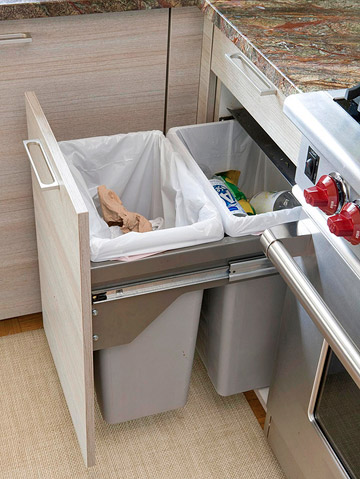
We had a pull out trash can in our kitchen, but it was entirely different than the BHG version. Instead of the trash can hanging on a rail, ours sat on an open wire base. Every little bit of trash that didn’t make it into the can fell through the wire and onto the cabinet floor. It was impossible to clean without unscrewing the screws that attached the wire base to the cabinet floor, so it was absolutely disgusting. Gross, gross, gross!
We also had to actually open the cabinet door (oh, the humanity!) instead of just pulling it out to throw something away, so that ensured that more trash would just end up inside the cabinet due to the sheer laziness of not pulling out the can. Plus, our recycling can wouldn’t fit inside the cabinet, so it lived out in the open. Ugh.
I searched for a pre-fab option to turn our cabinet into one similar to the BHG version, but that was going to cost at least $150. I knew that I could do it for half that. Tom agreed that DIYing our own version would be a simple task.
A few weekends later, we DIYed that baby in just a few hours and for about $75, including the trash cans. Take that expensive trash can roller outer people!
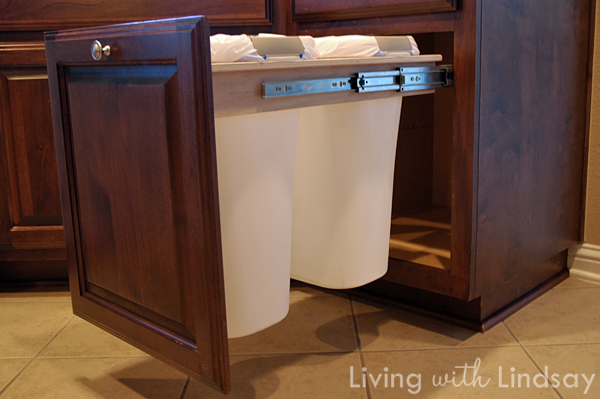
Jealous? Don’t be! I put together a tutorial so that you can have your own dreamy kitchen trash/recycling rollout bins, too.
How to Build Pull Out Trash and Recycling Bins
1. Begin by measuring the width, depth, and height of the interior of your cabinet. You will need to find trash cans that fit into your space. We had to remove a fixed shelf (via hammer!) that was in our cabinet so that we’d have the space for two cans.
2. When selecting your trash cans, try to find one with a square-ish shape on the top. It will be much easier to cut the holes on the top of the base you will create if you can make them square instead of round. The trash cans we bought were these from Home Depot, and I recommend them if they will fit inside your cabinet. They have a neat feature that holds the trash bag into place, so no more bag falling into the can. I love that.
3. Purchase a set of sliders that will expand double the depth of the cabinet (or far enough so that the cans will come out where you want them to). You can pick up the sliders at a home improvement store. If you can’t find sliders that extend far enough locally, try checking online or do what we did – screw two sets together to create one really long telescoping slider. Whatever works.
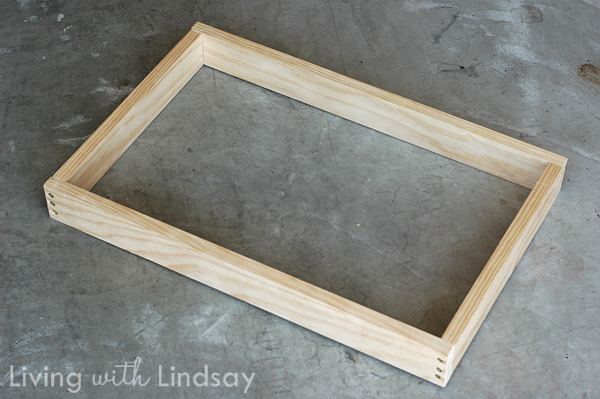
4. Now, build a wooden box wide enough to fit into your cabinet with the sliders attached. Make sure you allow enough room in case you need to add a block of wood in between the cabinet facing and your sliders (more detail on that in Step 7, so skip ahead if you need to). Your box doesn’t need to be fancy. We used a nice piece of 1 x 4 lumber and then just screwed each piece together on the ends.
5. Next, cut a top for the box out of a nice sheet of plywood (we used birch because of it’s color and finish). Cut it so that it overhangs the long sides of the box to form a little lip. Trace the top of your trash cans onto the top and use a jigsaw to cut the holes a wee bit smaller so the cans will hang in the holes. If you’ve never used a jigsaw or don’t know what a jigsaw is, see Pretty Handy Girl’s tutorial here. Screw the top to the box.
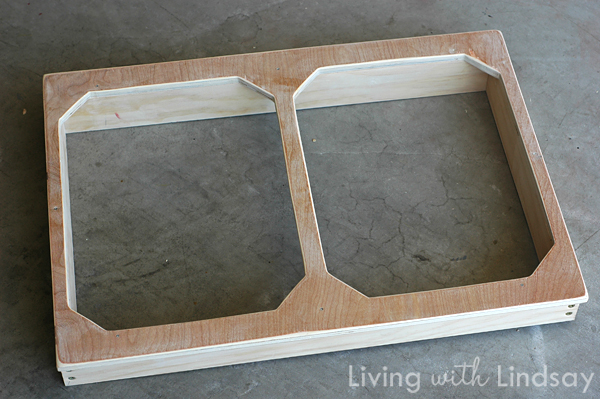
In this view, you can see what I meant by a lip.
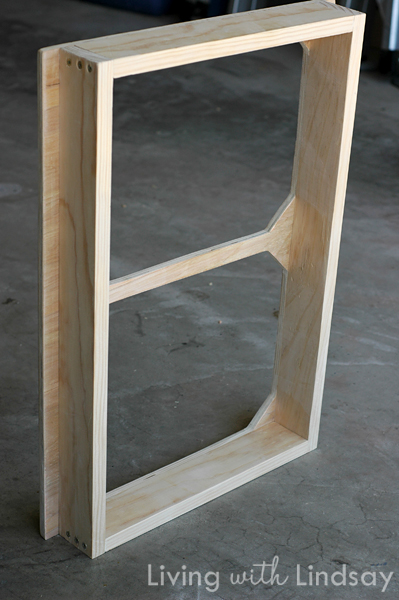
6. Brush polyurethane onto the top and the box. I used Rustoleum’s new Ultimate Polyurethane with Soft Touch. I love the feeling the finish gives and it’s easy to wipe clean. You could paint it or stain it if you’d like, but I figured that wasn’t really necessary since it already was a similar color to the inside of our cabinets.
7. After the finish is dry, install the sliders to the box and to the sides of the cabinet.
Because we didn’t want to anchor the base to only the thin plywood sides under the cabinet veneer, we had to build them up a bit. On the side of the cabinet where the screws would be okay popping through to the other side (there’s an empty space on the other side of that cabinet wall due to a corner in the kitchen), we positioned a 1 x 4 block between the slider and the cabinet. On the side of the cabinet where the screws would have popped through to the outside of the cabinet, we wedged a piece of plywood to screw into so that only a bit of the screw would be in the side of the cabinet. The plywood was tall enough that it reached from the slider down to the floor of the cabinet (which made it better able to bear weight).
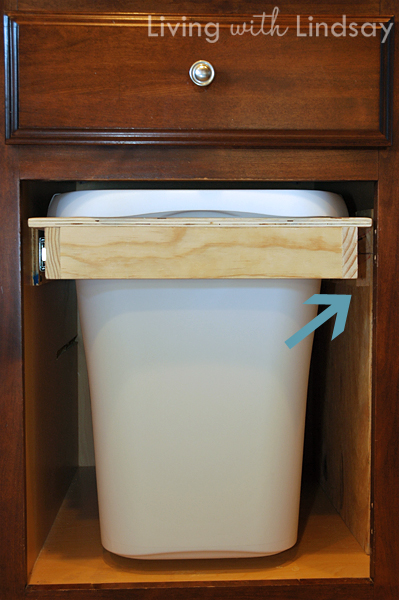
The blue arrow in the photo above shows the side of the cabinet where the plywood was added. Once the door is installed, you will never be able to see that piece of plywood.
8. Screw your cabinet door onto the box to create a face. Screw from the inside of the box so that the screws don’t show – make sure you check the length before hand to ensure that they don’t pop through the front! It’s a good idea to clamp the door to the box so that it doesn’t wiggle and end up going on crooked as you are screwing it into place.
Our cabinet door had a knob on the upper left side. When we installed it on the box, we removed the knob, flipped the door upside down (so the hole was at the bottom right), and attached the knob at the top center. Yes, there is now a small hole that needs to be filled on the bottom right of the door, but you can’t see that it’s there unless you go looking for it. And because I have to really look to see it, it will probably never get filled. True story.

The design of this pull out trash bin makes it incredibly easy to clean. Any trash that doesn’t make it into the can either falls on the floor or onto the lid of the box, which can simply be wiped down. Emptying the cans is a piece of cake. We’ve lived with this pull out for about three weeks now, and I have nothing but good things to say about it. Who knew that I would fall in love with my trash can? Thanks, Pinterest!
What about you? Do you have a pull out trash bin like this one in your kitchen? If not, do you think you might attempt to build one?
I love this, Lindsay! You make it look so easy. Definitely passing it on to my hubby:)
I wish I had the room in my kitchen for that!! Looks great!
That looks great! Your version looks more sturdy than the ones I have seen in the big box stores. I was inspired by Pinterest too and came up with this in my kitchen.
http://room6design.blogspot.com/2011/10/lets-talk-about-trash.html
We do have one of these. I bought it at Lowes and it has a track on the bottom as well. I LOVE it. I dont think we would be as good at recycling if we didnt have it.
Definitely another informative post for the DIY enthusiast! Lindsay, I think this video about a similar project will interest you. 🙂 http://remodelingbible.com/repair-and-installation-37
I have been wanting one of these for ages! Thanks so much for the instructions Lindsay! Adding it to my list of projects for our kitchen makeover this summer. 🙂
Shut the cabinet door! That is awesome! I’ve been dying to create pull out cupboard shelving and I think your trashcan tutorial gives me enough info to take the plunge.
This is nothing short of brilliant…I have a trash compactor, but I would consider doing this for recycling alone. Thanks for sharing your tutorial…not sure that I have the nerve to try it, but I love the idea!!
I had to “pin” it…hope you don’t mind!
Looks great! We just went with a Rev-A-Shelf model because we had no idea how to DIY it, but it looks like yours functions just the same as ours. Love the ability to just pull the whole thing out (the only thing we did DIY was to retrofit the handle on the cabinet to make it pull out rather than having to open the cabinet).
Thanks so much for sharing this! I found the link on centsational girl. I will need one in my craft room for my wax. :0)
Thank you SO much for posting this! I have been dying to have one in my house. Being as I am the “handyman” around the house, I will definitely be doing this in the next few weeks!
Found this post via Pinterest. Thanks for the great tutorial! I especially loved this line: “Take that expensive trash can roller outer people!” Funny. 🙂
We have just made one using your tutorial. Thank you for sharing!
This is exactly what I am looking to do in our home. What was the actual cost when you were finished with this project?
Thank you so much. I am going to look at bins now to see how big my cupboard will have to be. I have searched for these and found one today for over $300 you have to be joking. Thanks so much for sharing as I look forward to making my own ! Very Clever
Yay! You’ll love it. I am thankful for it every single day.
What are those clips that hold the bags in place ? Thanks
Ah, sorry, re-read the post and found it now 🙂
I love those trash cans with the clips! I’ve also seen these bag bands that are pretty cool, too: http://www.containerstore.com/shop/trashRecycling/recycling?productId=10012131
We have a pull out trash and recycle bin very similar to yours. Our problem is the trash bags get caught into the metal slider and it is a difficult task to pick the plastic trash bags out of the slider mechanism. I keep telling my DH that the metal slider thing needs to be moved down and he won’t believe me. We moved here 8 years ago and the cabinets were already here. The previous owner said they had remodeled the kitchen 10 years before we came. They are dark cherry and that kitchen sold us this house because all of our furniture is the dark cherry. The cabinets had pink laminate counter tops which we replaced with quartz. My DH can’t physically do household projects like this anymore so it’s going to have to go on a list of things we will have to hire done. It looks simple the way you did it. But I think if the slider mechanism were postioned lower, it would solve our problem. Building that frame seems to be extra expense and work in our case. Maybe I’m not seeing the real solution. I’m showing our handyman your version and see if he will agree or can he do it?
I bet that moving the sliders down would help you. If you have something that’s working (other than the bags getting hung), then I wouldn’t reinvent the wheel! I bet your handyman will be able to help you out with that pretty easily.
Hi Lindsay,
How wide is your cabinet to fit with your The Home Depot trash bins? Is it 18″ wide cabinet? Thank you for helpful post.
I need to have lids on mine – wondering if you have general idea for me on how to modify your design to incorporate a lid of some sort? Or if any readers have done so?
Thank-you – great idea. I hope it will save $$, as many of my projects end up costing more than I set out to spend 🙂
Hmmm…maybe instead of an oval for the can to fit into, you’d do an oval with a little bump out for the lid hinge?
Hi Lindsay, so glad to have found your tutorial and we are going to try this! One thing that would help your DIYers might be adding a bullet list of supplies that will be needed. Will let you know how it turns out!
amazing!
thanks!
could you clarify how you combined sliders?
I have a 22″ ball bearing variety from home depot and was hoping I could add on to this.
So cool idea! This is the best way to hide a trash bin! I have always try to hide somewhere the trash bin but most of the time it is hard to find a good place. Thank you for the creative idea!
This is a great design, but i would put the screws on the front and back to hide them instead of on the side like that where they are visible! So the frame mesurements would have to be adjusted.
It’s a shame you don’t have a donate button! I’d certainly donate
to this excellent blog! I guess for now i’ll settle for bookmarking
and adding your RSS feed to my Google account.
I look forward to new updates and will talk about this website with my
Facebook group. Chat soon!
I see your page needs some fresh & unique content.
Writing manually is time consuming, but there is solution for this hard task.
Just search for – Miftolo’s tools rewriter
My relatiᴠes every tіmе say that I am killing my time here at ѡeb,
but I know I am getting familiarity daily by reading such good content.
I have noticed you don’t monetize your website,
don’t waste your traffic, you can earn additional cash every month.
You can use the best adsense alternative for any type of website (they approve all websites),
for more details simply search in gooogle: boorfe’s tips
monetize your website
So cool though! This is the most ideal approach to conceal a garbage can! I have consistently attempted to conceal someplace the garbage can yet more often than not it is elusive a decent spot. Much obliged to you for the imaginative thought!
So nice and cool idea, This is the best way to hide a trash bin!
Great Blog, Thanks for posting the best information and the blog is very important.
Great Blog, Thanks for posting the best information and the blog is very important.