Spray paint is one of my favorite ways to transform something old into something brand new. It’s cheap, easy and quick, so I don’t have to spend a lot of money or time to breathe new life into an item that’s seen better days.
When spray painting smaller objects, such as drawer pulls or cabinet knobs, I always run into issues with making sure they will stand straight so the paint goes on evenly and smooth. Is it just me or can those little things be top heavy and fall over in the slightest breeze? Anyway, I finally had an a-ha moment and figured out how to hold them in place while being able to paint their entire surfaces at the same time.
How to Spray Paint Drawer Pulls and Cabinet Knobs
1. Find a flat surface of some kind that you don’t mind putting nails into. Try to use something you have on hand – there’s no need to buy something new for this. I had a sheet of foam core, so that’s what I used. An empty cardboard box, a thin scrap of wood or a small piece of styrofoam would work, too.
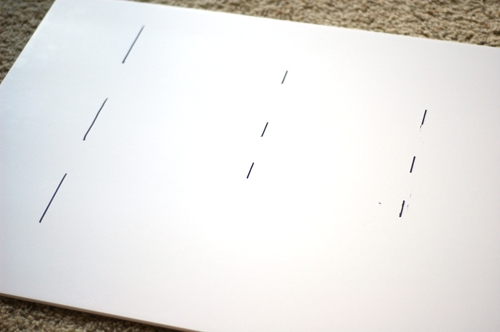
2. If your pulls have more than one screw hole, measure the distance between them and then draw a straight line that length on your surface. Draw the same number of lines as pulls, making sure you leave enough space between them that the pulls will fit without touching (you will later see that I had to move some of mine).
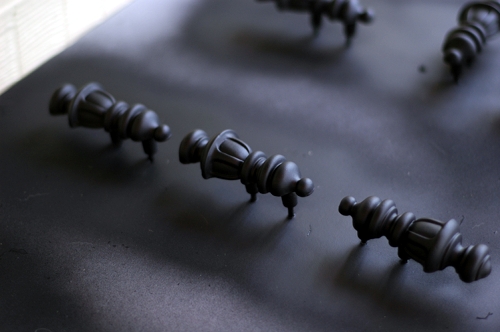
3. Using small nails (I used roofing nails), poke a hole at the end of each line. Then, push nails through the bottom of your surface. Slip your pulls over the nails.
4. Carry your surface outside. You can happily spray away knowing that your pulls won’t fall over.
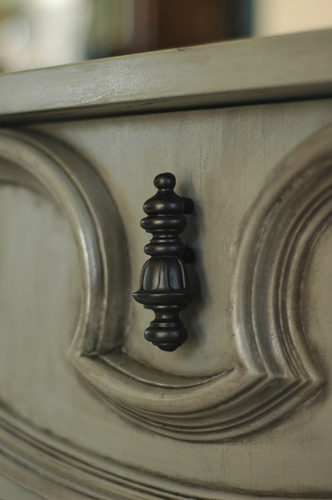
5. Let your pulls dry about an hour, and they are ready to go onto your project. Hopefully, you will be as happy with your finished results as I am with mine!
A reader asked last week how I sprayed the pulls for my yellow Miss Matched dresser without them sticking. They were tarnished brass, so I cleaned them with steel wool. Then, I spray primed them with the hinged pull pushed up, waited for that to dry, and then primed them with the pull facing down. Once the primer was dry, I repeated the process with flat paint. My personal experience has been that gloss spray paint is more tacky than flat paint, so that may be why some hinged pulls tend to stick.
What has been your experience with painting small, top heavy items like drawer pulls and knobs?
Joining Transformation Thursday at The Shabby Chic Cottage.


Great idea! I am thinking of painting all of the dresser knobs in my room!
I’ve been thinking of doing this to our kitchen knobs. I’m so glad you did this tutorial. I’m pretty creative when it comes to solving problems (I am an engineer), but I hadn’t had time to think about how they’d stand up. Thanks for posting this! I can’t wait to get some free time and start painting. Do you have any hints/tips on spraying cabinet hinges?
Why not attach them to something that could hang them upside down. Such as across deck railing so they will hang freely and you could paint everything at the same time. I will be trying this soon.
I just spray painted some knobs for a vanity I just bought and I stuck them in some styrofoam. The spray paint melted the styrofoam a bit but It held them up nicely. They were big large round knobs really top heavy. They came out pretty good. I want to get some different ones but these will work for now =)
great idea….Does the paint stand up to constant use?
You’re genius! I will definitely be using this technique.
Those pulls look great! I’ve been wanting to spray paint the knobs and pulls in my kitchen for ages, but I know I’ll have to do the cabinet hinges too. I had planned on using a piece of that foam board stuff to hold things in place, but the hinges seem to have a small plastic piece on them…now not sure if I can paint them or not. :s
Love this idea! I’ve spray painted pulls and knobs before, but I just leaned them one way, painted, then leaned them the other way. LOL. Great idea!
Clever! I have hung tricky small things by a string and then painted them (under my deck).
You’re a super smart cookie! Thanks, Lindsay!
~Kim
Love this technique. I did the same thing when I did my dresser pulls, but took a large cardboard box and cut the top and one side off and put it on top of a piece of styrofoam. That way when you spray the paint it all stays inside the box. We didn’t really have anywhere to spray other than by our deck so it kept all of the paint contained so we didn’t get it all over everything!
The power of paint is wonderful. It can save sooo much money. Thanks for sharing your tips.
GREAT idea! I’ve been spraying one side, waiting for it to dry, and then turning it over…this will save a ton of time!
Lindsay, I posted about this same thing earlier today! Great minds must think alike 🙂 I saw your post on the Shabby Chic Cottage linky party and thought, ‘Ooh, I wonder how she does it?’ So I clicked over and sure enough, we had pretty much the same idea (but you do a much better job of explaining it!). The yellow dresser looks fantastic!
You’re BRILLANT! Now why didn’t I think of that…………..?
Thankyou, thankyou! This post was perfect timing for me. I had just sanded and undercoated two bedside chests and was wondering how to do the handles! Yay, and thankyou!
Perfect! Good luck!
I’ve always hung things by clothespins from a coat hanger (like this), but it blows around a lot, especially when the spray paint hits! Your contraption is much more stable! Thanks for sharing 🙂
Great idea! Thanks! I will definitely use that!
Brilliant. I have new-found confidence after reading your post and am going to go for it! Do you have any tips on painting cabinet hinges?
Yay, Melanie! You can definitely do it.
For hinges, I’d lay them flat and open. Prime and paint one side and flip it over once it’s dry. Let them sit for a few days before you install them just to make sure they don’t stick.
Do the hinges still close well after you spray them?
I think they still should – I’ve never done it myself, but I know tons of people who have painted their hinges.
Lindsay – I used this technique (with an empty box from a case of beer :-p) for my pulls and it worked great! Thanks for the tip!
NICE! That’s my kind of recycling! 🙂
Now I can finish the dresser I am refinishing without having to find new odd size drawer pulls. Great tips!
Oh, yay! I love being able to use the original pulls.
At last! Someone with the insight to solve the prlembo!
Hi, CookieThank God for your amazing resilience and will to keep going. May He continue to bless you. Good to read your blog and also your tweets. I actually liked you in that long hair and the glasses – real cool! It has finally stopped raining this past week and we have glorious sunshine most mornings. And I miss you both a lot – especially when I bake bread.Scary to think how little time I have left here in Mussoorie – and so much to do!Meanwhile much love to you both. God bless. Mira
I consider myself a coleman fan. Grew up with the stuff. This soft case is nice if you have the shrouds or want to carry extra mantles, etc. I am able to keep them in the case with the lantern. Very convenient
This was just what i needed! Can I ask what color was that you used in this project? Also, what type of primer to use?
Hi Nicole! The color of the knobs? I think it was just flat black. Here’s more info on the dresser I put them on: http://makelyhome.com/mastering-the-master-bedroom-the-thrift-store-cast-off-dresser
This is great! Especially adding the info about nails in the cardboard or whatever so you can have the pulls dry! Just what I needed! Question…I live in NYC and dont have space to spray paint and if I do find a place outside its cold here and I know I am going to have to do so many coats so I’m just like that is not going to work…how bad is it to spray paint inside? I just dont want to do it in the house and my walls are now black with the spray paint spritzing all over the place. Any suggestions are well welcome
Here is a variation that might help. Because it is hard to spray the underside of a drawer handle. I drilled holes in each end of a piece of 3/4 inch wood about 1 wide x6 inches long. Screw a drawer pull into each end with the body of the pull extending out from the holes. Then you can hold the piece of wood and spray the pulls inside, outside and underneath. After spraying you can set the piece of wood down on a flat surface to dry.
Thank you!! Knew this was out there somewhere on the internet. So glad I found it. Didn’t like the idea of standing them up as they would have the potential to fall over.