Makely

Let's Make Life Awesome

  • Home
  • Decorating/DIY
    • Create Your Decor
    • Decorate Your Home
    • Paint Your Walls
    • Transform Your Furniture
  • Healthy Living
    • Essential Oils
    • Family Wellness
    • Household Care
  • Project Gallery
  • Contact

Thoughts on Adding Quirky Charm

by Lindsay Ballard on April 5, 2012 1,138 Comments

When I had my very first apartment, I amassed quite the selection of odd tchotchkes.  I had the entire collection of N*Sync bobble heads.  There was a Britney Spears poseable doll.  I also had a really odd light from Ikea that had these colored slides that displayed different characters, like the international symbol for a woman’s bathroom or two hands shaking.  I know it sounds weird (or maybe oddly charming?), but the quirkiness of it all made me happy.

After Tom and I got married and moved into our first house, I decided that I needed to “grow up.”  Justin and Britney were donated to Goodwill, and I spent my time collecting items like picture frames and fake flowers.  I lived in that uninspired and “grown up” way for the next few years.  My brown leather beast of a sofa still survives from that era.

But one day, I woke up and realized that I don’t have to live in a home of uninspired niceties.  I needed to be surrounded by things that make me smile, even if they seem a bit odd to other people.  Luckily, my selections have gotten a little more refined.
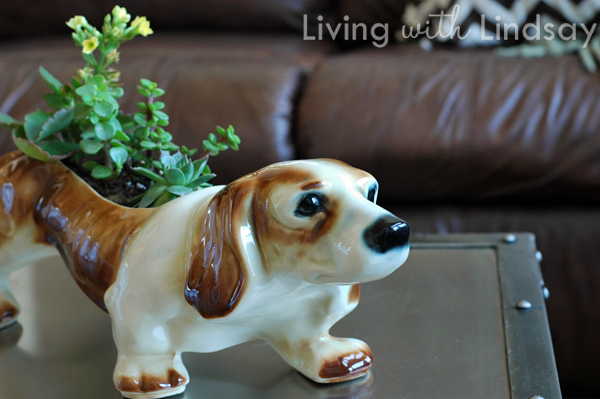
Throughout the years, I’ve collected things that aren’t really what you see in the pages of your favorite shelter magazines.  It’s much more important that the rooms in my room scream “happy, quirky fun” than they do “you should want to live exactly like me.”

A few weeks ago, there was a vintage Basset Hound planter offered on One King’s Lane for around $130.  I wanted someone to buy it so I wouldn’t spend that much money on something so weird, but I fell in immediate love with him…and I fell hard.  Then, I realized I had some credits in my OKL account, so the price seemed a little easier to swallow.  I put the planter in my cart, but then I quickly did an Internet search to make sure I wasn’t crazy for convincing myself to pay so much.

Turns out I was.  I found an identical vintage planter listed on Etsy for $38.  I released the $130 model from my OKL cart and purchased the one from Etsy.   He now resides in my living room, holding some of my favorite types of succulents.
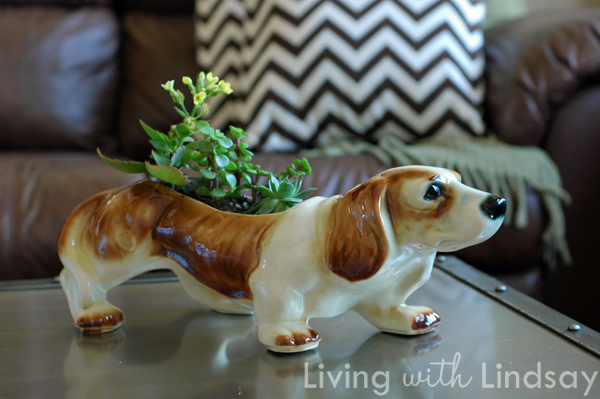
Have you ever fallen in love with something like a Basset Hound planter but been afraid to take it home with you?  Don’t be afraid to inject a little quirky character into your home.  Stop questioning  yourself and worrying about what other people will think, and add elements to your home that inspire you.

********************

Want to add some fun to your home through brightly colored pillows?  Two winners have been selected for the $25 shop credits to Modest Pillows.

  • #1 – Rachael
  • #51 – Amy P

For those of you who didn’t win, Modest Pillows wants to extend a discount code to you.  Enter the code LIVING at checkout and receive 15% off your purchase through April 15h.

********************

It’s also time to announce the winners of the Home Depot “Spring it Forward” giveaway.  Three winners have been selected to receive $20 gift cards to Home Depot.

  • #59 – Kyra
  • #82 – Tonya
  • #96 – Amber

You still have time to Spring it Forward with Home Depot.  Please visit Home Depot on Facebook to join in the fun!

What I Did Over Christmas Vacation…and for Three Months After That

by Lindsay Ballard on April 3, 2012 1,302 Comments

On Christmas morning, our kids woke up to find that Santa Claus had left them a big, wooden playscape for the backyard.  Only they didn’t quite realize that they had received a playscape.  The jolly, fat man had the nerve to leave the bolts and swings and plans, but he didn’t buy and cut the lumber or assemble it himself.  I guess he got lucky in that we are DIYers and were looking forward to putting it together ourselves.

We, I mean Santa, bought a playscape kit online from Detailed Play.  It came with a set of plans, all of the fasteners we would need, and most of the accessories.  We liked that we could select our own grade of lumber and make sure it was constructed properly.  We also liked that it was big enough that our 6-year old could still play on it for many years to come.

The day after Christmas, we rented one of the trucks at Home Depot and brought home a garage full of lumber.  It was a daunting task, but we got it all measured, cut and built in the week between Christmas and New Years Day.  The entire family joined in on the building fun, and it was good “together” time.  And yes, we can wear short sleeves at the very end of December.

So, if all this happened around Christmas, why am I just now talking about it in April?  Well, it’s because what happened after it was built that was the nightmare.

I thought that staining the playscape would be a breeze.  I stained our bed.  I’ve painted (what feels like) hundreds of pieces of furniture.  I had never stained an exterior structure before, but I figured that I wouldn’t screw it up.

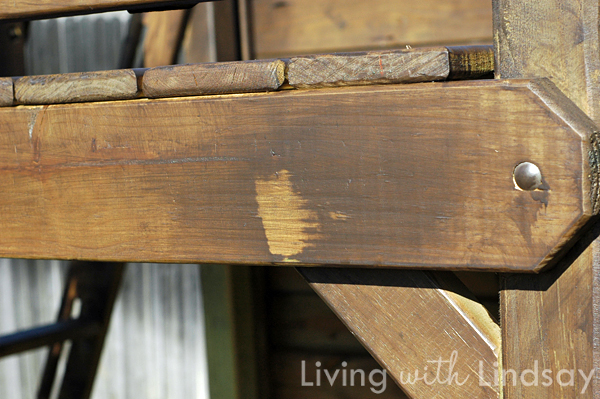
Y’all, it was bad.  It was so, so bad.  I tried to stain using a mitt, a brush and a sprayer, and each technique was worse than the previous.  I used a semi-transparent stain, which was a mistake, and my technique left a lot to be desired.  It dried streaky and splotchy and was so bad that I didn’t want any of my friends to come into my backyard.

I pouted for a few weeks, and then I ran crying to my friends at Rustoleum, who I knew had just released a new line of wood care products.  They talked me off the proverbial ledge, and they suggested some products and techniques to me to fix my awful problem.  Talk about friends with benefits!

One option was to wait until the stain weathered off the playscape, but I wasn’t willing to live with the mess for several years.  So, we decided that I had to strip the stain off the wood and stain again.

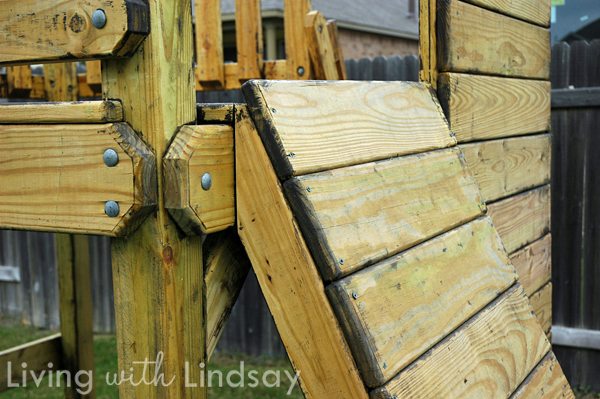
To remove the stain, they recommended I use Wolman Deckstrip-ASR.  It’s a stripper that removes weathered or relatively new acrylic or latex stains without scrapping or sanding.  I had my doubts if it would really be that easy, but we gave it a try.

Well, we decided there must be some sort of Harry Potter action going on in the bottle, because the stain just melted off.  We started by applying the stripper with a medium-grade paint brush (i.e. don’t use a nice brush, because the stripper will destroy it), but then we found out that putting the stripper in a spray bottle and just spraying it on was much easier.  After 15 minutes, we’d wash off the stripper with a small power washer that we borrowed from a neighbor. We were concerned that the stripper would kill our grass, but it didn’t at all.  See?  Harry Potter magic, people.

There were a few places where I had applied the original stain extremely heavily, and those areas were harder to strip.  We also could really only lighten the edges of the boards instead of stripping them entirely, but that was fine since we were going to re-stain it.

If you have an outdoor project to strip this spring, like a deck or a playscape, here are some tips:

  • Protect your skin, because the stripper will burn like crazy if it splashes on your skin.  I wore a long sleeved shirt, long paints, rain boots, gloves, and safety goggles.  To protect your face, put on a thick coat of thick lotion (like Cetaphil).  It sounds crazy, but it really helped.
  • Have many pairs of disposable gloves on hand.  I used Nitrile gloves, and threw each pair away after I stripped a section.
  • Wear a respirator if you are spraying the stripper.  Otherwise, you’ll inhale the stripper, and it will hurt.  I speak from experience.
  • Work a small section at a time.  It will take longer to finish, but you’ll get the job completed in one pass.
  • Don’t try to strip areas that are in the direct sunlight.  You need to keep the stripper “wet” for 15 minutes, and it dries quickly in the sun.  Choose a cloudy day to work on the project.
  • Strip over a couple of days.  Using the pressure washer means that your yard will become a swampy, water-logged mess.  We worked a little bit over the course of 3 weekends to keep our yard from getting torn up.

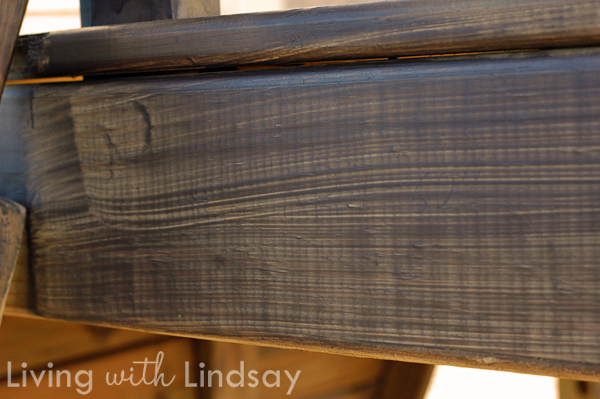
After the yard dried out, it was time to reapply the stain.  Again, my friends at Rustoleum were incredibly helpful in this regard, too.  They suggested that I use their House and Siding Solid Stain.  It’s tintable to 22 colors (I chose Black Walnut) and has a formula they call Cool Touch Technology, which promises to reduce the surface temperature 20 degrees – perfect for those of us who live on the surface of the sun (aka Central Texas).

Unlike the previous stain I used, this stain was incredibly easy to apply.  I used another medium-grade paint brush and just brushed it onto the surface.  I could immediately tell that this stain was a million times better for my project that the old stain.  Rustoleum recommends applying 2 coats, but I only did one out of laziness and needing to be finished with the project (after 3 months!).  Only time will tell if that was a bad idea.

If you have an outdoor project to stain this spring, like a deck or a playscape, here are some tips:

  • Pour the stain from the gallon can into a smaller container.  Only fill that container about half way.  When you dip your brush into it, tap it on the side of the container instead of dragging it to remove the stain.  You’ll have more stain on your brush, and it will make it easier to apply it in an even coat.
  • Work when temperatures are between 50 and 90 degrees.  I could definitely tell a difference in the consistency of the stain as the temperature changed from a cool morning to a warm afternoon.  It felt much thicker.  Get your staining finished ASAP if you live in a hot climate, as it might not go on nicely in the heat of the summer.
  • Work when it isn’t supposed to rain for 24 hours.  The day I started staining, we had a freak rain shower that wasn’t forecasted.  On a few parts of the playscape, the stain was removed in a little dot pattern where the raindrops had hit.  I was able to simply reapply the stain in those areas, but it would have been nice to not have to do that.

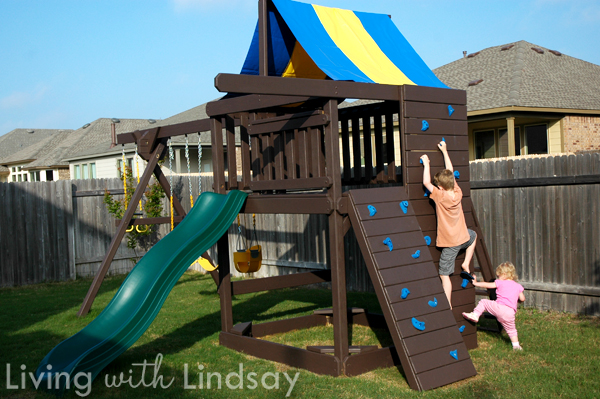
About two hours after applying the last bit of stain (because it was so warm and the stain dried so quickly), we added the accessories and our kids were ready to play.

Look at Emma!  She’s very much a “Monkey See, Monkey Do” type of gal.  At 19 months, she’d climb up that rock wall if she could just figure out how to do it.

I’m very pleased with the way the playscape turned out in the end.  As playscapes go, I think it’s lovely.  But what’s even more lovely are these happy little faces.

Pure joy.  ♥

Have you tackled stripping and staining an outdoor structure?  Did you build your playscape from plans or did you buy a kit that included the lumber?  Share your stories with me in the comments!

Thank you to Rustoleum for providing me with the products to right my wrong.  They did so with the understanding that I would share my experience with their products, but the opinions expressed here are my own.

« Previous Page
Next Page »
  • Email
  • Facebook
  • Instagram
  • Pinterest
  • Twitter

About Makely

Lindsay Ballard is a former college mascot turned political geek turned roller derby playing, DIY fanatic.

Lindsay chronicles her projects, design ideas, and lifestyle tips here at Makely, where she shares tutorials and inspiration. Her DIY designs are bold and graphic, while her spirit is fun and full of color.


Archives

Categories

PRIVACY POLICY
Copyright © 2009-2019 Makely School for Girls | All Rights Reserved | Posts may contain advertising content or affiliate links