For the last six months, I have been tripping over a builder’s grade chandelier in my garage. It was a perfectly nice chandelier and hung in our dining room for many years, but when I fell in love with the Cardboard Clover Chandelier, this ordinary fixture had to go.
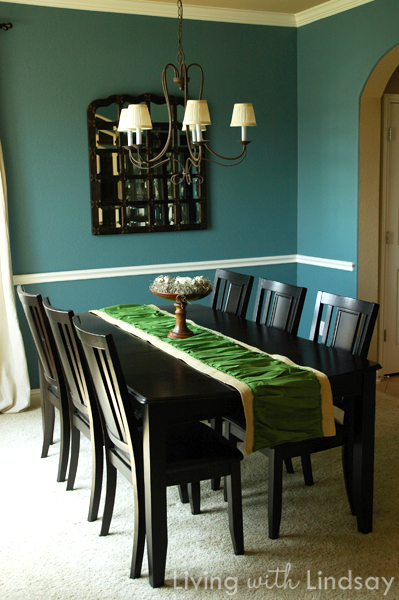
I tried to sell it at a garage sale, but there were no takers. So, it was destined to be donated during my next trip to the ReStore. Luckily, I kept forgetting to take it with me.
I say “luckily,” because inspiration struck. The old chandelier was the right scale for our lofted playroom that I’m working to update, but it needed something to make it extraordinary. I’m not sure how the crazy idea of beaded necklaces popped into my mind, but Emma and I immediately raced to Party City for supplies.

The beads I bought were $1.99 for a set of 8 necklaces. I loved the colors and that they have a metallic sheen to them. I think I used a dozen sets total.
I cut each necklace between two of the beads so that it was a long, single strand. I added some hot glue to the the first two beads of the strand and then applied them to the chandelier. I’d wrap the strand around 4 or 5 times, and then I’d add a blob of hot glue to the chandelier to secure the beads and wrap some more. I finished each strand by adding glue to the last two beads an attaching them to the chandelier. I started the next strand where the previous had left off.
Because I wanted this to be funky and fun, I alternated the colors in a rainbow pattern. I plan on painting large horizontal turquoise and white stripes on the playroom walls, so the alternating stripes of the chandelier are going to be amazing in the room. You could do this with all one color, and I think it would look really luxe.
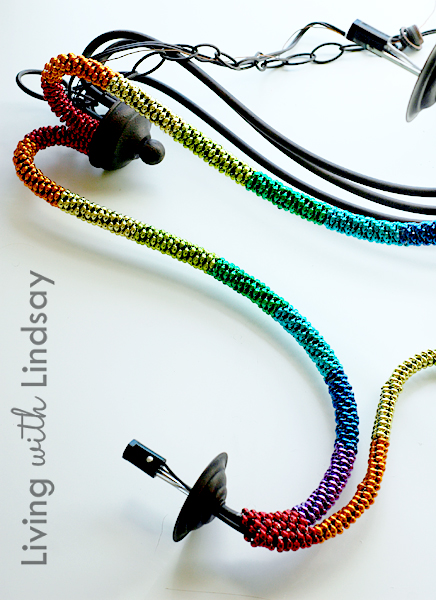
I wrapped and glued for a few hours each day over a three day period. When it was finished, I painted the old chain and a set of socket covers with Rustoleum’s Painters Touch spray paint in Blue Lagoon and then coated them both with a clear gloss.
Because the beads are metallic, the chandelier really shimmers in the light. We have a large window in the playroom, so it is sparkly even when it’s not lit.

I was worried that my 6 year old son would think it was too girly, but he thinks it’s the most amazing light he’s ever seen. He might not agree when he’s 10, but for now, I’ll take what I can get.
If you’d like to bead your own chandelier, I’d like to offer a few tips:
- If you are starting with a fixture that’s not white or dark brown/black, I’d spray paint it before you start beading. You will be able to slightly see the base color underneath the beads.
- Go with metallic beads instead of just plain plastic ones. It will kick your project up a few notches. If you can’t find them locally, try ordering from Party City or Oriental Trading online.
- Prepare yourself for some glue gun burns. I used a low-melt glue and managed to burn my fingers a handful of times.
- If your chandelier needs to be rewired, do that before you start beading it. It will be virtually impossible to take it apart without ruining it otherwise.
- Know that your beads will not be incredibly close together on curves and just accept that. Geometry makes it so that your beads won’t touch on both sides of the curve. When you are finished with the chandelier, you can go back and glue in single beads into any places that have too much negative space.
- When you are beading areas that you need to go around in a circle (like the silver cups that hold the sockets), start from the smallest part and work to the largest. I had to turn the chandelier upside down to do those parts. Otherwise, it’s hard to get the beads to lay straight.
Couldn’t you see this in hot pink in a preteen girl’s room? Or in silver tones in a funky hair salon? Or in turquoise over your dining room table?
Are you bedazzled over this chandelier? Have questions or need more directions? Let me know!