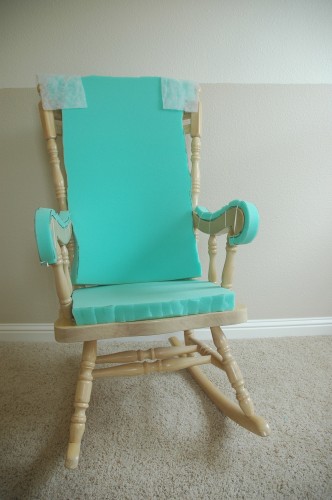
Last week, I left you with my rocking chair half-way finished and a bit scary looking.
If you missed Part One, click on over and read that before you finish this post. If not, carry on.
Adding Comfort to a Wooden Rocking Chair – Part Two
After adding the foam cushioning to my chair, it was time to slipcover it. I’ll admit, I have never, ever made a slipcover before, and I was really scared. I was certain that I’d totally screw it up. Luckily, I studied Pink and Polka Dot’s Laziest Slipcover Ever tutorial, and it answered so many questions for me. As my usual luck would have it, she released an e-book about two days AFTER I finished tucking, pinning, and sewing. I haven’t read the e-book yet, but she’s so great that I would highly recommend it if you are working on a slipcover. I’m sure it will help immensely!
I chose linen for my slipcover. I know, I know…it wrinkles like crazy. I have always loved the look and feel of linen, though, and a natural linen is the perfect color for my room. I bought about 5 yards of fabric and had about a yard leftover.
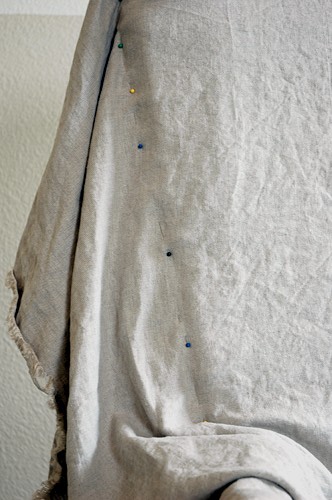
I started my slip cover by draping fabric over the back of the chair down to the arms in the front and down past the seat on the back. I pinned it along the sides of the back to start making my slipcover shape. I made the mistake at first of trying to make it too fitted, but then I remembered it was supposed to be loosey goosey.
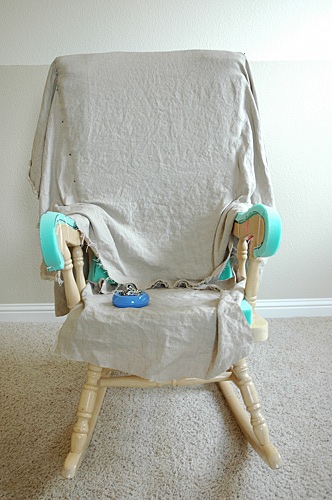
Then, I cut a piece of fabric that fit the seat and pinned it to the piece that I had already fitted to the back of the chair. I really didn’t want to have a seam at that location, but I couldn’t figure out how else to put it together due to the shape of the chair.
I then cut two pieces for the arms. I pinned each one to the piece of seat fabric, to the big piece that covers the back of the chair, and in front of the arm pieces.
Then, following Pink’s direction, I basted the entire chair by hand, removing the pins as I went along. She suggested it would be easier to sew on a machine without pins sticking you, and I think she was right about that. I sewed it together on my machine and made sure it fit on the chair. It did!
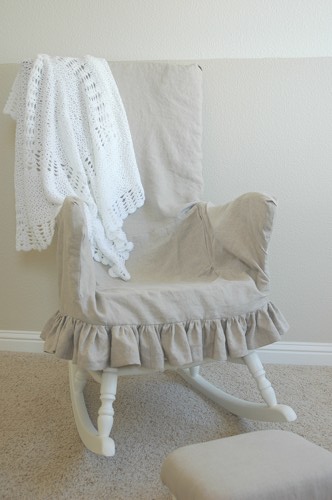
I trimmed the skirt so that it was the same length all around – just barely skimming the bottom of the seat. I then added a 4-inch ruffle around the bottom. I also painted white just the part of the chair that is visible from under the slipcover. Yes, I’m that lazy – I only panted about 1/3 of the chair.
It’s definitely not perfect – far from it, actually! But, do you know who’s not going to care? Sweet Baby Emma. 🙂 It is now so comfy and wonderful to sit in. I can’t wait to just sit and rock my baby girl (and her big brother, if he will still let me).
I’m adding this post to Kimba’s DIY Day, Gina’s Transformation Thursday, Kim’s I Made It! Party, and Traci’s Best DIY Projects of April Party. Man, do I know how to party or what?


Ohmygoodness! That’s just the cutest thing!
Your rocking chair turned out perfectly! The linen is just right for the loosey goosey slipcover and the little ruffled skirt…swooning!!! 🙂
Toooo cute, I love it!!!
Sandy
Love it!
It’s beautiful! I love it!!
Emma will love it! Is there any better feeling than rocking a sweet sleepy baby?! I know I love rocking my grandbaby in our rocker! It’s the little things that warm the heart.
What a beautiful chair. That was a great idea adding the padding and the linen looks just right (I’m swooning over the skirt too).
I think it looks great Lindsay!!! Nice job!!
Oh your sweet slipcover is just perfect!
Great job, Linsay! That turned out so precious! You know how I love slipcovers!
I got my book page tassel in the mail on Saturday and it is just beautiful! Thanks so much! I’m going to post about it shortly…
Thanks again!
Pam
I would have never thought of that!!! Such a cute idea
That looks so great Lindsay! I love the ruffle!
OH MY GOODNESS!!
I am so blown away! I love it soooo much! I want that chair with the slip cover you made. You are so talented! And you didnt even use your glue gun…
the ruffle is my favorite part…
Jen
Lindsay, this is just so beautiful & simple! I loooooooove it!
Oh my! It is perfect! I have’nt been over in a while (I promise to catch up), and I see that you’ve chosen the name Emma! I love Emma. I said if I ever had a girl, her name would be Emma Leigh.
Oh I can’t wait to “meet” her! Take care, hun!
That is just perfect! I love everything about it and you did a wonderful job. I have about a gazillion slipcovering books but actually have never gotten up the nerve to try it. Don’t ask me why–I guess I’m just overwhelmed with the idea. But you do make it sound so simple. Just maybe…
That chair turned out so pretty. I’m inspired! I have a chair to cover I think I may just paint the bottom too!
Love it! I am all about the lazy painting – if you aren’t going to see it there is just no sense!! I can’t wait to go check out that ebook!
The linen is just right for the loosey goosey slipcover and the little ruffled skirt…swooning!!!I guess I’m just overwhelmed with the idea. But you do make it sound so simple
Adorable! I just love the way it turned out, Linds!
so sweet and charming!
Who thinks of this kind of stuff–padding a rocking chair???? You amaze me Lindsay and I love the ruffle! Great job.
Wow! What a big project and it looks great! I don’t know if I could do it. I’m sure you’ll spend a ton of time in it! 🙂
~Kim
I absolutely love the relaxed look of this slipcover. I know you pointed out it was far from perfect, but I think it looks wonderful. It has a very…historic feel to it. Like a chair you would see sitting in front of a large hearth opposite a wing chair. Anyway…I love it.
I think your chair came out perfectly, imperfect. I’d love to feature your link on my WABI SABI saturday if that is okay with you 😀
http://con-tain-it.typepad.com/bobis_business_of_bliss_i/
Of course you may! I’d be honored. 🙂
Thanks Lindsay…so appreciate it!
Fondly, Roberta
Hey Lindsay…here’s my post linking your post 😀
Happy WABI SABI Saturday, fondly, Roberta
http://con-tain-it.typepad.com/bobis_business_of_bliss_i/2010/05/wabi-sabi-saturday-diy-perfectly-imperfect.html
Lindsay,
That is so darling!! I love the way it turned out. It looks so cozy, and I know your baby girl will just love the time she spends with you there. 🙂
Thank you for linking up to my party.
Blessings,
Traci
LOVE this… the ruffles are fabulous!
We have a friday fun finds party… we’d love it if you’d link to this! 🙂
lindsay,
this is the most adorable ruffly slipcover ever! i love how you cushioned the chair!
I followed your excellent directions – and am now the proud owner of a slipcovered rocking chair. Mine didn’t come out as good as yours, but I’m kind of a novice. But you know who doesn’t care? MY sweet baby Veronica! 🙂
(If anyone wants to see it, feel free to email me)
Thanks for the awesome tutorial!
Awww, so sweet!
oops – storygarvie@gmail.com 🙂
I think this turned out great and I love your idea of adding some foam for comfort. I have a rocker I could totally do this to! 🙂
What you done is best idea. I am happy to read and try it so that we will get new experience on making the comfort chair. Thank you.
I’m currently pregnant with my first child after 23 months of fertility treatments. My mom gave me the wooden rocking chair she bought in the 1980s when she first got pregnant. I really wanted to use it to rock my son, but I knew it wouldn’t be comfortable. I’m so glad I found your site!! It took me all weekend but I just finished my foam/slip covered chair. It’s not perfect but it’s better than I expected, and now the chair is so comfy. Thank you so so much!!!
Absolutely beautiful! Wish you sold them. I would buy one myself.
My health doesn’t allow me to sew anymore so I just admire others amazing work.