Makely

Let's Make Life Awesome

  • Home
  • Decorating/DIY
    • Create Your Decor
    • Decorate Your Home
    • Paint Your Walls
    • Transform Your Furniture
  • Healthy Living
    • Essential Oils
    • Family Wellness
    • Household Care
  • Project Gallery
  • Contact
You are visiting: Home » Decorating/DIY » Create Your Decor » Page 94

How to Create a Real Drum Shade Pendant Light

by Lindsay Ballard on September 22, 2011 1,915 Comments

What do you think of when you hear the word ‘drum’?  I’d assume that most people think of their kids loudly playing a drum kit in the garage, high school football halftime shows, or their favorite rock and roll band.

But, most people aren’t us, are they?  We DIYers and home decor obsessed people probably have a drum shade spring to mind instead.  Or, at least I do.

I’ve been rolling around the idea in my head for the past few months on combining the best of both versions of drums.  I’m glad that I let my mind wander down that path – it’s a lot of fun when I can dream up something pretty farfetched that ends up becoming reality.
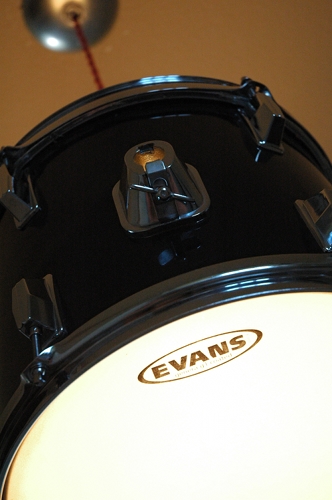
Creating this fixture was actually a pretty simple process once I figured out what to do.  I put together a tutorial so that you could do it, too.

DIY Drum Pendant Light

Materials Needed:

  • Used Tom drum
  • Short piece of scrap wood
  • 4 finishing nails
  • Drill
  • Jigsaw
  • Pendant light kit (I HIGHLY recommend the cloth cord kits from Shanell’s)
  • Scissors or X-Acto knife, if needed
  • Canopy

1.  I bought a used Tom drum off of Ebay for under $30 shipped. I’m sure I could have found a better deal at a thrift store or pawn shop around town, but I knew what I wanted and was willing to pay a little extra so that I didn’t have to drag the kids all over town. This Tom is 12 inches tall and 10 inches wide.  Any size will likely do – you’ll just want to make sure it will fit in your space.

2.  I removed the top and bottom of the drum by unscrewing the screws that hold it together.  I was able to unscrew it with my fingers, but you may need a really small socket or “drum key.”  Please note, I know not one single thing about drums, and I’m sure the top, bottom and little screws have a name.  I’m going to just call them my own terms so that other non-musician DIYers, such as myself, can more easily understand the instructions. The top and bottom will separate from the chrome ring.
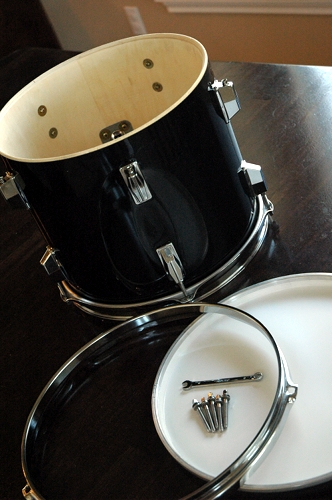
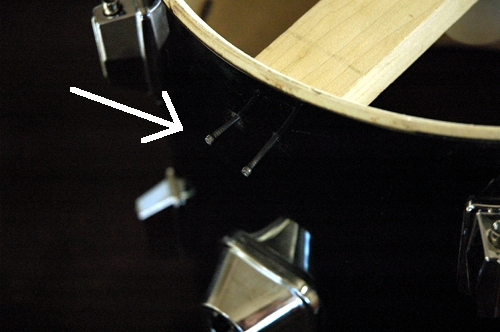
3.  I cut a piece of scrap wood so that it would fit tightly inside the drum without distorting its shape.  I didn’t curve the edges; I just cut it straight across.  On either side, I hammered in 2 finishing nails to hold it in place (drill small holes first to make it easier).  In the below photo, I hadn’t hammered them in all the way so that you could see them more easily in the photo.  Obviously, hammer them all the way in.  I colored the nail heads black with a Sharpie marker since my drum is black, but they are pretty well hidden by the chrome rings once you put the drum back together, so you might not have to worry about that.
4.  Once the strip of wood was in place, I needed to create a slot for my light fixture to thread through.  I drilled three holes that were roughly the diameter of the the piece I needed to thread.

I used my jigsaw to connect all three holes into one long slot.  The reason you need to do this is to be able to balance the drum.  There is a clamp on the side of a Tom that attaches it to a drum kit, and it creates more weight on one side of the drum.  The drum doesn’t hang straight from the center, so a slot gives you the ability to slide the fixture around to figure out its balance point.
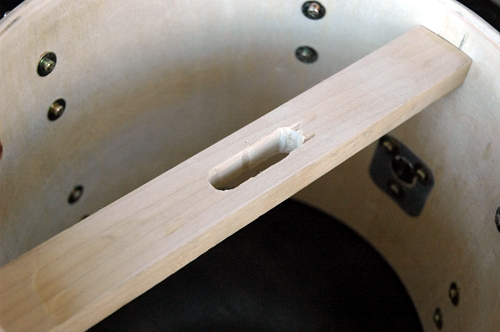
5.  Thread your fixture through the slot.  You can pick up a light kit at a home improvement store, which you will hang by a wire and chain.  OR, you can do what I did and use one of the Pendant Light Kits from Shandell’s.  Instead of having the ugly chain, these kits are made from cloth cord.  They come in several colors – red, gold, brown and putty – and in either nickel or brass finishes.  These kits are $29 each and I couldn’t speak more highly of them.  They definitely give a much more finished and vintage look to a fixture.
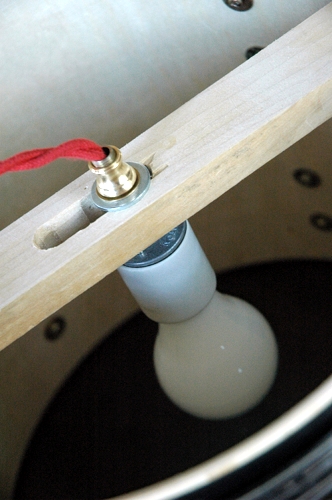
I have a 60-watt blub in the fixture, but that could vary by project.  You will need to test it on your own drum, but mine does not get warm to the touch at all, even when left on for many hours.

6.  Replace only the chrome rim on the top of your drum (where the light fixture is).  You may find that you need to cut (with scissors or an X-Acto knife) the little silver ring off of the what was then the bottom head (they part you don’t play) and put that under the chrome rim.  You’ll see what I mean when you start to put it back together – you want the top to be open, but you may need that silver ring as a spacer in between the drum and the rim.

Flip your drum over and attach the head (the part you actually drum) and rim to what is now the bottom of the drum.  You can just screw the screws back in with your fingers.

7.  Hardwire your new fixture to the ceiling.  You’ll want to buy a light canopy  to hide the wires.  I got mine at Home Depot and spray painted it chrome.

I hung my new drum pendant light in a small area of our entry way.  I could not possibly be more in love with its quirkiness and originality.  I bet you will be the only one in your neighborhood with this light fixture!
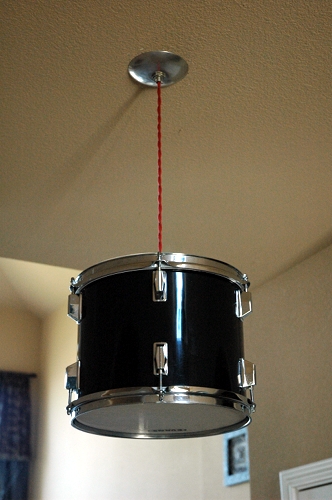
My favorite part about it is the amazing light it throws off at night.  There is an almost ethereal glow that comes through the drum head, and the light that shines on the ceiling really highlights the fixture.
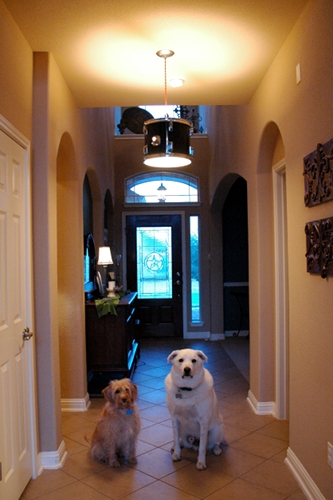
And yes, I totally bribed my dog boys with treats to sit right there.  I sure love those crazy mutts, even if their constant barking makes my head feel like I’m actually living in a drum!

So, what do you think?  Does the term drum shade have a whole new meaning for you now?

How to Rewire a Lamp

by Lindsay Ballard on September 8, 2011 1,882 Comments

Almost every time I bring home a lamp from a thrift store, Tom rolls his eyes.  “Now I’m going to have to rewire that so it doesn’t burn the house down,” he says.  Watching him work, it seemed an easy enough task, but it’s always been one of those things that I let him think that only he can do.  Ladies, I know you have those things around your house, too, right?

Well, my sweet friend Jenna from SAS Interiors is about to ruin that charade for me.  She’s put together a wonderful tutorial for you detailing how to rewire an old lamp.  Thanks, Jenna!

Thank you so much Lindsay for having me as a Guest Blogger today at Living With Lindsay! For those of you who don’t know me, my name is Jenna and I’m an Interior Designer and blogger of SAS Interiors. I have been a huge fan of Lindsay from the day I started blogging and her DIY skills just continually blow me away. She is such a kind, inspirational person and I am so glad to call her a friend!

My post for today is about changing out the “lamp guts” of a light fixture. Over the years, I’ve had many lamps that didn’t stand up over time – either because they were cheap or just overly used. Even though they didn’t function anymore, I couldn’t throw them away, because they were still “nice” looking. I assumed one day I’d take them to a lamp shop for an ole’ fixin’, or maybe give it a try myself. Well a few weeks after scoring this old lamp that cost only $1, I decided on the later… to fix it myself!

When I made my purchase, I was SO excited that the lamp only cost a dollar, that I didn’t even check to see if it worked. DUH… No problem though! Once I did test it when I got home, the existing lamp guts were totally shot. Another trek to Home Depot was upon me and I ventured into the (somewhat overwhelming) electric department!

Thankfully I didn’t need to start from scratch since the plug and wiring of my lamp were still in good condition. If they hadn’t been, I would have chosen a new lamp kit ($10+/-), like this~

via

Instead I only had to purchase two parts: On/Off Socket and Steel Threaded Nipples~

Step 1

The existing threaded nipple in the light fixture was too short and the lamp socket wasn’t able to “grab” on to the threading. Switching to a longer threaded nipple allowed for more play. Depending on the shape and/or size of the light fixture that you are fixing or making, will depend on the size of the threaded nipple you will need. The nipple is the part of the lamp that goes through the fixture and connects the lamp and the socket together. As you see above in the Universal Light Kit, the nipple is very short and wouldn’t have worked for my fixture makeover.

A simple switch of the existing washer and nut onto a longer Threaded Nipple did the trick~

Before moving on to the next step, I thought this would be the perfect time to share a diagram of how all the inner workings of a lamp go together. This is a great pictorial reference for fixing or making a lamp.

via

We’re ready to move on to the next Step!

Step 2

Pull the cord through the opening of the lamp (as seen in the diagram above), then through the threaded nipple (as seen in my image below)~

Step 3

Remove the bottom part of the on/off socket~

Step 4

Put the threaded nipple through the top part of the lamp, so the cord and wires are exposed~

Step 5

Screw the bottom part of the socket (from step 3) on to the threaded nipple. Once the wires are secured onto the socket, the washer and nut can be tightened as needed~
(If you want to add a lampshade harp, put it on before the socket piece.)

Step 6

With the wires, create an Underwriters’ Knot. This type of knot will prevent the wire from loosening inside the socket. To make this type of knot, first separate the wires, form a large loop with each wire, and thread the end of each wire through the other loop. Complete the knot by pulling the ends of the wires so the knot will tighten~

Step 7

With your fingers, twist the wire strands together to form a partial loop. Then wrap each wire clockwise around the socket terminals (the inside of the screw). Then tighten the terminal (a.k.a. = the screw) ~

Step 8

Once the wires are screwed in and tightened into the terminals, slip on the cardboard sleeve (YES, LEAVE THE CARDBOARD ON), and put the socket shell into position~

And that’s about it. This tutorial may seem long, but it actually only took a few minutes to do and this was my first-time.

This lamp makeover has a whole new set of “guts”, but isn’t done quite yet! I’d love for you to stop over at my blog, SAS Interiors, to check out the remainder of this makeover, where I’ll be changing up the color and adding a cute shade – come over and take a look!

Thanks so much again, Lindsay, for having me over today! xo Jenna

No, thank you for the great tutorial, Jenna!  I guess I won’t be able to pretend I can’t rewire my thrift store lamps any more.  😉

Added 9/13/11: Well, Tom couldn’t just leave well enough alone.  🙂  He doesn’t want us to shock ourselves, I guess!  He sent me the following info to include:

Linds – You need to include instructions about which wire to attach where.  This is important because if you do it backwards, the socket and bulb will remain electrified even when the switch is in the “off” position, which means they can shock you.  The two wires in the lamp cord are called the “hot” and the “neutral” wire.  There are different schemes for indicating which wire is which, but in general:

When both wires have the same color insulation on the outside, and same color wire inside:
hot = smooth and unmarked insulation
neutral = ridged insulation or a stripe

When both wires have the same color insulation on the outside, and different color wires on the inside:
hot = copper
neutral = silver

When wires have color-coded insulation on the outside:
hot = black
neutral = white

In all cases, the “hot” wire should go to the copper or brass colored screw, and the “neutral” should go to the silver colored screw.  Doing it this way allows the switch to interrupt the electricity before it enters the socket, instead of as it is leaving.

« Previous Page
Next Page »
  • Email
  • Facebook
  • Instagram
  • Pinterest
  • Twitter

About Makely

Lindsay Ballard is a former college mascot turned political geek turned roller derby playing, DIY fanatic.

Lindsay chronicles her projects, design ideas, and lifestyle tips here at Makely, where she shares tutorials and inspiration. Her DIY designs are bold and graphic, while her spirit is fun and full of color.


Archives

Categories

PRIVACY POLICY
Copyright © 2009-2019 Makely School for Girls | All Rights Reserved | Posts may contain advertising content or affiliate links