Makely

Let's Make Life Awesome

  • Home
  • Decorating/DIY
    • Create Your Decor
    • Decorate Your Home
    • Paint Your Walls
    • Transform Your Furniture
  • Healthy Living
    • Essential Oils
    • Family Wellness
    • Household Care
  • Project Gallery
  • Contact
You are visiting: Home » Decorating/DIY » Page 234

Easing into Fall Decorating

by Lindsay Ballard on September 7, 2009 84 Comments

Do you want to learn to create this wreath?  Find the tutorial here! 

In Austin, the official start to Fall is the moment our beloved Texas Longhorns take the football field. After 69 days of 100+ degrees this summer ( a new record! Go Austin!), I’m certainly ready for some cooler temps.

In order to usher in the new season, even when it is still in the upper 90s, I’ve decided to take on my Fall decorating baby step by baby step. I’m not too big into decorating for holidays (other than Christmas) and the seasons, but I’ve decided to at least try to give the vibe that it isn’t so hot here all the time. I haven’t done any Fall decorating on the inside, but that will be coming soon.

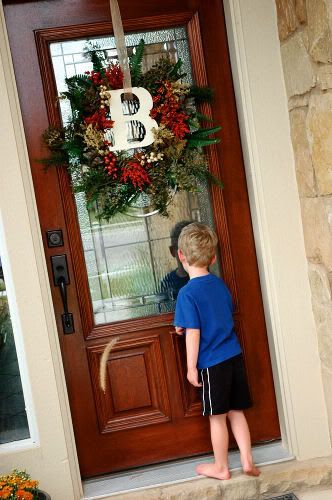
Inspired by the Nester’s new wreath, I created a Fall wreath for our front door by just sticking the wired elements into a grapevine wreath and using no hot glue at all. I know – it was hard to ignore my precious glue gun, but I like the idea of being able to easily change out the pieces when I want to freshen my wreath.

I bought the wreaths (I wired a 14 inch wreath and an 18 inch wreath together), the floral/greenery stems, and large ‘B’ at Hobby Lobby. Everything was 1/2 off and I’ll be able to reuse it all again.

The ‘B’ isn’t actually wood, but instead, it’s heavy pressed cardboard. For $1.99, I didn’t care that it wasn’t wood since our front door is shielded from the elements by our covered porch. I used a little craft paint to paint it a creamy white and I was good to go.

Oh, and ‘B’ is the first initial of my last name. I’m always surprised when people ask me why I have ‘B’ stuff since my name is Lindsay. I think the rest of my family would feel left out if I just put an ‘L’ on everything.

If you follow me on Twitter, you may have heard me say that I was running by Home Depot to pick up some of their $1.25 mums (I believe the sale runs through today, so get over there!). I added them to the planter at our front door.

Now, our front door now looks like it’s time to usher in the cooler Fall weather, even if we are still wearing shorts.
I’m adding this post to Melissa’s Fall Nesting Party over at the Inspired Room. Visit her to join in the fun!
Do you want to learn to create this wreath?  Find the tutorial here! 

Decorating With What You Already Have

by Lindsay Ballard on September 4, 2009 13 Comments

In my Making Your Dream Room a Reality series, I spent some time talking about how to work with what you already own. When redecorating a home, a room, or just a tablescape on a budget, having an eye for new uses for old items is particularly helpful.

My blog friend Tiffany from Songbird Tiff has provided us with an excellent example of having such an eye. Check out her Pottery Barn knock-off dining set. It sure is amazing what a can of paint and some elbow grease can do!

Catalog browsing is good for producing a strong case of “The Wants”. When I saw a table and chair set in the Pottery Barn catalog I knew it was exactly what I wanted.

The problem? I’m cheap frugal. (What’s the difference?)

The solution? A can of paint and a few hours.

This is the set I feel in love with from Pottery Barn. It’s wood, it’s black, it’s perfect.


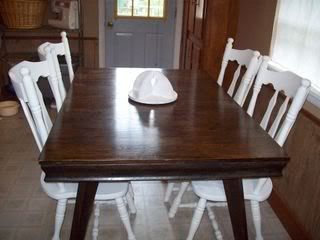
This is what I already owned.


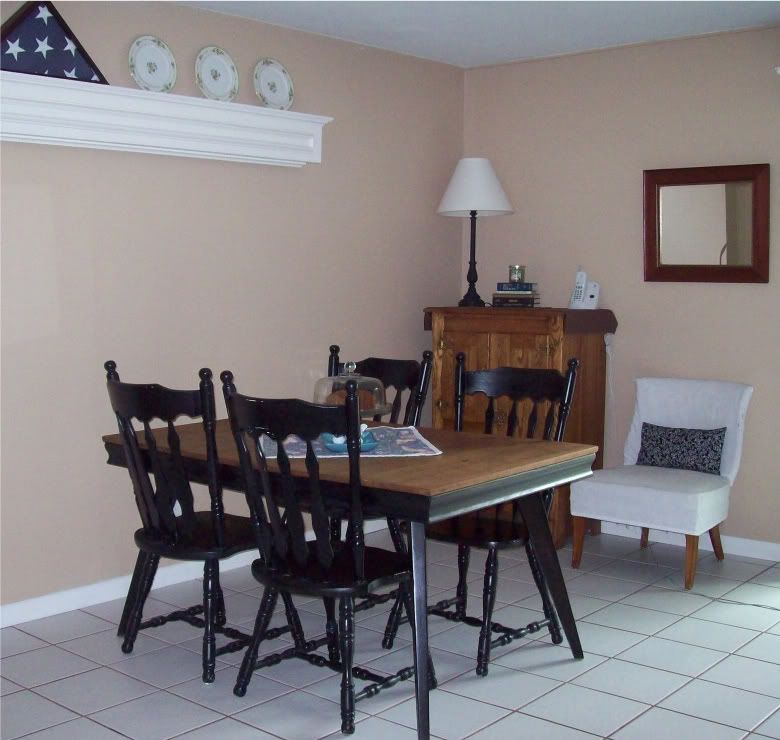
Over a year and one house later, I’m still loving my Pottery Barn knock-off set.


Cost break down:
paint $8
stain $0 (left over from a previous project)
paint stripper (spray can, safe for indoor use) $7.50
sand paper $1 (dollar general)
Total: $16.50

Do you have an inspiration photo that you could use to turn something you already own into your new favorite furniture?


Tiffany can be found blogging about eating well, thrifting, five crazy animals (plus one crazy husband!), and creating a cottage life on a outhouse budget at www.songbirdtiff.blogspot.com.

Thanks for sharing your fantastic makeover, Tiffany!

« Previous Page
Next Page »
  • Email
  • Facebook
  • Instagram
  • Pinterest
  • Twitter

About Makely

Lindsay Ballard is a former college mascot turned political geek turned roller derby playing, DIY fanatic.

Lindsay chronicles her projects, design ideas, and lifestyle tips here at Makely, where she shares tutorials and inspiration. Her DIY designs are bold and graphic, while her spirit is fun and full of color.


Archives

Categories

PRIVACY POLICY
Copyright © 2009-2019 Makely School for Girls | All Rights Reserved | Posts may contain advertising content or affiliate links