In my on-going effort to re-do my powder bath, I have been trying to collect handcut silhouettes to display on my crazy stenciled wall (oh, yeah – I have decided to stencil!). I search antique and vintage stores quite often, but “real” silhouettes are actually pretty hard to come by. In fact, I have only found 3 in all of my looking, and only one of those was unique enough for me to purchase. I know that I can find them on Ebay and Etsy, but I really like to get a close look at them before I purchase.
So, as I continue my silhouette search, I knew that I had to take matters into my own DIY hands. I have decided to mix a collection of “real” and “real-ish” silhouettes on my wall. All of my family members will be represented. Won’t my in-laws be so excited and surprised to sit for their portraits when they come to visit this weekend?
Although not as special as the real thing that are cut by an artist simply looking at your profile in about one minute, DIY silhouettes are incredibly easy to make. Let me show you!
Supplies
- Profile picture of your subject
- Black cardstock paper
- Off-white cardstock paper
- Pen that will write on the black paper
- Sharp scissors (like embroidery or manicure scissors)
- Picture frame
I began with this picture of Jackson.
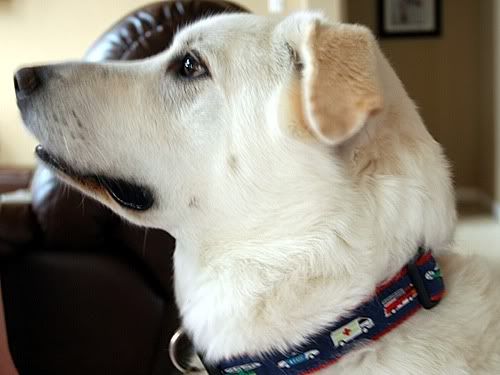
I said I was doing silhouettes of all my family members, right? Meet Jackson, better known as Jack, BaBa Jack, and Bubba. He was our first baby, and is totally a member of the family. We also have another dog and a cat who are going to have their silhouettes cut. I do draw the line at cutting the fish.
I resized this photo so that Jack’s head would fit within my 5×7 frame. Traditionally, most silhouettes fit into a 5×7 oval frame, but all I had on hand was a rectangular shape. Once it was sized correctly, I printed the photo and cut out the shape of his head.

The reverse of the photo is shown above. It may be hard to tell on the photo, but I tried to make his ruff a little wavy since he’s a fluffy dog. You’ll also see that I cut his neckline in a gently curved line. This gives it a better look than a harsh angle. I also cut out an outline of his ear. If you have an outline you want to highlight, just cut a small snip into that location and then cut away. One of my “real” silhouettes is a woman with an earring, and this is the way the artist cut into her silhouette to show the earring.
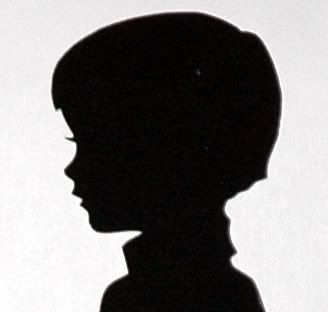
Also, people look better with an eyelash cut, like this one of my husband from when he was a child:
Next, turn your print out to face the side OPPOSITE of the way you want the final version to face. Trace the print out onto the black paper with the pen. I used one of those white gel ink pens here.
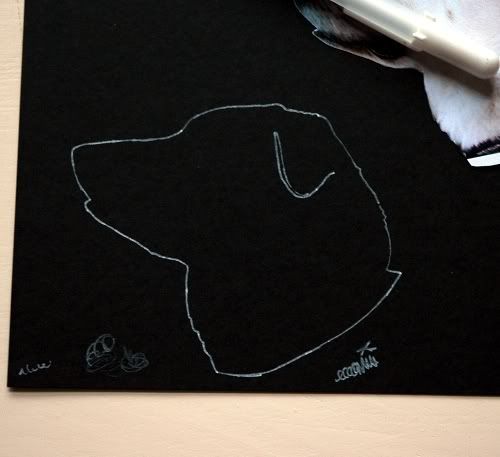
A note about the black paper: Make sure you use the blackest black you can find. There are so many variations in black paper – some look modeled, some are more brown, some are too gray. Once you start looking at black paper, you’ll see what I mean.
Cut your outline out of the black paper. When finished, flip it over and see if there are any stray pieces that need to be trimmed.
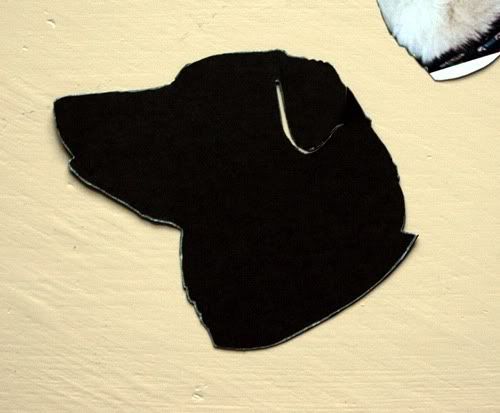
Then, use a glue stick to glue your silhouette onto a piece of off-white cardstock (the side with the left-over pen marks goes down). Generally, the paper these silhouettes are mounted on is not bright white and not ivory…it’s sort of in between. My paper here was called “Soft White” and was pre-cut into the 5×7 size I needed for my frame (It’s actually a flat note card for card making). If you want to do something really modern, I think using a patterned paper – like a stripe or damask – under the silhouette would look really interesting.
To give your silhouette a realistic feel, use a fine tip black pen to add your initials like the artists do.
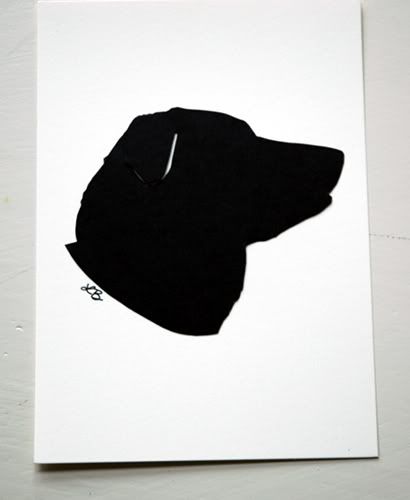
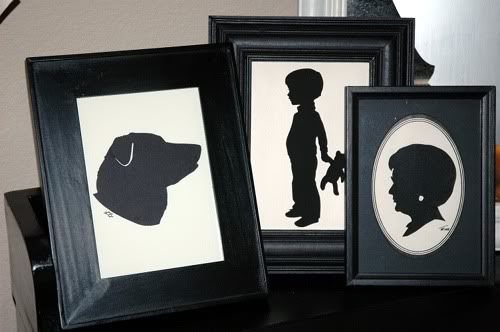
Add your silhouette to the frame and you are ready to go. Here’s Jack with some of my “real” silhouettes. You can barely tell the difference, huh?
Cute and easy! I still want to get my son’s portrait professionally cut, but I love my DIY version, too. How about you?
I've been scared to try this. Someday I'm just going to have to do it. Yours look terrific.
Awww, you aren't doing one of the fish. I think that would be a cute addition, you should reconsider. LOL
Very nice tutorial, I really need to try this one of these days!
Love it. I think this would look great in our dining room. Have you seen any on backgrounds other than white?
That's a way easier tutorial than what I've been seeing! Thanks so much. I love the earring cut out. It adds an even more custom look.
Looks *real* to me!!!
It is so funny that you should post this today; I just made silhouettes of me and my husband last night! What a coincidence!
These are very cool… have been wanting to do silhouettes of my kids. Love the idea of doing them for pets too!
I also love the earring cutout in the lady's silhouette… details!
i love this idea. i would much rather do these myself — makes it that much more special. i think i will add these to my family tree wall.
thanks – courtney
http://davidcourtneyandcamryn.blogspot.com/
It is hard to find real silhouette artists, like you said! The type the teachers trace on the walls, are clumsy, and are life-sized. Silhouettes are more valuable if they are no larger than 4 or 5 inches. In Europe they prefer 3 inches tall, max. Quality in silhouette work, has to do with speed. The best known silhouette artists are always the fastest, and they put personality into the work, in addition to a likeness and style. Edourt is the most famous, and Kara Walker.
Your tips were great. I have been doing silhouettes 40 years, and am the only living artist with the beautiful authentic French silhouette paper– they discontinued it 20 years ago. My silhouettes are collectable antiques the second I do them. Please see my site silhouettesbycindi.com Send me a photo to Cincere@wt.net and I will do a REAL silhouette for you. You can also view my work, on the Guild of Papercutters site, that mentions every authentic silhouette artist that has notability in the last 300 years, with the words that Cindi Harwood Rose, is the premier silhouette artist! What an honor by this precious, beautiful art heriloom site.
Hi Cindi-
You are never going to believe this, but I think YOU cut the only real silhouette I have of my son!! I’m not at home to check the name on it, but your name is so familiar – I just know it’s you. Have you ever done an event at Kaleidoscope Toys in Round Rock, TX? I believe it was last year.
So glad to have found you, because we have a baby daughter now and will want another one cut soon. Once I get a good photo of her, I’m definitely going to send it to you!
Yes Lindsey, I did authentic real silhouettes in Round Rock last year, and two weeks ago in Austin, Texas at the Learning Express stores. I will be back in the Fall. Call them for the schedule, we have not yet picked dates, but I am thinking September, before the big holiday rush starts. Please e-mail me at Cincere@wt.net, and see my web:silhouettesbycindi.com I can send you some silhouettes for your blog. They are really super at weddings. There I do two silhouettes– one for the guest, and one for the guest book. I do silhouettes by e-mail with all proceeds going to cancer survivors. I am the only silhouette artist in the world that still has authentic French sihouette paper, no longer made, from 40 years ago. Also look at the feature on Silhouettes by Cindi on the Guild of Papercutters site, they say Cindi Harwood Rose is the top silhouette artist, what an honor!
I would love to meet your baby. I am in Austin this week doing silhouettes for a baby shower. The exactness and soul is normally seen by a real silhouette artist. I find I can capture personality. http://silhouettesbycindi.com
That's an awesome idea!
That is a really good idea! I love how it turned out!!
Those are adorable! I've been wanting to do some silhouettes for a while but didn't know how to go about doing it. Thanks for the tips Lindsay!
I think it turned out awesome! How about profiles of your neighbors?? Could be fun right? 😀 I'll be expecting it next time I come over…..
My brother made one of my dog for me for Christmas! It ended up being my favorite gift! Yours turned out great!
http://redheadscraftmorefun.blogspot.com/2010/01/what-im-diggin.html
Have a great day,
Courtney
That is so perfect. Will you come over and hold MurphyGrace still so I can get a great profile shot? How did you manage that with Jackson?
those are fabulous! Love the idea for my black and white bedroom!
Those look like a professional profile to me. I like how you did the dogs ear.
This is so cute! I think I need to do this for my 2 cats, aka my babies 🙂
I did my sister's dog for a Christmas present and had to cut waves in her ears to simulate her curly fur on them…it was boring otherwise. Here's where you can go to see it… http://cindis.blogspot.com/2009/12/last-minute-project.html
Looks wonderful to me!!
I love my silhouettes too! I did cuts of my two dogs (fur babies, you know!) a few months back, but used craft foam, and not paper! Check them out:
http://design-aholic.blogspot.com/2009/11/modern-dog-silhouettes.html
Can't wait to see the new bathroom…
-Amy
really a nice simple idea. I like it very much and I'm going to try. thanks a lot for this idea. bye bye from tuscany – italy.
Love it! Very cute!
I remember sitting for a silhouette as a child and then using a screen and toothbrush to splatter paint the background. My mom did it and I just inherited it—I'll have to dig it out.
When we sat for the silhouette, she taped the paper to the wall and made us sit in front of a lamp so she could trace our shadow. Much easier than free-handing it!
I love this, Lindsay! I need to do this with my two boys. I especially love that full body silhouette of your hubby… I wonder how hard that would be to DIY?
I recently took pictures of my little nieces who moved to Georgia last summer. I had planned to make them into silhouettes for my sister-in-law as a Valentine's gift. Thanks for the tutorial. I wouldn't have thought of the eyelash cut. I think I'll work on them this weekend. I'll post them on my blog one of these Mondays if you'd like to check them out.
You're a genius! I love love love your blog. And I'm totally doing this for my dog and cat. Thanks for posting!
Terrific job! I actually picked up a kit/book on clearance after Christmas and haven't had a chance to give it a try yet. Your instructions are a lot easier for me to figure out. Thanks for sharing!
I love that you did a silhouette of your dog! My dog is my kid too.
I agree that you should draw the line at cutting the fish. Wouldn't it be more appropriate to fillet them? 🙂
I've been thinking about doing that for my kiddos and I remember doing one of myself as a kid but I just didn't remember exactly how. Thanks for the step by step reminder! Looks great!
xo, Kate
Ooh I want to do my dog now! Thanks so much for the tips, I'll be linking.
I've been wanting to make a few of these with my pups in my entry, so thanks for the tutorial! also, congrats on bebe #2 🙂
Silhouettes signed by famed American artist, Cindi Harwood Rose, can be bought by logging onto to the Rose Ribbon Foundatin 501 (c) 3 where people can send in a photo by e-mail, and get an ornate, signed, valuable hand-cut authentic silhouette on French archival paper, and donate to charity. Log onto http://www.silhouettesbycindi.com
I will be linking… what a terrifi Father’s Day present! Really! Perfect for twins!
Thanks!
I love the pup! Actually, I love all three. I added you to my link love blog post today. adorable!
we we foud aa nice little cut in a mystery box when we moved. It measures appprox. 6″x4″ in an oval matte 7″x 5″ in a glassed frame 11.5″ x 9.75″,by MYONG 1987.It is of a small girl holding a doll.Do you know the name MYONG? RSVP…….thanks
Just wanted to let you know that I stumbled upon your tutorial and have made silhouettes of my daughter for Christmas presents for the grandparents. Super easy and they look very nice! Thanks for the tip about including the eyelash – at first I thought it would look odd, but now I think it makes the silhouette much better.
Hi Lindsey, i will be back in Roundrock doing silhouettes before x-mas and at some Austin stores throughout the year. If you send me scans of your children, I can do a silhouette for you. I really love doing silhouette weddings! Every time I come to Austin it is for a silhouette wedding and i tie it in with silhouettes in a children’s or toy store. If you know your favorite children’s store, I will be glad to do them there, and do your children again as a gift. Your crafts are beautiful though, and are a step up from crafts others may do. You have talent.
This post brings back a fond memory of my first grade teacher creating a silhouette of each student to give as a gift for mother’s day. Sadly, the silhouette was lost through one of our many moves.
You created a lovely silhouette of your dog and now I just have to do one of my Yorkie (he is my”child”) Thank for the post.
Wow, what a great teacher she must have been!
ROSALINE Only ‘with my of other white people see,”
You are visiting: Home » Decorating/DIY » Create Your Decor » DIY “Real-ish” Handcut Silhouettes
DIY “REAL-ISH” HANDCUT SILHOUETTES
by Lindsay Ballard on January 28, 2010 48 Comments
In my on-going effort to re-do my powder bath, I have been trying to collect handcut silhouettes to display on my crazy stenciled wall (oh, yeah – I have decided to stencil!). I search antique and vintage stores quite often, but “real” silhouettes are actually pretty hard to come by. In fact, I have only found 3 in all of my looking, and only one of those was unique enough for me to purchase. I know that I can find them on Ebay and Etsy, but I really like to get a close look at them before I purchase.
So, as I continue my silhouette search, I knew that I had to take matters into my own DIY hands.