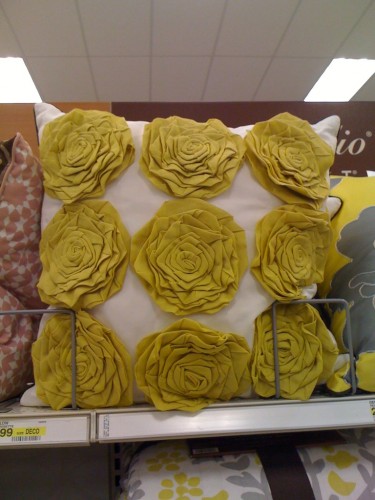
Technology is an amazing thing. Last week, I spied a Dwell Studio for Target pillow I loved, only the colors were wrong for my home. I tweeted the picture asking for ideas on how to replicate it, and I had several replies within minutes saying it would be easy to do.
One such reply came from Gina @ Stampin’ with Gina. She sent me a few pictures of different rosettes she made, and when I told her which one I liked the most, she even wrote a tutorial for me on her blog – all by that evening. That’s technology at work, my friends! {I have since found a nearly exact replica of the Dwell Studio pillow in a tutorial over at Crazy Wonderful!}
Since I figured out how to make the rosettes (with Gina’s guidance), I could go crazy and create my own design inspired by not only the Dwell Studio for Target pillow but also this amazing Ankasa ($540!!!) pillow I spotted in the March edition of House Beautiful:
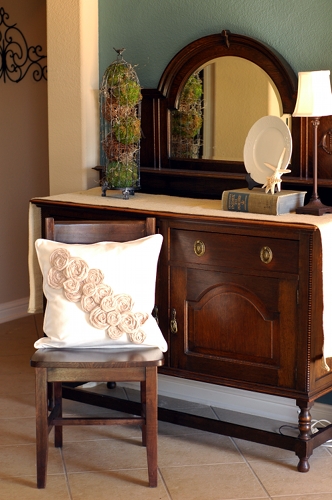
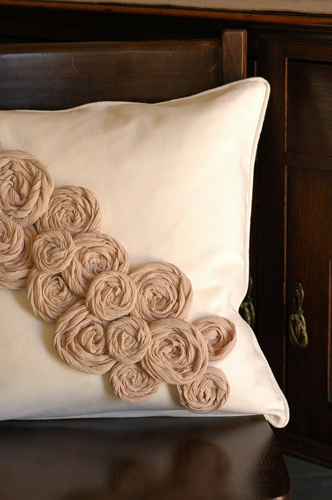
I put together a tutorial of the process I used so that you can put your own twist on the rosette embellished pillow.
Rosette Embellished Pillow
Supplies:
- Pillow cover (mine is a 20 x 20 ivory “Aina” from Ikea)
- Pillow insert (I used a down “Fjädrar” insert, also from Ikea)
- Fabric for rosettes (any fabric will work – I used 1 yard of cotton gauze)
- Felt
- Glue gun w/ glue sticks
- Straight pins
- Aluminum foil
- Fabric glue (permanent)
Directions
1. I began by cutting my fabric into 2 inch wide strips, per Gina’s instructions. I just sort of eyeballed it because they don’t have to be perfect. Because I was using 1 yard of fabric, my strips were 1 yard long and 2 inches wide.
2. Next, I put a dot of glue…oh, wait. Just see for yourself. Here’s the video I put together on making the flowers, which is slightly different for this project than Gina’s technique:
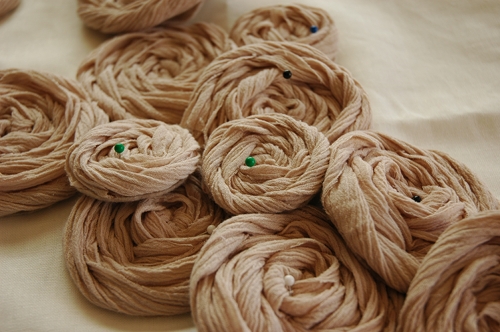
3. After I made all of my flowers, I laid them out in a design on the pillow cover WHILE the pillow insert was inserted. You will want to see how it looks with the dimension of the pillow in the cover, not just with the cover lying flat. After you have arranged your flowers in a fun design, pin them in place as best you can with the straight pins.
4. Slide the pillow insert out of the cover and insert some aluminum foil in its place. This will keep the fabric glue you are about to use from gluing your cover shut.
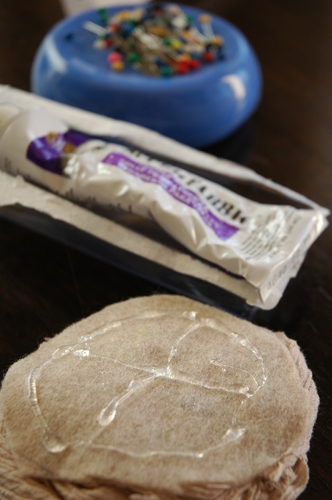
5. On the felt side of the rosettes, apply a good amount of fabric glue. I applied the glue in a circle around the edges and then made an X in the center. If your rosettes are layered in your design, work from the bottom up. It helps to take a quick photo of your arrangement in case you have to move them around when gluing.
6. Once your rosettes are glued to the pillow cover, find something heavy to lay on top of them while the glue dries. I used a few heavy books and left them there for a few hours. Then, I removed the books and let the glue set overnight.
7. The next morning, the pillow was ready to go in the insert, and I was ready to have a gorgeous designer-inspired throw pillow!
Want to add some color to your decor? Look beyond my beige flowers and try some in brightly colored fabrics.
Seems like an easy weekend project, huh? Get to it!
P.S. My pillow and I are partying at Gina’s Transformation Thursday at the Shabby Chic Cottage.

Gorgeous Lindsay!! I love it!
Thanks so much for linking to me!!! Your pillow is gorgeous! Just might have to try this one too! My hubby is going to be wondering what the deal is with all the pillows lately 😀
Girl you are sooo crafty, I love it and I think I’m going to try it sometime. Thanks!!!
Thank you for the wonderful tutorial. You made it looks so easy. This is on my list to do now.
I love it! I have always loved crafts and sewing and now that I found your website you have inspired me and I’m gonna go out and buy myself my first glue gun! 😀
Too cute and looks very professional!
Yay! I’m so excited to try this. I just found your blog today by googling “how to paint laminate furniture” and I’m going to try that tutorial too. I saw that same pillow at Target and it is the colors I wanted, but I wasn’t going to pay that for a pillow! I’m too cheap! LOL
I will be following your blog from now on!
ourlittleplacecalledhome.blogspot.com/
I LOVE LOVE LOVE LOVE LOOOOOOOVVVVVVVVEEEEEEEE these! I saw your tweet and then Gina’s response last week, so Spring has come early to my house! Flowers in bloom everywhere! And I love your design for your pillow–it looks fantastic! I’ll post some pics on your FB page of mine as soon as the kiddos go down for a nap. Oh, who am I kidding?! They won’t nap! I’ll just post them as soon as I can! Keep up the great work!
What a wonderful pillow! Very well done! Have a delightful day, Kellie xx
I love this info. I saw that very pillow at Target and thought the same thing! I liked it but not the color. Thanks for the links and the tutorial. I am ready to go make some rosettes!
Thanks
Denise
Oh my gosh, I love it! I cannot wait to try this! I made a paper wreath inspired by the one you posted years ago, and this sounds like another great project! YES! Thank you!
You are amazing! I can’t wait to try this too!
ah looks so great!
Once again another great tutorial. Job well, very well done.
LOVE LOVE LOVE Must try this one too!
I love how it turned out.
I have to say, the dresser behind the chair, GORGEOUS!!
Yanet of 3 SKBs
Thanks so much!
Lindsay,
They are fabulous! So much better than the yellow (and I love yellow) I love the color! I wish I could get away with the light colors, but with men (or adult children), dogs and cats, it’s just a dream…
Thanks for linking to me and to the other rosette tutorial. I will be making pretty pillows for my home as well.
Thanks again for all your inspiration. Hugs!
Love ya!
I LOVE this!!!!!! Your video makes it look sooooooo easy!!!!! I’ve just found my to do project for today!!!!!! 🙂 Thanks for sharing!
Yay! I hope you love your new pillow!
Absolutely gorgeous! Love the design and the colors. Any idea if a pillow cover like this can go in the washer? I’d love to make some but with 4 small ones running around everything around here has to be able to go in the wash. I’ve never tried to wash something with hot glue on it….
Hot glue washes just fine! I’d do it on the delicate cycle just to be safe. If you are going to make something like this to wash, make sure you coat the entire rosette with hot glue instead of in small sections like I did. Otherwise, I’m afraid it would come undone in the wash.
Hope that helps!
This is fabulous! I saw this pillow at Target last week and loved it, but the colors were wrong for me, too. I am definitely going to try making my own. Thanks for the tips!
I love this! Thanks for sharing. I’m actually featuring it today on my blog! 🙂
Thank you so much for coming up with a beautiful rosette pillow case tutorial for those of us who DON’T sew! 🙂
What a great tutorial, I have been looking for a good rosette tutorial for awhile. Thanks for the video, it give really clear instructions on how to make them.
One question, I am planning on putting rosettes on a onesie for my daughter and I was wondering if the hot glue would hold up to lots of washes. If not do you know of another option for sticking the rosette together?
Thanks!
This has “me” written all over it. I love it! Thanks for sharing.
Is there a certain type of fabric you suggest to use for the rosettes?
i wish i could post a picture of the pillow i made thanks to this great tutorial!! you da bomb, girl. 🙂
Thanks!
Hi lindsay, thank you very much for this tutorial! You are awesome! I cant wait to have my own house and do the stuffs posted on your site! You are very inspiring! Hope you will not get tired of sharing your talent. Thank you!
You are so sweet, Angeleigh! Thanks for the sweet comment.
With havin so mjch content do you ever run nto any issues of plagorism
or copyright violation? My website has a lot of exclusive content I’ve
either written myself or outsourced but it seems a lot of it is popping
it up all over the web without my authorization.
Do you know any methods to help prevent content from being ripped off?
I’d genuinely appreciate it.