I come from a long family of crafty women. My mother painted sweatshirts for my sister and I in the 80s. My grandmother made dolls that looked much like the original Cabbage Patch Kids. My great, great grandmother made beautiful quilts that I still cherish today.
Even though I grew up creative, I never wanted to learn to sew. Then when my son was born and I couldn’t find much clothing for him that wasn’t covered in sports themes, I tricked myself into learning how to sew.
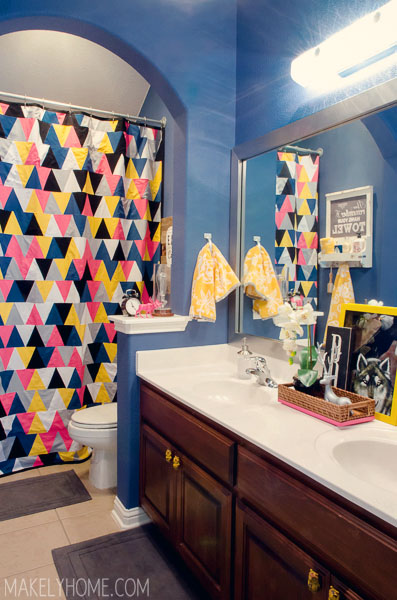
And even though I taught myself to sew, I never wanted to learn to quilt. It seemed too tedious and precise. But then when I couldn’t find a really great shower curtain for my epic kids’ bathroom, I ended up tricking myself into learning how to quilt, too.
I’m a sucker.
I had absolutely no idea how to make a shower curtain, or a pieced quilt, but I just sat down and decided to do it. I felt like playing chess, trying to see two or three steps beyond my current position. Believe it or not, it all eventually worked out without a major amount of seam ripping going on. Folks, I consider that a major win!
I didn’t take pictures along the way because I didn’t want to turn this into a tutorial since I didn’t really know what I was doing. But because so many of you have asked for one, I’ll give you the basic idea of how I made the magic happen.
1. I bought two two polyester, extra-long shower curtains from Amazon.com (affiliate link). Mine are 96 inches long, since I wanted to raise make the shower curtain as high as possible for my tall ceilings. I chose this particular curtain because I wanted it to be waterproof yet not feel like plastic. I also wanted to be able to wash it in the washing machine if needed. I used one as a liner and the other as a base for the shower curtain I was sewing.
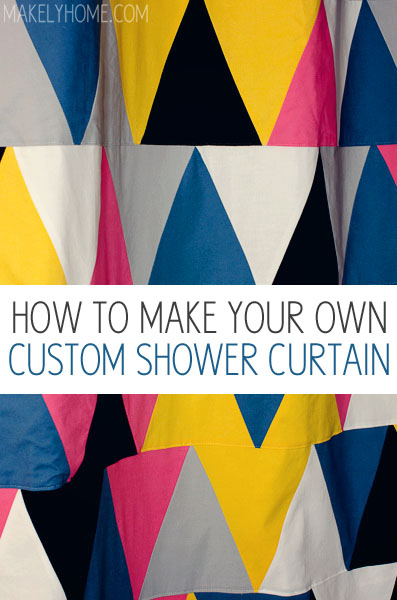
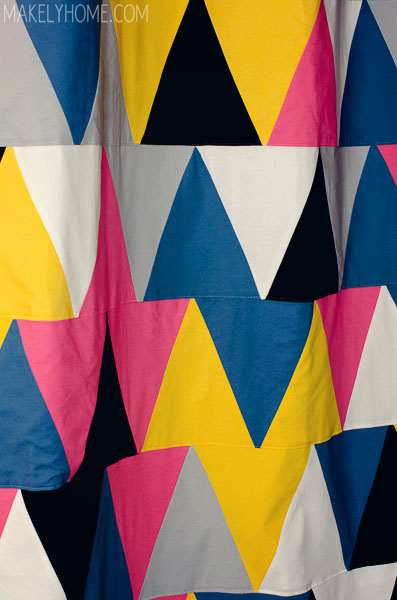
2. I ordered fabric for the curtain from a local store that has a big online presence – Fat Quarter Shop. I knew from my previous sewing experiences that I wanted to order Robert Kaufman’s line of Kona cotton. That fabric is easy to sew with and washes/presses beautifully. I chose 6 colors – Camilla, Cadet, Corn Yellow, Iron, White and Black – and ordered 2 yards of each color.
3. When the fabric arrived, I washed and pressed it.
4. Then, I spent a ridiculous amount of time cutting it into triangles. I found this blog post that showed how to make an isosceles triangle quilt, and I used that as a guide on piecing it together. I used the suggested Quilt Sense Kaleidoscope Triangle Ruler (affiliate link), which made it really easy to cut my triangles out with a rotary cutter. It wasn’t difficult to do – just time consuming.
5. After the triangles were all cut out, I started sewing them together in a random order with a 1/4 inch seam allowance. I sewed them together in rows and then went back and sewed the rows together to be slightly larger on all four sides than the shower curtain. I literally laid the shower curtain out on the floor and laid rows out on top to know how many I would need. I think I ended up with 17 rows of 30 triangles – which was about 500 total triangles.
6. After the triangles were assembled, I used my double ironing board technique to press open the seams on the back.
7. I laid the polyester shower curtain down on a flat surface and laid the triangles out on top of it. Making sure that the triangle pattern was even and smooth, I pinned the triangles to the shower curtain every few inches around the edges I also put some pins across some of the rows so that it wouldn’t bunch in the middle.
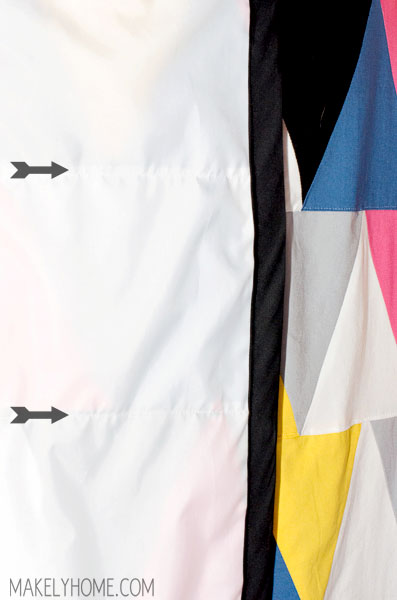
8. With invisible thread in my machine and white thread in my bobbin, I sewed across the rows. This effectively “quilts” the triangle top to the shower curtain backing. I sewed across every row about 1/8 of an inch from the bottom of the row.
Here’s how that looks from the back:
9. Then, I sewed around the edges of the curtain and cut off any extra triangle fabric that was hanging over the edges.
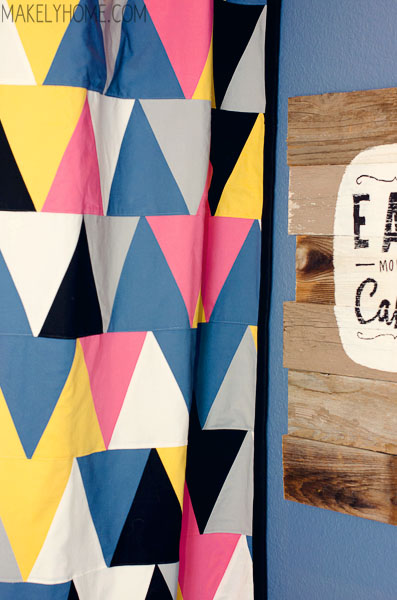
10. I bought wide black double-fold bias tape to finish the edges. There are a lot of different ways to finish edges with bias tape, but I just sewed mine on in the easiest way possible – like the “cheater” method at the end of this post.
11. Whew! Almost finished. I just used my sewing machine to make button holes on the top of the shower curtain so I would have a place to put the hooks. If you don’t have a button holer on your machine, you can always use grommets like Beckie did here.
I hung it up and used the 2nd shower curtain I ordered as a liner. It’s been in place for about a month now and is holding up perfectly. I’m so proud of it!
That was a lot of sewing, but I think it’s well worth it. I just love this shower curtain about eleventy billion times more than anything else I’ve ever seen in stores.
Questions? Definitely let me know! And thank you so much for taking a look!
It’s lovely and a million times better than store-bought! I’ve found that quilting isn’t hard, it can just be fiddly. If it is something you enjoy then it is a nice, zen activity.
I think you may have made the first “heirloom” shower curtain!
Such a fun curtain, Lindsay! It really makes the room.
I think I’ve said this before but you are a genius. I won’t attempt to make the curtain though because a lot of sewing is a NO-NO for me. I’d need therapy afterwards 😉
That is so amazing Linds. It turned out fantastic. I absolutely adore it!
My son who is in his second year of college was talking about the lack of a shower curtain just last week. I wonder if I could trick him into learning to make his own. Hmmm, a girl can wish right? Lol, pretty sure his would not look near as lovely as this.
What a creative & unique way to make a space your own! Looks fantastic! Nice work!
These designs of shower curtains remind me of designs used on Kites, cool ideas here Lindsay!.
I found this site doing a search for some shower curtain ideas. You did a wonderful job stitching this baby together. I do a bit of sewing, but this is definitely beyond my patience meter. If I were making something like this, I’d need to be sleeping under it! 🙂 Kudos to you!
I have been obsessed with geometric designs using triangles for a couple years now and have had various project ideas but have never followed through. As I was perusing Pinterest for the first time in about two months this morning, your shower curtain stood out to me in a big way. I love it!
I almost can’t believe it, but I had never heard of your blog before this. Now I’m checking out all the cute and creative things you have done. Expect lots of comments from me today!
Love the colors and how you didn’t really use a repeat of them to give it the randomness (it that a word? the spelling looks funny…). I will use this idea next time I need a shower curtain. I can never find one exactly like I want. Thanks for sharing!
What a clever idea I love it.
This curtain is gorgeous! You did a fabulous job.
Thanks so much, Katie!
This is awesome! I love it!!