
Painting stripes on a wall or two is a cheap way to create some drama in a room. Tone on tone color gives a classic feel to a room while contrasting colors provide bold visual interest. Regardless of your color choices, there are two vital elements to pulling off a perfectly striped room: 1) level stripes and 2) crisp paint lines. Today, I’m going to help you learn to do both. Yeehaw!
Last week, I tackled the stripes in my kids’ playroom. I started with a blank slate of a clean white wall (what I call “Lindsay White” – a gallon of Glidden white base flat paint that I ask the paint guys at Home Depot to add 1 oz of white to). If you aren’t going to have a white stripe, you can just prime the wall and then paint the entire wall the lightest of the colors that you will be using.
How to Tape Off and Paint Perfect Stripes
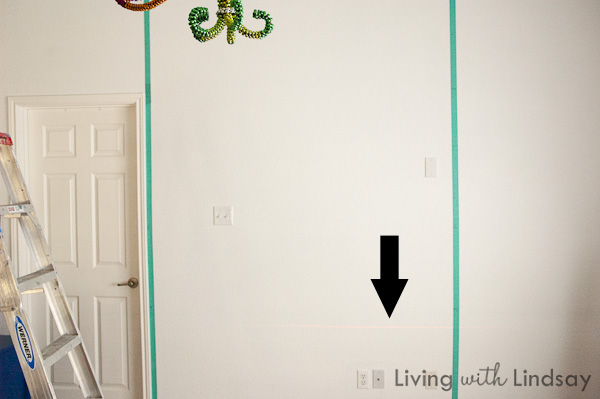
1. When your base coat is dry, tape a strip of painters tape in a straight line from where the wall meets the ceiling down to where the wall means the baseboard trim at the floor (if your final stripes are going to run horizontally). You can either line the tape up against a corner or against a window or door frame as I have done. Lining it up on a vertically straight section keeps your tape line straight.
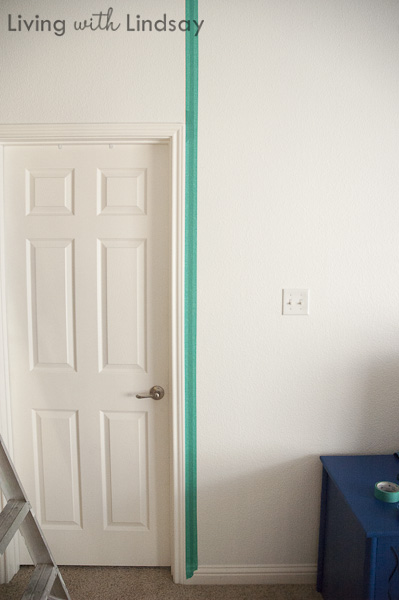
If you are going to paint vertical stripes, run your tape line horizontally along the straight edge along the ceiling or baseboard trim.
Overlap a few strips of tape over the first line that you’ve created (I have 2 tape lines in the above photo). I recommend at least two lines, but three will give you even more precise results.
2. Measure out where you want your stripes to be and make even marks across the strips of tape. I used a ruler with the long edge pressed as a straight edge against my door frame to make sure that my marks were level. Also, mark the location of the ceiling and baseboard.
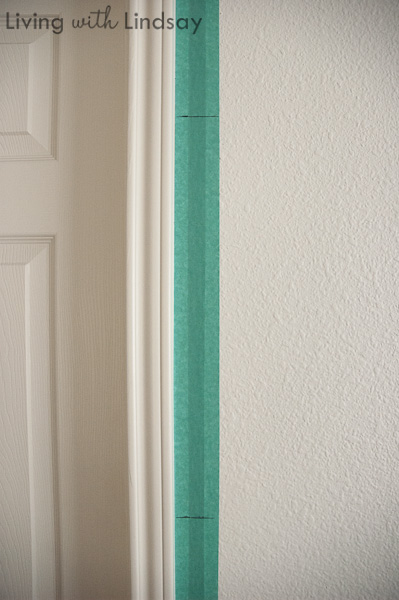
3. Next, carefully peel off the top layers of tape and reapply them on other parts of your wall. I moved mine to the corner, using the corner as my straight edge. Line up the ceiling mark and baseboard mark with your ceiling and baseboard, and your marks will be essentially in the same place (possibly give or take a few centimeters if your walls aren’t “square”). As you can see, I also went ahead and re-taped over the line next to my door so I could have a third line down the center of my wall.
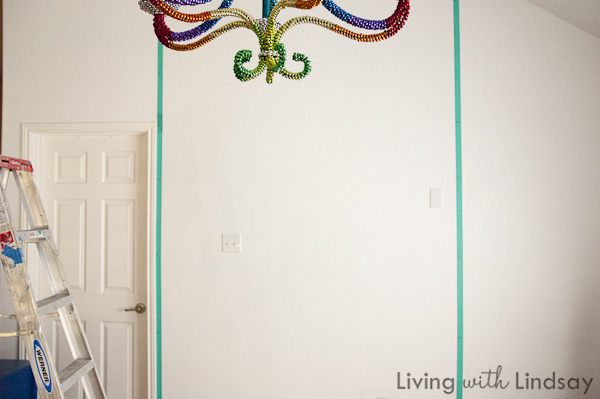
To apply the tape line in the center, Tom shot a vertical line with the laser level. To make sure the laser line was actually level (you really can’t judge from the bubble levels on the laser level itself), he used a square and another level to line it up. If you tilt your computer screen back, you can see the laser line in the photo (it’s hard to photograph in bright light).
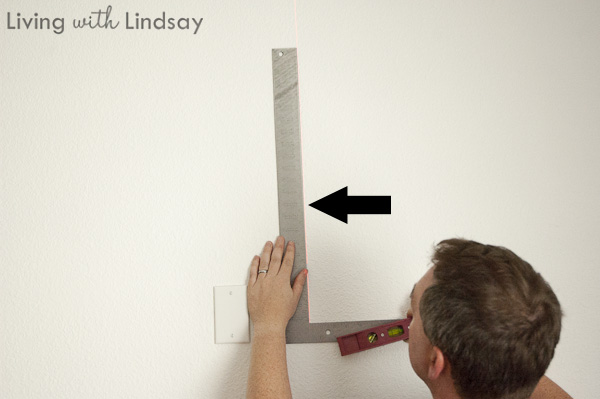
If you are painting vertical lines, you’ll be running these tape lines horizontally.
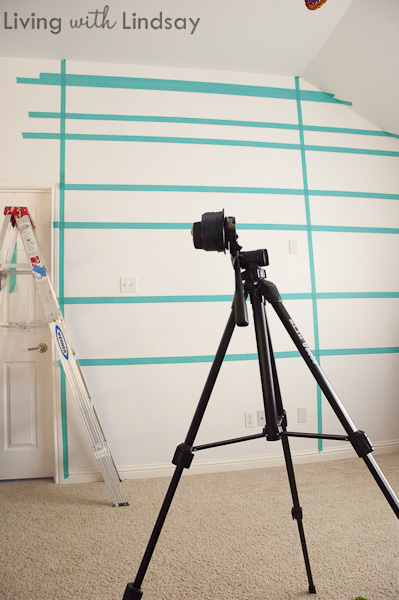
4. Now it’s time to start taping off your paint lines. I put my laser level on a tripod and shot the lines directly on the wall (instead of using the suction or pins that come with the unit). The tripod makes the laser level much easier to work with. Because you have marks on your tape lines, you will be able to line up your laser lines with those marks. Again, tilt your monitor or screen back to see the laser line in the below photo.
Apply the tape in such a way that you are fully exposing the stripe to be painted. You need to think about which color stripe you are taping. If you are taping the bottom of a stripe to be painted, you’ll need to tape BELOW the laser line. If you are taping the top of a strip to be painted, you’ll need to tape ABOVE the laser. This ensures that you are masking off the stripe that will not be painted. I think it doesn’t make much sense in words, but it will make sense when you are doing it. It always works best for me if I draw the stripes on a sheet of paper and label them blue, white, blue, white, etc.
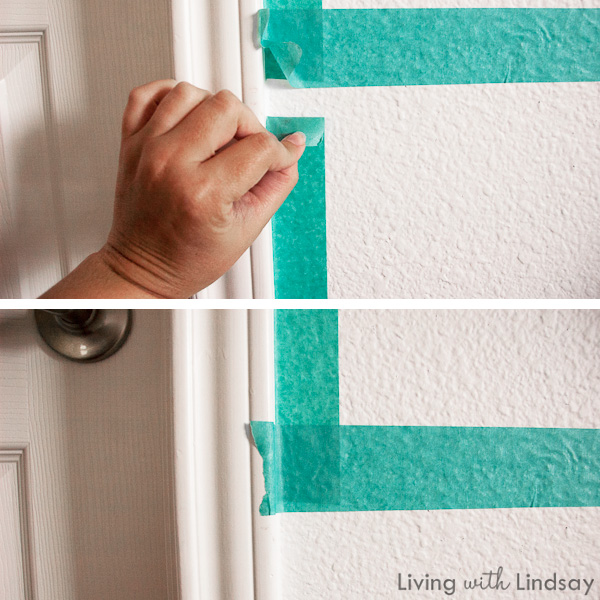
5. Once the stripes are taped off, you’ll have to remove your original tape lines (the ones with the marks). Because my horizontal lines are taped over them, I carefully lift the horizontal tape and use an X-Acto knife to cut the tape to cut along the vertical stripe. I only remove the tape on the stripes that I’m painting and leave the tape in the areas I’m not supposed to paint as a signal to myself not to paint there.
6. Get your paint on! Following the instructions I detailed in a previous post, seal your tape with the base color. When it’s dry, paint your stripe color. I always do two coats of color.
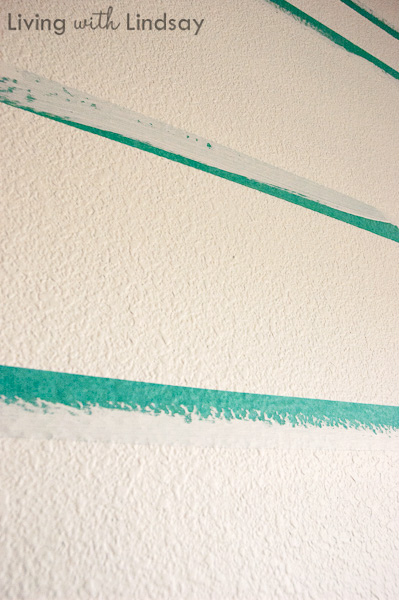
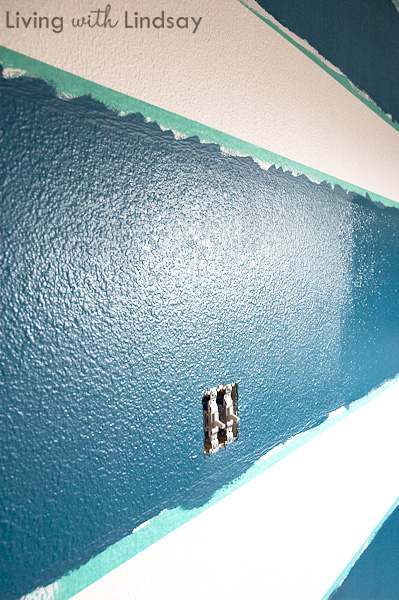
I normally peel off the tape when the 2nd coat of color is still wet. This paint color I used for my stripes is Peacock Blue by Glidden.
At this point you should have nearly perfect stripes! You may have a little bit of bleed in a few places where the tape didn’t get sealed well, but that touch up is much easier to tackle than a whole room of bleeding lines.
I also only stripe one wall at a time. I completely finish one wall and then use it as a guide for marking and taping the adjacent wall.
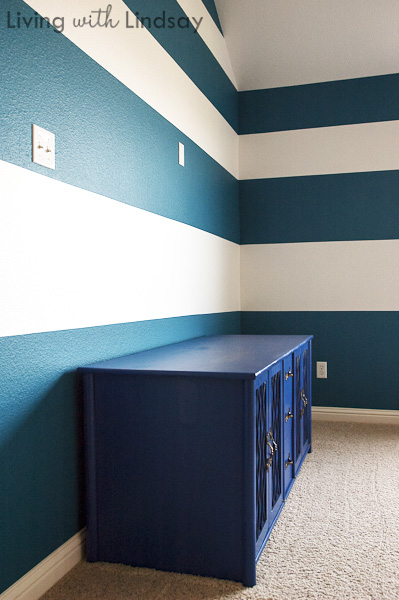
And here’s a peek at where I am in the playroom. That crazy chandelier and cobalt blue stereo cabinet are starting to look more at home, aren’t they?
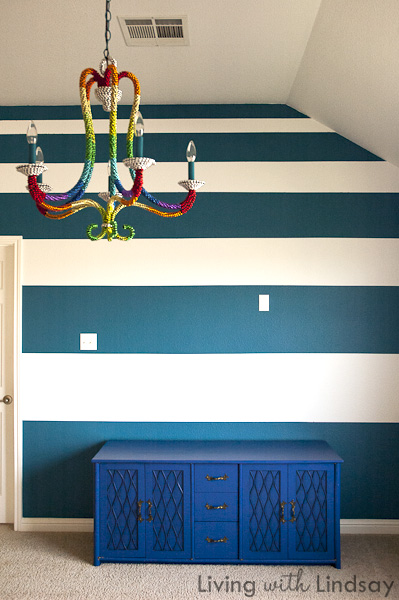
Have you painted stripes in a room before? Do you think you’ll try my marking/taping technique if you attempt it again?
P.S. A note about the tape I’m using – this is a newer painter’s tape on the market called Bloc-It. It’s almost teal in color. The company sent me some rolls to try, and I have to say that it performed beautifully for me. It’s thinner than the other tapes on the market so it tears easier. It’s also not as sticky, so you don’t have to worry about it peeling the paint off or your walls. I haven’t been too happy with the new formulation of the 3M Blue Painter’s Tape with Edge Lock and Frog Tape has never met my expectations. In my experience, no painter’s tape is going to perform without bleeds on textured walls without using the painting method I detailed. Block-It is currently only sold at HomeDepot.com and on Amazon.com, but I hope to see it in physical stores soon.
P.P.S. Ever wonder how I get it all done? Well, the kids are normally playing in the space I’m working in. Here’s how my house really looks. I say, “Don’t touch the paint!” about hundred times an hour. 🙂

How do you decide how wide to make your stripes? What kind of math did you do for the above arrangement? Did you only do two walls then based on the last picture? I love the color!
That’s a great question, Olivia! It really is just determined by how I want the stripes to look. I always have the same color on the top and the bottom, which always gives me an odd number of stripes.
If I’m doing a stripe where they are all the same width, I measure the height of the wall and divide that by the number of stripes I want – normally 7. I turn that number into the closest fraction I can, and use that to measure them out. Any left overages I apply equally to the top and bottom stripes.
For this playroom project, I wanted the stripes to get larger as they went down the wall. I also had an angled ceiling over one of the walls, so I wanted it to work out so that both walls had blue at the top. I had to measure the top of the tall wall down to where it met the shorter wall and figure out the stripes for that. Then, I basically added 4 inches to each set of stripes (blue and white) as I went down. I had some overage, so I just added into all of the other stripes.
It sounds super complicated, but it really wasn’t!
I love the way stripes look but I just don’t think I could ever do it! Your walls are beautiful!!! I absolutely love the color….I’d paint my whole house in that color if I could!
Thanks, Christine! What worries you about stripes – the big impact or the time it takes to do them?
It just seems like a really difficult task…I don’t know maybe it’s not that bad 🙂 But I’m all about bold! I guess this is one of those things that I’ll have to try and be okay with it if I end up with a slanted stripe instead! And lately I’ve been on a project fail streak so I won’t be trying it any time soon!
Ha! I hear ya on the fails. Mine are too numerous to list. I have faith that you can do it, though! 😀
This is a great post. Thank you for the tip on the tape.. any tape ive ever used it’s bled through. Ugh. Also for showing the kids as well, i’ve always wondered where the kids are when you’re doing your projects, good to see them having fun! 🙂
You’re welcome, Michelle! That paint sealing technique is really the only thing that will keep it from bleeding – I don’t care what any tape manufacturer claims. 😀
DIY is definitely a family affair around here. The only thing I don’t do around them is use power saws. Otherwise, they are right in the middle of it all. I do try to do as much as I can during their nap/quiet time, but those hours are getting shorter and shorter these days!
I’m loving the variety of stripes that you painted! That color looks especially good with the the light fixture:)
Thanks, Mindy! The variety sizing was sort of on a whim, but I’m so glad that I did it that way.
Lindsay- I’m like a broken record with my kids.
“yes, it’s wet. yes, it’s wet. yes, it’s wet.”
Love this post- and the stripe sizes are brilliant!
Thank you, Sarah!
I have. Ever heard of sealing the tape before. I will have to give that a try next time.
Girl, it will change your life. Or, at least change your painting life.
I love doing stripes – your tips are awesome. I will Pin for future projects.
I painted stripes up and across the ceiling of my daughter’s room. It looked great when it was done but it was a lot of work.
http://voneinspired.com/2012/03/how-to-make-cute-kids-rooms/#
Thanks, Vone! The stripes in your daughter’s room are brilliant!
Wonderful tutorial! I’d add call your doctor your going to need some pain meds because your back is going to be freaking killing you!
Ha! I usually am so sore after I paint a room, but I wasn’t so much after this one. I think it’s because I painted on a ladder instead of with a roller on a pole.
Hi Lindsay! Thanks for the tutorial. I’m painting stripes on an accent wall in the nursery. My tape is level, but there are slight waves. They aren’t noticable at all from across the room, but I’m worried it might be noticable when the stripes are painted. Thoughts? If you think it will be noticable, do you have advice for putting the tape down so it is perfectly straight?
Hi Julie!
When you say wavy, do you mean looking at it head on or looking at it from the side? Often times walls have a little wave to them, so that throws you a bit when you are looking at the tape. If that’s the case, it will end up okay in the end. Mine were like that and it’s not noticeable now that it’s painted.
Now if your tape itself is wavy, that will drive you crazy. You want to line it up as straight as possible.
I love your personality Lindsay. I’ve spent a good half hour here this morning and not only learned something but gotten to know you a bit. Thanks for all the time and effort you and your family put into making your blog so much fun.
I painted a stripe in my living room last year, and I still sit and stare at it when I’m in there. Real WOW! factor.
Hi Pamela! What a nice comment. Thank YOU very much for making my day.
I’m so addicted to stripes. They make such an impact with very little work!
My sons room is small and I want to stripe one wall. Will stripes make the room larger going one way or another?
Hi Christy! Horizontal stripes will make the room feel wider, and vertical stripes will make it look taller. Good luck!
Checking back on this blog as I am attempting above stripes on my kids closet doors (they’re massive!) TODAY!! So excited – was going to do symmetrical lines, but like your varying sizes better. 🙂
How did it go, Jenny??
Making the lines = not fun! The doors are not symmetrical of course by a lot (thank goodness I wasn’t doing vertical lines!), but it looks great! I ended up doing 8 chunky 11.5″ stripes and it definitely makes a difference in the room. I used the same paint that’s on their wall (can’t remember the name, but it reminds me of wet sand) with white and it makes a big difference without being overpowering or taking away from the bright artwork in the room. Thanks for the tips!!
Great! I’m so glad that it worked out. NOTHING in my house is symmetrical, and it wears me out.
I’m looking for the pics of the entire room finished with all of the furniture in it! Where are they?
Hey Girl! Try here: http://makelyhome.com/modern-vintage-inspired-playroom-reveal/
Okay, I’m trying to test this again. Let me know if you get an email from me. 😀
A long time ago, I saw the woman who used to paint for David Bromberg on the old show in LA…She used clear glaze as a first coat OVER the taped off walls. I thought this was brilliant, but I’ve never done it. Now, I am prepping to paint my dining room wall with one very wide horizontal stripe of dark gray, and I am definitely going to do this, because I HATE bleed lines. I just do not understand where these people get off advertising no bleed lines…they all bleed, peeps!
I bought my house last year and I ALSO picked all my paint colors and BOUGHT THEM. Huge mistake. I wanted a gray dining room, but it doesn’t get much light as it is…it would look like a cave, not the look I’m going for. Since it is currently white, I’m just going to paint a wide (Like five feet) stripe around the room, which I think I am so brilliant for thinking of!
Shall I let you know how/IF this works?
And…is there a brand of glaze you would recommend. I’m going to use the most matte finish I can find, which kind of makes “glaze” sound like an oxymoron.
Great idea!!! Thanks for great information!
Thanks for this article!
Love love love it! Did I miss somewhere what color you used for the teal-ish color?
The colors are very harmonious. Your article has inspired me to paint my bedroom … Thank you.!
Wow those stripes look awesome! I would love to paint my room like that but I dont think I could make it look that nice lol
They look absolutely perfect! I so want to do this in our entryway hallway but have been a little timid about it. I might just have to go for it now! Thanks for the greater inspiration and instructions!
I painted stripes up and across the ceiling of my daughter’s room
Great tutorial … and you do not have to stop at painting stripes!! You could go completly crazy with tape if you wanted to. Unleash your inner artist 🙂
Well! This is invaluable information, not only people looking to improve their own homes, but also those who are into flipping houses. Personally, i love to polish already beautiful houses up to make them really shine.
Awesome idea. I really love this post, your useful tips help me a lot, I’m going to try them out . Thanks for sharing.