As much as I love the thrill of hunting for a great bargain at a thrift store, sometimes it’s just easier to buy something ready-made at a discount or department store. It’s very easy to embellish simple store bought designs to bring a custom-made feel to your home.
Take, for example, this window treatment I put together for my son’s playroom:
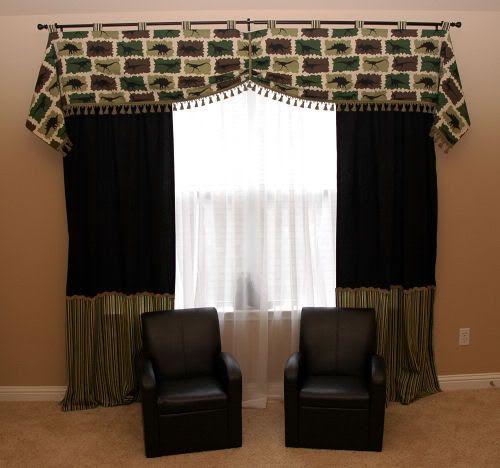
Although it looks lavish, it was very inexpensive and simple to put together. The combination of several layers of draperies, combined with added coordinating trims, kicks what would have been a very boring window treatment up to the next level.
To recreate this treatment, you will need three curtain rods: a spring-loaded tension rod, a single conventional rod, and a decorative rod. The decorative rod will need to have a longer return (i.e. the length the brackets hold the rod away from the wall) than the conventional rod. My decorative rod had a return of about 1/2 inch longer than my conventional rod.
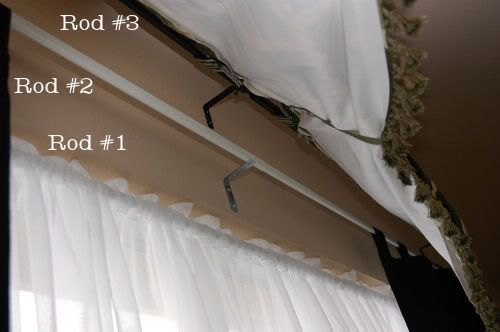
Another view of the three rods:

My tension and conventional rods cost just a few dollars each at Big Lots. The decorative rod I had leftover from a window treatment in our old house, but they can be purchased anywhere from Wal-Mart and Target to JCPenney and Goodwill.
Using the tension rod, I hung three white sheers inside the window. The sheers were $5 a panel at Big Lots (Notice a theme here? Big Lots is a GREAT place to buy basics like this.). I used the chart on the back of the curtain package to figure out how many sheers I needed to hang according to the width of my window. I thought I could get by with two since the measurements were close, but ended up having to go back to the store to pick up another one. I swear, this type of thing happens to me with every project.
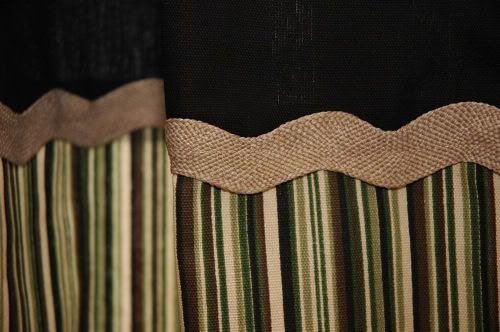
Next, I hung the conventional rod about 3 or 4 inches higher than my window and about 6 inches wider than my window on each side. I purchased a set of solid black tab top curtain panels at Target, although you can choose rod pocket panels if you would like. I measured from the top of my conventional rod down to the floor (plus about 4 inches, since I like my panels to ‘pool’ on the floor), and divided the length into thirds. I added some striped fabric to the bottom of the black panels and cut off the excess black fabric (and saved it to use for another project). I hemmed the edges and the bottom of the striped fabric and sewed a strip of jumbo ric rac across the seam where I joined the two pieces. I sewed the seams on my machine, but you could definitely just glue gun this all together if you were so inclined.
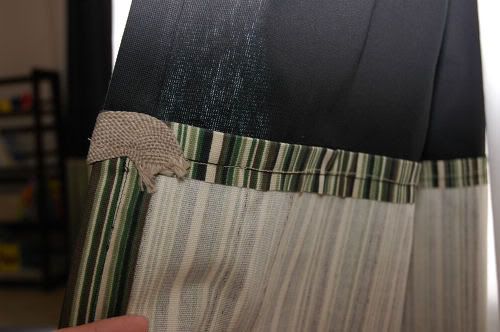
I also added a layer of lining to the black panels because I really hate the way it looks when the sun shines through dark fabric. Yes, I know I’m a bit crazy.
To fully cover the window with the black panels, I would have needed more than two of them. However, I only wanted to layer them over the sheers as static panels, not sue them as actual window coverings. If I ever wanted to, I could close the black panels, but they wouldn’t be as full as they should be.
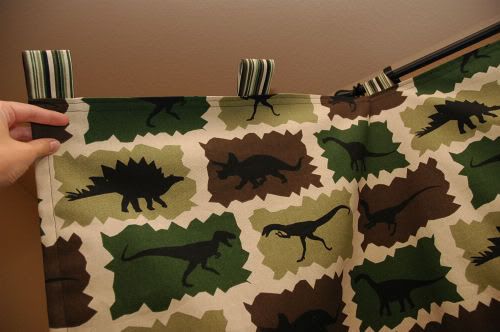
Next, I sewed the tab top valence to hang on the decorative rod out of some fun dinosaur fabric my son picked out. Your valence should be as long as 1 1/2 times the width of your window. You can create your own with a glue gun using a fabric you love with these directions, or you can purchase ready-made valences and join them together with pins, a glue gun, or a sewing machine. If you make your own valences, remember that the tabs are usually spaced about 8 inches apart with a two inch drop. The window treatment police aren’t going to arrest you if you don’t do it that way, but at least keep them all spaced the same distance apart as it will make it easier to work with.
After sewing (or glue gunning) some cute trim to the bottom of your valence, hang it on your decorative rod as high as you can. I also hung mine a little wider than the conventional rod I used to hang my black panels. Center your valence on the rod, letting the “extra” fabric hang off the ends.
You can “fluff” the hanging fabric using these instructions, but it should pretty much hang naturally.
For my curtains, I didn’t want to leave the valence just hanging straight across the window, because I thought it made it look too boxy. I pinned and fluffed the valence for a few days before I settled on this solution. I pinned a piece of trim to the top back of the valence, ran the length of trim over the top, down the front, under the bottom of the valence, and pinned that piece back up to the top. I pulled the trim up enough to make a nice little gather on the center of my valence. Think of your trim as a little pulley system and this may make a tiny bit of sense.
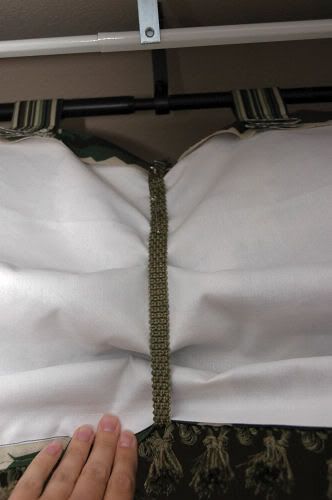
From the front of the valence, I folded the bottom half in little accordion folds until it laid nicely on the trim. I wanted it to look like the trim was actually pulling the valence up in the center, so I pinned it from the back a few times to make sure the it all hung right. It takes some time to get it looking just right, but it’s definitely worth the time spent “fluffing.”
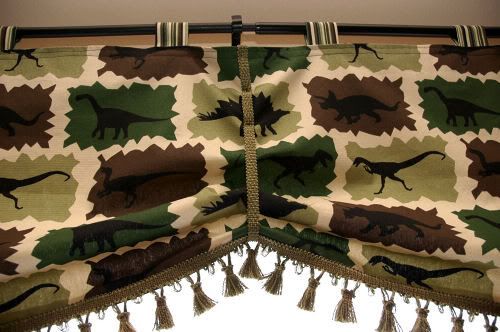

Now, you’ll have a completely custom-looking window treatment made from mostly store-bought panels. Don’t you love that? A little fluffing, some added trim, and hanging several cheap rods helps to upgrade a boring window treatment to something much more exciting.
Oh, and the random shoe behind my sheers that you totally think I hid there to get it off my floor when I was taking pictures? That’s Wall-E’s Growing Shoe, of course.
I'll second that. It would have been more expensive to buy fabric for treatments for our addition last summer. I got two khaki, tab-top panels from Target, added a black button to the bottom of each tab and fabric-glued some black ribbon to the top of the hem at the bottom of each panel. It really looked great! I did the same thing with the roman shade I got on clearance at Target to match on the back door. And WM's Better Homes & Gardens line has some cute curtain rods!!! 🙂
Either that window is HUGE or those chairs are small.
Love the Mis?Treatments! You can do some nice damage with a sewing machine girl! And your guest post is up today–thank you!
I love reading your blog!!!
These curtains are great!
I did not know that dinosaurs could be sophisticated.
It’s hard to believe that you didn’t do any of these things before reading the Nester’s blog…seriously. You’re a professional now, in just a year? WOW!
Looks great. Good job. Hugs, Marty
I met you today from Nester’s blog. I do love the “mis-treatments”. After looking at your blog I am a new follower. Your letter to her was so profound. Good for you for have the courage to go for it. You do a great job.
Thanks for sharing.
Charla
Love the curtains, I love how grown up you made them feel! I made my own altered store bought curtains this past weekend. Now I have 5 yards of material that I also bought half off the half off at Jo Ann’s..Ha! You have my mind thinking girl, thanks for sharing, you do it so well!
Oh, this could NOT have come at a more perfect time! Just three days away from my expected due date for my first kiddo and I decided that I HATE the boring store bought curtains in the nursery. What to do? WEll, thanks to you, I’m going to cut, dice, and glue gun my cares away while getting a little creative. And if Hubs doesn’t like it – who cares? I’ll just tell him I’m pregnant and its my perogative! 🙂
Well thank you. Now I know I am not crazy. My cheapo bedroom curtains have been driving me crazy for months b/c they are so thin. I’ve been mulling over lining them with muslin and now I feel that I have permission. 🙂
Hmm. Wonder what else I could mistreat them with?
This looks great–thank you for the tutorial!
What a super cute idea! I need to do something with my boys playroom. I am so marking this post!
Love this! Thank you SO much for the fantastic tutorial!!
looks a bit busy to me.