Sometimes when you hit the thrift stores, you really have to check out every inch of the place to score a great find. On a recent trip to Goodwill, I found this chair tucked underneath an old dining table.
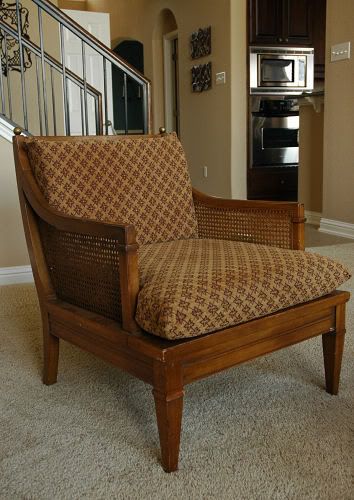
It was hidden out of sight, yet it was the treasure of the store. I immediately carried it to the checkout and paid for it just so no one else had the opportunity to touch it. Surprisingly enough, it was only $19.99. I was going to make it look like a million bucks.
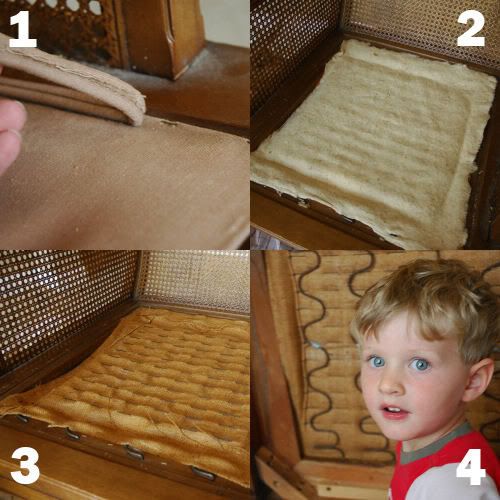
I was lucky that this Drexel piece was in nearly perfect condition. I think it was manufactured in at least the mid-1960s (according to the label), so I wanted to replace the batting and fabric in the frame of the chair. I knew that all I would need to do was replace what was already there, so as I took it apart, I photographed each layer so I could remember exactly how it all went together. I’ll explain these steps in a bit.
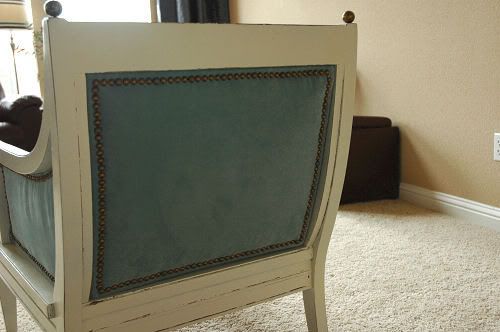
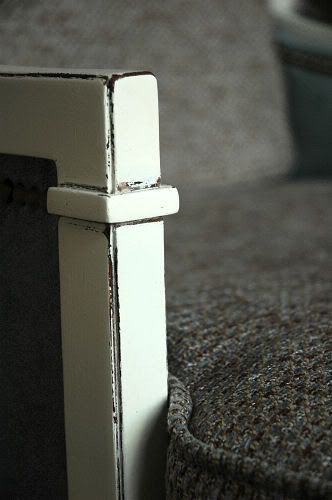
Next, I sanded the chair with 220 grit sandpaper and sprayed it with Dove White spray paint (I used the Krylon Fusion line, only because it was the only line that carried the color I wanted to use). I was so excited about the chair that I totally forgot to use primer (Um, yes. I’m that easily excitable.), so I had to use about 3 cans of spray paint. Dork.
After the paint was dry, I distressed the edges with a sanding block and applied two coats of rub-on poly. The poly really gave it a nice sheen and will protect my paint job.
When the poly was dry, I replaced the pieces of the chair that I removed for painting. The bottom layer (3 in picture above) is a new layer of canvas with 18 gauge wire woven in it (to make it more sturdy when pressed against the springs). The middle layer (2) was a new layer of batting. The top layer (1) was a new layer of duck cloth. I simply stapled each layer in place with a staple gun and cleaned the springs on the bottom of the chair (4). Please, don’t shy away from doing tasks such as this when rehabbing furniture. It was very easy to do, and it made sure that years of dust and filth weren’t trapped in the chair.
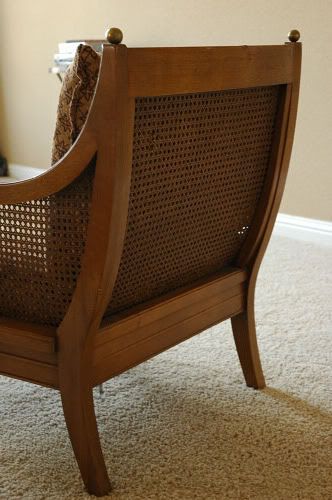
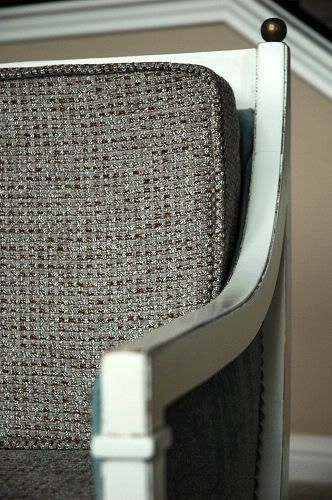
I wanted to cover the caning to make the chair look more upholstered, so I followed Kate’s excellent tutorial on the process over at Centsational Girl. I used matting board purchased at a craft store for the “bones” of the inserts (it’s pretty stiff, yet flexible enough to bend if you need to fit something like a curved chair back). I attached a thin layer of batting and a layer of light blue faux suede over the board with my glue gun and then hot glued them over the caning. I lined each section with the nailhead trim Kate recommended, and it worked great.
Now that the chair itself was finished, I turned my attention to the cushions. Luckily, the original cushion cover on the bottom cushion was underneath the fabric the previous owner used to (very lazily) recover the cushions, so I simply pulled it apart and used the pieces as a pattern to cut out my new fabric. I had to wing it on the back cushion since the original cover wasn’t there, but I think it turned out okay. Not perfect, but good enough. I won’t explain how I did it since both pieces have hidden zippers and piping covered in self-fabric. I’ll just say that 1): I totally rock for teaching myself how to insert the piping without instructions and 2:) if you ever need to insert a zipper in a cushion, follow this tutorial from Curbly (as it’s way easier than the other methods I’ve learned).
So now, my chair and the cushions were ready for their big reveal.

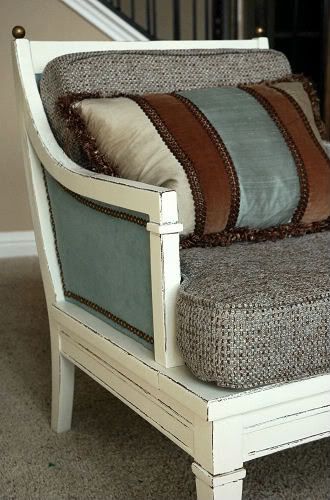
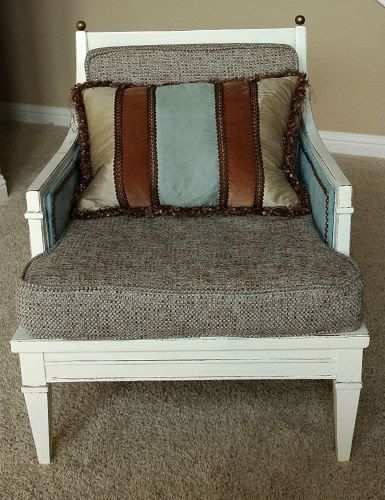
Not only did I like the shape of the pillow, but I loved that pillow itself on the chair. The colors are perfect. Score one for the home team! This is an example why it’s so important to try to use what you have before you make or buy something new.
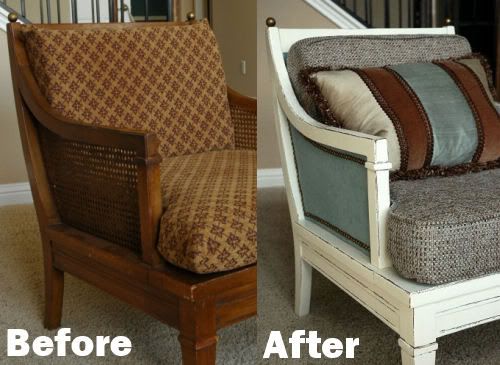
I couldn’t be happier with my chair. It looks so elegant in my living room and adds much needed seating to the room where we spend most of our time. Here’s a little before and after, just because I pink puffy {heart} before and after shots.
Don’t be afraid to try something new with an old piece of furniture. You just never know what kind of new life you may be able to breathe into it.
I’m adding this post to Kimba’s DIY Day Party at A Soft Place to Land. Visit ASPTL to see all of the projects!
Girl, that is amazing! What a professional looking job! I saw one similar at our Goodwill, and passed it by because it was 29.99. Our stuff always seems quite a bit higher here. I will be on the lookout because I have a room that one or two of those would be great in. Good idea of taking the pictures. I am a visual person, so that helps me a lot! Have a great week. Jackie
WOW, Lindsay!! That looks amazing! 🙂 I know I've seen an almost identical chair in my grandmother's house…that would be fun to redo. I love the colors you chose. 🙂
Absolutely amazing! I cannot believe that is the same chair!
Pat yourself on the back, girl. You done good!!!
Incredible! I love the fabric you used and love the paint job on this, love the distressing of the white! I seen your teaser on Facebook last night and couldn't wait to see it this morning!
That is simply gorgeous. I have a caned bench and I have been debating on painting the caning, but I'm not sure if that's a good idea. I like the idea of covering it with panels!
Lindsay, it looks fabulous! You and Kate (CG) inspire me to tackle lots and lots of home DIY projects in my blog/life. Thanks for sharing- I am on the hunt for a nice chair like this. Wish me luck!
Wow, fantastic job! I love the distressing detail on your paint job!
Fabulous! I would never be able to tackle that on my own, I would surely need some help from my mom…..great job!
Wow, what a beautiful transformation!
Lindsay! This is absolutely beautiful! Love, love, love it! And the pillow-icing-on-the-cake is to die for! Girl, we would all understand if you just sat back and spent the whole day gazing upon the wonder of your handiwork! I know you will grin every time you pass this beauty! Enjoy!
Your did a fabulous job. The chair looks awesome. I really like the combination of fabric that you used. Great to cover up the caning also, it does look so much more up to date. LOVE it. Hugs, Marty
Hey Lindsay, I LOVE it! You did an amazing job! I love to do projects like that! What is the rub-on poly you used and where did you buy it? Thanks for sharing!!
Ginnie
http://www.alliemilliedesigns.blogspot.com/
GRenner@cox.net
Stunning. I love it. I saw the sneak peak on facebook last night and couldn't wait for your post today!
You are amazing!
Gennie- I use the Minwax Rub-on poly. It comes in a satin finish and a gloss finish. I used the gloss for this chair. It costs about $9.50 a can at Home Depot, and you simply wipe it on with a sponge. A little goes a long way, so I bet I only used 1/4 of a can for that chair. I kind of balked at the price at first, but once I realized how many projects I'll be able to complete with it, the can seems pretty cheap!
Lindz, it's GORGEOUS!!!! Nice execution, too!
Looks awesome L!!!
That is sooo awesome! Thanks for the great tutorial. This will be save in my archives.
UNBELIEVABLE!! I have chairs that need a redo…it's just starting that's so hard. 🙂
Lindsay: This is stunning! I LOVE it!! I love the blue faux suede and the pillow just sets it off!
Great job!!!
Lou Cinda 🙂
Wow! Great to find a post knickong my socks off!
Today's American female is increasingly expensive, no matter how she's parsed.Let's face it. Men are subordinate to women. Illusions to the contrary are merely a passing fad historically. Read Robert Graves.
Linds,
Yep. Just called you Linds. This is so fabulous!!! Love it times a gazillion 🙂
That looks great! I'm really impressed with how professional it looks!
Wow! It looks great! I really need to learn how to sew.
It is gorgeous! What a great job!
Wow, what a transformation! Your hard work paid off – it's gorgeous!
Wow, it looks fabulous! I love the color combo you used, what a difference! I'll be linking.
That is incredible! You did a fabulous job and the pillow really makes it shine. Now that's talent!
Holy smokes! That's an amazing transformation! Wonderful job!
You did an awesome job! Love the colors you chose for the paint and fabric and the soft blue suede is gorgeous. The pillow goes perfectly! Nice work!
I just found your blog & I have to say that I love this chair! It turned out so great & now I want one for my house! Looking forward to reading more of your posts!
Absolutely GORG!!! Wow, I am soooo impressed. I have not attempted this yet, but am considering it with our dining room chairs. (The backs.) Wow. This is amazing!
wow, that is AMAZING. i can't even believe it! yeah, the only kind of re-upholstery business i'm in involves a staple gun, so wow is right!
Yikes, Lindsay. This is amazing. Awesome job. So inspiring!! =)
Wow – the caning on the chair would have made me pass it up! It's beautiful
I am not believing this!! This is absolutely wonderful!
Seriously, you did an awesome job on this chair. It would be so funny if the person who donated that chair were to read your blog. He or she would not believe what you've done–and they sure would want the chair back!
Way to go. You are so inspiring.
This is an amazing transformation! I have an old chair in my house that I am eying.
You have inspired me!
Thank you,
Cindy
http://www.chalkaboutit.blogspot.com
WOW! I have one word for you…you are awesome! Wait…that was actually 3 words. I am a dork. LOVE that chair.
~Amanda
I'm not joking—My heart started beating faster when I saw your chair makeover. It is just beautiful and the fabrics are marvelous! Love it.
Wow – what a difference! I love it and glad I stumbled upon your blog.
girl – what a fabulous job! goes to show what a little elbow grease will do! I would have passed that chair by & never thought twice…must hone my thrifting skills 🙂 Yea – great job!
This is one of my favorite chair makeovers, it looks AMAZING.
super! project………..
love it!
looks wonderful…yay!
Very beautiful! I'm impressed with the transformation.
That is fantastic! I have a chair I'm in the process of secretly reupolstering (my husband will kill me if he sees me fumbling through it). You've given me the confidence to continue. LOVE IT!
WOW! That chair is awesome. I would have definitely bought that chair too. $20!! That's really a steal for such a great piece of furniture. You are so lucky!
Wow…great DIY project! I love taking old pieces and makin 'em new again! Check out my new blog when you get the chance!
What a great makeover! It looks amazing! Well done~I love the colors on the chair.
Um- Can I have that chair?? 🙂
That chair looks amazing! Great job!
That looks amazing! Don't you just wonder how much you could sell it for now???? Thanks for showing us how and giving out some tips! One day I'll get brave and try that!
Melissa 😀
*thud*
(That was the sound of my jaw hitting the floor.)
amazing, amazing!
Linds, I am so impressed! And I've been meaning to tell you I love your new layout. It's so pretty and classy, and perfect !
Do you mind if I mention this revamp in a post next week?
kate
Hey, Lindsay! I love this! I'm visiting from Kimba's blog! You are now one of my favortite blogs!! I need you to help me with some slipcovers that a lady has had since January–no lie! I am so ready to get them back!So, come on and visit!
OK, here's my question. I am making these darling crosses. I am using E6000 glue and having to use so much that the fumes are crazy! Is there a better glue to use? Running out to Hobby Lobby in a while and can pick up something better. I am gluing stones on wood. What are your sweet thoughts?
Hugs,
Susan
scrunnermom@gmail.com
Hi Lindsay! I'm new to reading your blog from Kimba's. I absolutely LOVE this chair!!! The colors in it are almost identical to the color scheme I have in my new living room. I have a terribly old & disgusting couch that desperately need new life but I'm terrified of messing it up. Got any pointers?
I saw two chairs like this at my Goodwill today for only $9.99 each. I was afraid to buy them because I didn't think I could fix them. I wish I had your skill! Your chair is beautiful!
I am so inspired by this chair! I’m redoing a chair right now and will be having my first go-around with giving something an antiqued look. I’ll be using a bronze color underneath with heirloom white over top. Will be posting photos once I finish! I love your idea of adding the nailhead detail… hmm, you’ve got me thinking! 🙂
Lindsay,
Thank you for this wonderful (and thorough) DIY. The fabrics and choice of colors are superb. Who needs the new when you can do fabulous things like this with the old?
I posted your lead image along with a link to your site on my latest blog post. You can find it here: http://nouveaubohemian.wordpress.com/2012/03/27/im-going-to-rehab-furniture-edition/
That’s really nice! I like the colours. Thank you for the tutorial!
Thank you, Lissou!
Hi, great post- love the chair!! I’m just curious- cause I see a lot of DIY on painting furniture but little on the actual fabric that’s being painted… I have an ugly polyester chair & ottoman I’ve been wanting to try this out on & I’m not sure if this material will take the paint/dye/stain. I know I can test it out on a hidden area- but before I go spend money on just any paint- I also wanted to know if polyester can be painted, what is the best paint to use? If anyone knows email me thx much- Abigail.elarde@yahoo.com. Again, thanks to any tips! 🙂