I’m one of those “teach myself” people – I taught myself to sew, I taught myself how to make a faux tailored bedskirt, and I even taught myself how to be a college mascot (I was the mascot at the University of Texas while I was in school, because I thought it was something I could do…I auditioned and it turns out that I was right!).
After seeing all of the beautiful tassels hanging out around the Internet, I decided that I had to teach myself how to make them, too. I have tons of trims just taking up space in my sewing room, and I thought a tassel would be a beautiful way to use some of my stash. Last week, you told me that you wanted to learn to make them, too, so I put together a little tutorial while I was assembling one of my new friends.
**Before I get to the tutorial, I want to ask that this tutorial not be used to make tassels to sell. There are some incredibly talented women out there that are already making these lovelies for public consumption, and I do not want to be a party to the over-saturation of the tassel market. I just wouldn’t feel right about that and would lose a ton of sleep…and you don’t want to see Lindsay on little sleep. Certainly, no one has asked me to make to make such a request, but it’s just what I feel is the right thing to do. I definitely hope you understand where I’m coming from.**
Okay, ready to get started making a little beauty for yourself? Let’s do it!
It’s time to assemble the cast of characters. Most of what you need may already be found around your home.
You will need:
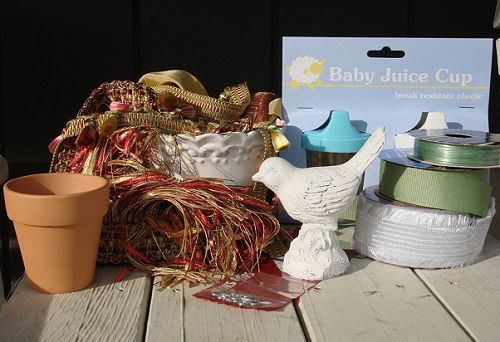
A selection of trims and ribbons in various lengths in complementary colors
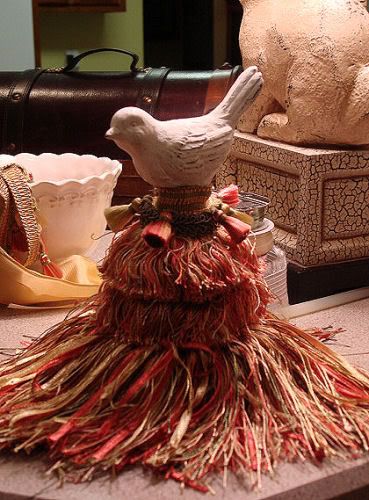
Ornament or small decorative item to use as topper
Small eyelet screw (and maybe a drill) and a width of ribbon that fits in the eyelet
Glue gun
Small cup or pot to use as a base
In trying to teach myself how to make a decorative tassel, I experimented with several types of bases. The two that worked best for me can both be found at the Dollar Tree.

I recommend using the baby juice cups. With the top removed, they are lightweight and the perfect size for the tassel. You can find the cups in the baby section, and they cost $1 for 2 cups.
I have also used the mini flower pots that can be found in the floral section. They are quite a bit heavier than the juice cups, but they are $1 for 3 pots, so you can get more bang for your buck.
You may have something around the house that could work instead of the juice cup or flower pot, but it should be roughly the same height and shape as these items.
To get started, you need to sort your trims by lengths. You can use any type of trim you have on hand from previous projects, such as tassel trims, eyelash trims, fringe, etc. If you need to go out and purchase trims, try to pick the best quality you can find (without breaking the bank!). I actually received an email this morning that Hobby Lobby’s trims will be 30% off this week, so if you have a HobLob around, this is a good time to check out the home decor trims.
You’ll want to use your longest trims on the lip of the cup. You have a few different options for applying your trims. The first option, and the one that you will most commonly use, is gluing your trim directly to the cup. For this example, I wrapped the trim around the cup twice so it would be fuller.

Or, as I ultimately decided to do for my tassel, I glued the trim upside down. My fringe, although beautiful, isn’t very fluffy, so I wanted to do something to puff it up a bit. As you can see, I glued the trim on in the opposite direction as my previous example, with my trim hanging down the cup instead of away from it. If you are using tassel trim or a fuller fringe, you won’t need to do it upside down like this.
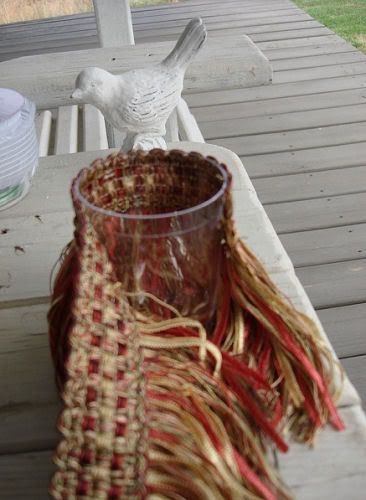
I wrapped my trim around the lip of the cup twice here, too. Then, I lost my light outside, so I had to move the tassel-making operation inside. 🙂
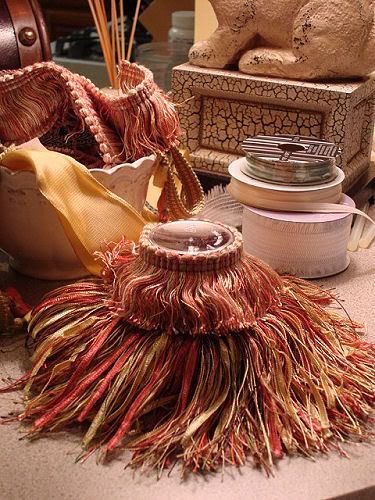
Keep adding fringe until you get to the top of your cup. You can layer them on top of each other if you want to “build up” your trims, or you can space them out like I did. All you really need to remember is to make sure none of the cup shows through the trim.
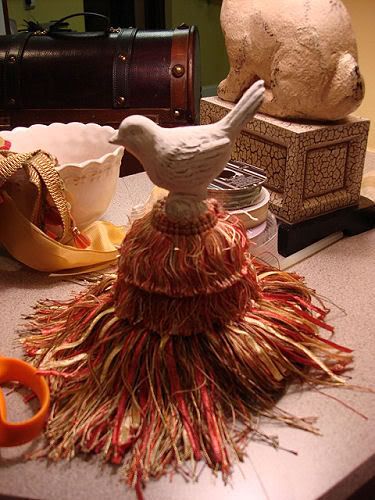
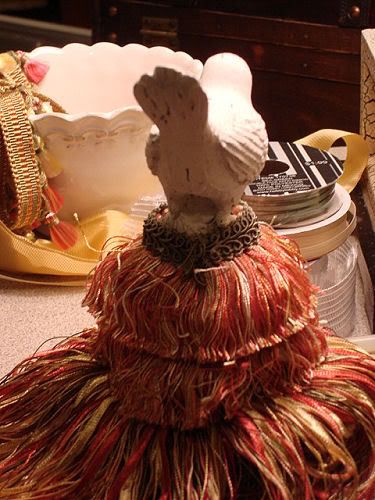
Next, take your decorative ornament and see if you can screw your little eyelet screw into the top of it. If your piece is made from wood, you will probably be able to. If it’s made from plastic or plaster, you will probably need to drill a tiny hole in the top, which is what I had to do. My eyelet screw is 1/2″ long from end to end and a package of 10 or so of them costs under $1 at a hardware store.
Add a generous amount of glue to the bottom of your ornament, and glue it directly to the flat top of the cup. Push the two pieces together while the glue dries so that the glue bond will be nice and tight.
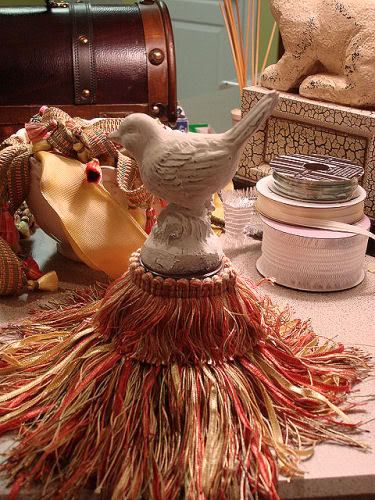
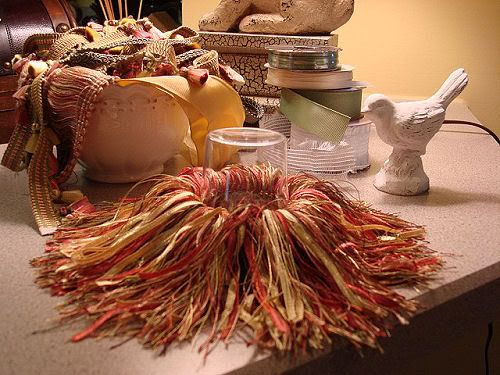
Once the ornament is in place, it’s time to add the last of your trims. I added more fringe around the base of my bird. Other types of trim that look really great here are eyelash trims or loopy trims. They really make it look like your ornament is sitting on a nest of trim.
Keeping adding trims until you feel like you are finished. I added some gimp around the top of the fringe.
Then, I added some little tassel trim on top of the gimp.
For a finishing touch, I added a little
bow to the back of my tassel.
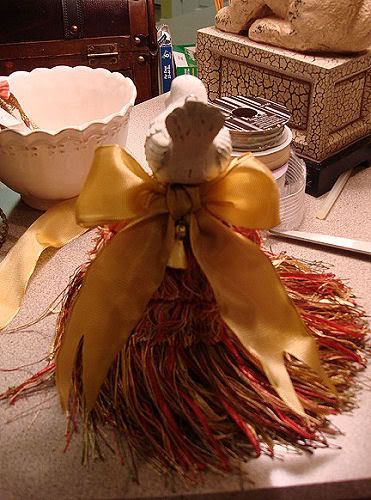
Once you are satisfied with your tassel, it’s time to add the eyelet and ribbon hanger. Screw the little eyelet into your drilled hole, slide a length of ribbon through, and tie a little knot at the top of the ribbon to make a loop.

Now, it’s time to hang your tassel somewhere beautiful and admire your work!
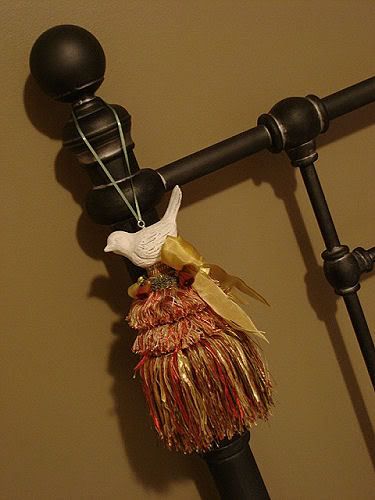
On my last post on tassels, several people commented that they didn’t quite know where to hang these type of decorations. The answer is to hang them anywhere you want! They look great on dresser knobs, headboard posts, lamps, or simply sitting in a dish. The sky’s the limit, so get creative.
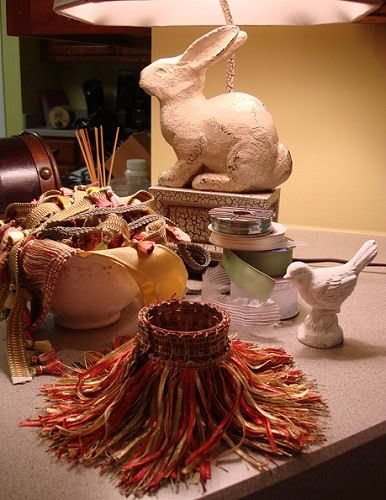
The first tassel I created was one with a bunny that looks like a chocolate rabbit. I purchased him at Big Lots in the Easter section for $1.50, and he looks so cute sitting on this tassel!
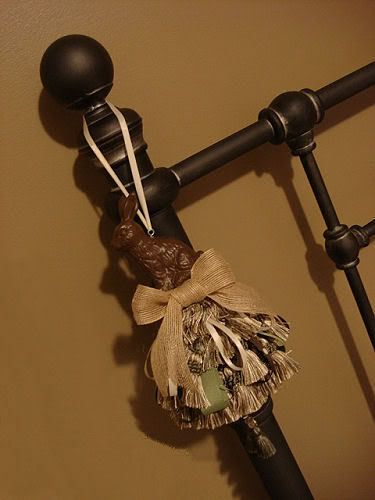
My mother loved this one so much that she told me to just go ahead and leave him at her house. 😉 He now hangs on a built-in china cabinet in her kitchen.
For the rabbit tassel, I used a mini flower pot as the base and used a lot of tassel trim and loops of ribbon. I even bought a pre-made small tassel for a few dollars at Walmart and strung it on a ribbon, which I glued to the inside bottom of the pot, creating the little dangling tassels you see. There are so many different ways you can make these tassels, so use your creativity and see what you can come up with.
I’ve enjoy making these tassels so much that I thought I’d make one more…for the Grand Prize winner of the Five Dollar Challenge!

The prize is shaping up pretty well so far, with monogrammed hand towels, a swatch organizer, and now a custom made tassel already announced. Get to work, because there’s more prizes to come!
Please let me know if you need any more tassel pointers or if there is a step that isn’t clear. Happy creating!
P.S. I’m adding this post to the Works for Me Wednesday linky carnival over at We Are That Family!
Those are so cute! You are uber-creative!
That is an interesting way to make a tassel and I found it a great lesson. Thank you. Sandra
Oh, how fun, and a great lesson! Thanks!
Suzanne
Thanks for showing us where to hang them…honestly, even though I’ve admired them, I didn’t know where they went! : )
Okay girl! This is your Toile party reminder! My fingers are bleeding from visiting everyone who wanted reminders… have to say I love your crafty tassel! Great job. Hope to see you Tuesday!
Hello! I’m new.
This is great! I’ve been craving some tassels (I have ZERO…sad, I know) and a DIY version is probably a little more frugal than going on an online shopping spree. Thanks!
Ooh, and what mascot were you? I’m a huge UT football fan, but I know you weren’t BEVO. LOL.
The way you made your tassles reminded me of hairy bells, hehe. Pretty cool way to fluff them up without having to use alot. So simple yet so effective. What would happen if plastic disposable cups were used instead? Would it be too fragile?
Liss- I was “Hook ‘Em” 🙂 You are a true fan to know the difference in Bevo and Hook ‘Em. Most people don’t!
Rozi- I think plastic disposable cups would work if they were small. I considered that option but then remembered my 3 year old son, so I knew he’d crush them as soon as you had the chance. They’d definitely work – you’d just have to be careful with them.
Pretty Organizer – Girl, it’s been on my calendar since you announced it! Wouldn’t miss it! 🙂
Oh my goodness, thanks for sharing this. I have been admiring all of the beautiful tassels around for awhile, and always wondered how to make one.
I’m choosing to ignore the UT mascot part, because I went to Ohio State, and although I shouldn’t, I’m choosing to stay your friend, because I like you THAT much. 🙂
Lindsay, I love it! You are my new favorite blogger. I finished the egg wreath last night and it looks great! I will be posting pictures tonight on my blog. Next project, TASSELS!
Girl, this is awesome!! Thanks for the great tut 🙂 I also am just wrapping up the egg wreath. Looove it.
Looks good love the chocolate bunny one!
That is so cool! I have always wanted to make a tassel and couldn’t figure out how! Thanks for the instructions!
Thank you, thank you, thank you!! I have been wanting a wonderful tutorial on these and now I have one! Thanks for that!! Yours are so cute…I sure hope mine turn out that way! Thanks again. I posted a link to your blog in my post..check it out…
http://ellisevents.blogspot.com/2009_03_01_archive.html#6910444874451641135
Thanks so much for the tutorial! Great directions! I can’t wait for the $5 challenge – I’ve been working on a few things!
By the way, Lindsay, I read your comment on Kimm’s blog about your headboard that you made using a door. Do you have pictures of that? Is there a post on your blog about it? I’d love to see it. I’m attempting to make a headboard out of an old door and I’d love some ideas! Thanks!
Very creative and cute! I bought the same little birdie at an antique store here in Texas this weekend and paid $5. Need to find Old Time Pottery!
I love the tassel and you make it look super easy,, can;t wait to try and make one. I also did a version of the egg wreath, but not quite finished with it yet, Anyway thanks for the tut on tassel making.
So cute!! You make it look so easy!!
How darling! Thanks for the great show and tell!
Thanks also for leaving a comment about my re-do on my kitchen. I’m glad I made your day about the color – part of my family might disown me if they see it. lol. (You know, the gig’em bunch.)
oh wow..thanks for sharing!!!
SOOO awesome and exactly what I’ve wanted to learn how to do! That is such a clever idea to use the cup. Wow. Thank you! They look so great.
All the best,
Allison
Wow~
Those are beautiful.
I have to say THOSE are adorable. Maybe I can try it out on a future DIY post and link it to you….although I cannot imagine mine turning out nearly as cute! Good job!
You have no idea how happy I am to have seen this post! I love tassels and have thought about making them, but it just seemed too time consuming. The cup idea is brilliant, and I can only imagine it saves on trim! You have done a wonderful job!!
That is a very inventive way to make tassels! I have attempted exactly one and that so far has been enough for me. I accidently dropped the poor rooster on floor while drilling the hole for the thingy to hang him with so that entailed a 30 minute glue job on a $2 bird because he was the last one at HobLob in that color. In the end he is my fave item in our kitchen and he even has a bow on his butt like your beautiful bird! Having fun browsing your blog! Wait….I do have two kiddos…where did they go!HA!
You can use a figural salt or pepper shaker as the top of a tassel. They come in darling shapes/forms/colors and you just thread some wire that you have bent into a hairpin or “U” shape, twist the wire at the top into a small loop, then thread the wire through a small bead which will act as a “stop” to prevent the wire from going all the way through the hole. Anchor the ends of the wire through a small button at the bottom of the shaker that is slightly larger than the hole where the little plug thingy would normally be. It’s a great way to use vintage salt pepper shakers that may be meaningful to your family, like maybe your grandmother’s. You can also buy shakers that match your dishware pattern and make matching tassels from those. I am looking at one right now in my living room that was made from an antique English silver plated shaker in the shape of the head of a dog. I also have a pair of tassels hanging from my buffet server that were made from a pair of rooster/chicken salt and pepper shakers. My dining room is done in a chicken motif. the best part is you can find vintage shakers at any flea market or thrift store For just a couple of dollars.