After tackling our living room, kitchen, dining room, master bedroom and sewing/craft room, my son Zack was feeling a little left out. “When are we going to do a craft for me, Mama?” he asked.
Who could resist that question?
I’ve been wanting to work on Zack’s room for a while. It’s very boring with the highly-functional-but-blah blonde furniture and builder’s beige walls.


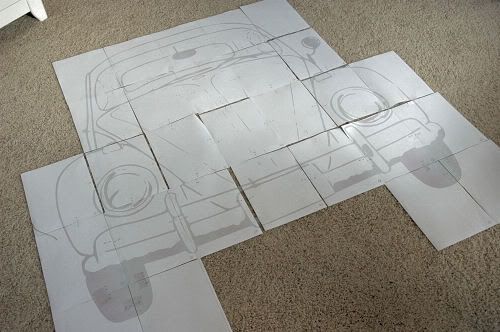
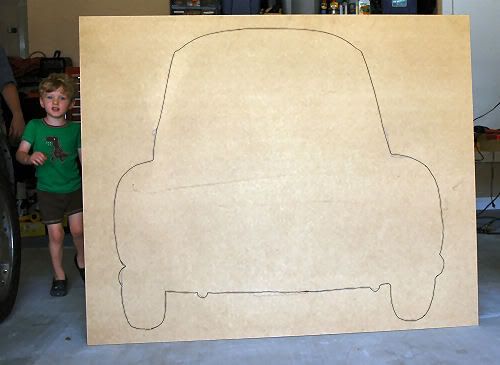
On the computer, my husband enlarged it to the size I wanted (the widest part of the car slightly larger than the width of Zack’s existing headboard), but it probably would have been easier to rent an overhead projector from the library and enlarge it that way. It printed out over several (like 30!) pages, so I taped them all together so that I would have one very large image.
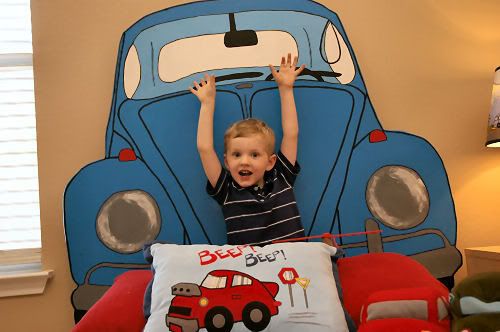
Yes, Zack is already excited about his car, although at this point he had no clue about what was going on.
3. Using the jigsaw, we cut out the outline so we would have a perfect car shape. Visit my guest post over at the Blah Blah Blahger to learn all about how to use a jigsaw. It’s so easy!
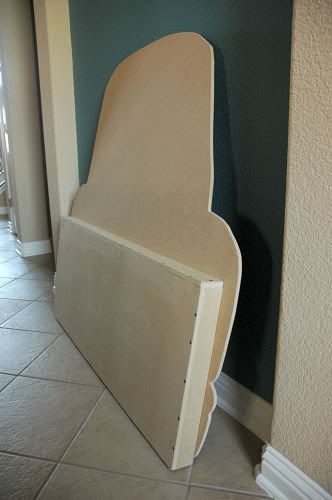
After cutting out the shape, my husband used his router to slightly round the edges of the car so that there wouldn’t be any sharp corners. This step is completely unnecessary, although it did give it a nice finished look. I think he just wanted an excuse to use his router.
4. Tom created a “slipcover” of sorts so that the new headboard would just fit on top of the existing headboard. He took the measurements of the boring headboard and basically made a slightly larger little box out of MDF and screwed it to the back of the car. This will allow us to add the new headboard without damaging the old headboard.
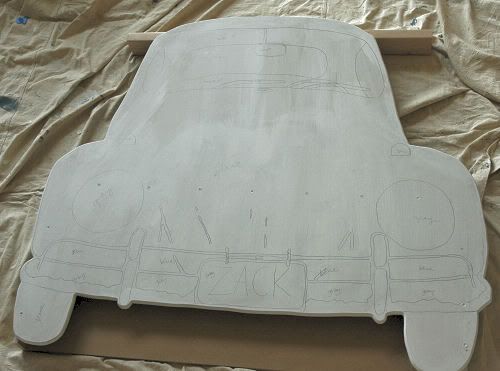
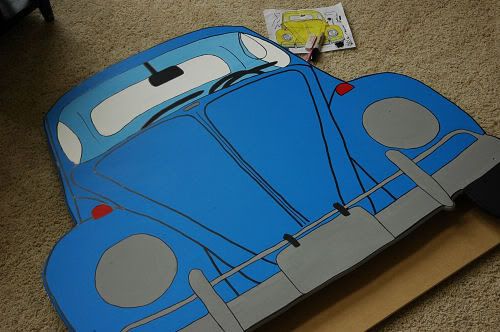
5. Next, I primed the car and drew in the details, such as the headlights, bumper, windshield, etc. I was originally going to get very detailed with the, um, details, but when I realied how long that was going to take, I decided to take it simple. I used my super fantastic newspaper tracing trick and it took no time at all.
6. Using the basic acrylic paint that sells for under a dollar a bottle at the craft store, I painted the car with foam brushes and small bristled artist brushes. I was able to do the entire thing with four bottles of paint – bright blue, white, black, and red. I mixed the colors in little disposable plastic bowls to form the different shades I wanted to use.
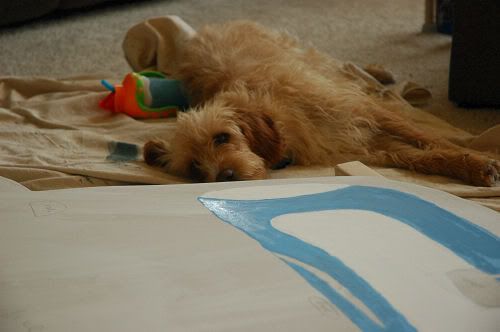
I also had the most adorable dog in the world assist me. Look how mistreated he is. He just wanted to play ball, but mean ‘ole Mama was busy painting. Everyone say ‘Hi’ to Duke!
When painting, I started with the lightest color and worked out to the darkest color. That way, I wasn’t so worried about having one color bleed through another if they overlapped a bit (I am so bad at painting inside the lines). I did two coats of each color before I moved on to the next color.
7. The next part is where I got REALLY nervous. I outlined each of the details I painted with a black permanent marker, which was pretty simple. But then, I had to freehand all of the other details, such as the lines on the hood. I drew them with a pencil before I used the marker, and I learned that I could use a white eraser to erase any stray pencil lines without messing up the paint. Score!
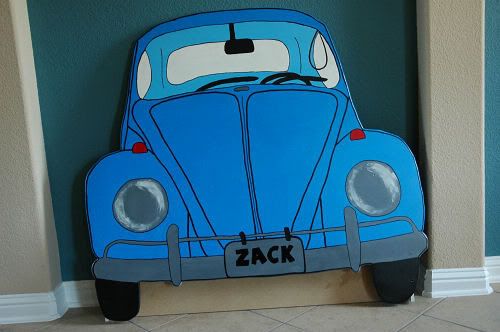
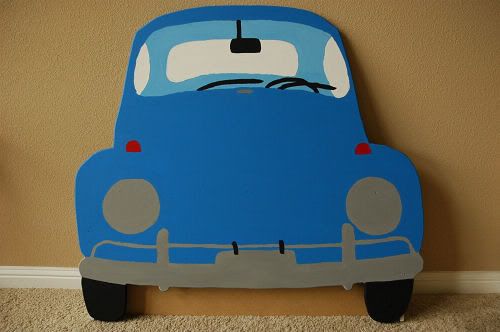
10. Now, all that was left to do was to just slide it on Zack’s existing headboard!
Remember the before?
Well, here’s the after!
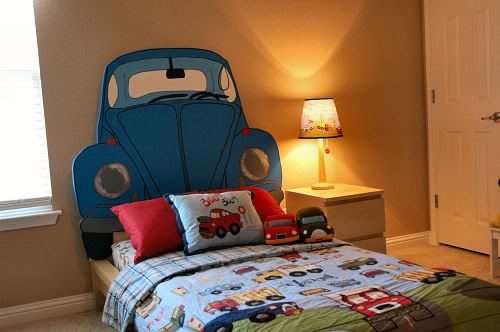
What do you think? Do you think your little one would like a bed like this? I think mine does.
Brainstorm about all of the adorable shapes you could use to make your own custom headboard – butterfly, princess tiara, soccer ball, baseball cap…the ideas are endless. This is such a simple project, but it creates so much fun in a little one’s room.
Do you think you’ll try this at home?
I’ve added this post to Kimba’s DIY Day over at A Soft Place to Land. Head on over to her site to see some wonderful DIY projects!
A great idea which I will not attempt! The local ER will thank me…
A-D-O-R-A-B-L-E!!! I love how you left in all the little details on the car. 🙂 I laughed about your husband and the router, b/c my hubby is the same way! He loves an excuse to use his tools. That is a wonderful head board, and I bet it's even more special b/c you made it instead of spending $$$ at a store. 🙂
Great job, Lindsay!! It's awesome. My son wants a car bed now 🙂
Unfortunately, my kids are too old for such a freakin' adorable headboard. great job!
This is wonderful idea Lindsay! I have been thinking of something to do for my deal son. But I think my search is over! Will show you my results when done.
Thanks for sharing! Brilliant
Sarah
great job! I LOVE it! I did some Winnie the Pooh characters for Walker's nursery a few years back using a very similar technique, so your post brought back many memories!
hope Zach will LOVE it!
jodi@back40life
that is the cutest idea EVER!!! you did an amazing job! your such a good mom.
Wow! You do such a terrific job!!!!! I know he must love that custom headboard. Now if you have time I would love to hear some of your wonderful ideas for my desperate kitchen. Jackie
Oh, that is adorable! Perfect for your little guy's room!
Your son is so lucky to have a mom like you that does amazing things like creating a VW bug headboard!!! Darling!
This is awesome! Makes me want to adopt about JUST so that I can do this. (is that wrong motivation?) 🙂
What a darling idea~~love the blue color too!
So honkin' cute! I've been planning a car/truck theme remodel in my son's room, so we'll just have to use this idea!
You're a jack of all trades…great at Statistics and great at DIY. : )
Lindsay, that is adorable. My "little guy" is now 28 y/o and bet he wouldn't appreciate it nearly as much as Zack does. I had an idea too…if I would/could/should make one, I'd use those stick-on touch lights ( http://bit.ly/k85dY) to make the headlights really light up. Oh, I wanna make one :-). Love this idea and you did a great job.
That is so adorable .
No boy here so no won't be making one for us , but you have one lucky boy there ,
Chris
Just Beachy
What an awesome job!! Simply love it!! Amazing! Great job!
That is so cute! What a lucky little boy!
That did turn out very cute. No little ones here, but if my girls were little, they'd definately have a tiara to sleep under! Happy Hump Day ~Natalie
Lindsay, you are crazy creative ! I am so smitten with your headboard….especially since I have a three year old boy OBSESSED with anything with wheels. Vrooooom Vroooom. I think this would be a fabulous art statement on a boy's wall, even if it wasn't such a handy headboard. You're brilliant !
So cute! My son has the same car pillow from Target! 😀
This is fabulous!! You are one cool mamma. I bet he's gonna love his new makeover. Can't wait to see it!
Thanks for your input. Do you think the painted cabinets would be OK with the rest of the trim stained? All of my woodwork is stained all over my house. The room adjoining is guacamole green, very bright, but I love it. The dining room is ajou pear( sherwin williams)I am planning on a dark countertop that is laminate with a granite look. My daughter has them in her house with beveled edges, and she has had several people mistake it for granite when they first saw it. That is what I would like. I may go with a buttery color, and definitely changing the hinges and hardware. This project will probably be slow go, but am looking forward to some changes. I would love any other suggestions that you have. You have some amazing projects and I am inspired by all of your creativity. I am trying to get a little back over here. Thanks for all your help. Jackie
So fun! Love it! My boys would definitely want a headboard like this for their beds. Very creative.
Hugs,
~Victoria~
Totally cute!
I'm impressed!!
Wow, that turned out great! Loved the colors and the license plate!
Wonderful!
Love it!!! What a darling little boy and what a great bed!!!
I have been waiting to see this! It is so cute and you did such a great job. Beep Beep!
that is soooo cute!, great job! you're super talented
That is just the coolest! Looks like it was lots of work, but from that last photo, I'd say it was all worth it. So cute!
OK – that totally rocks. I am a little curious about one thing, though. How did your hubby blow up the car on the computer and get it to print out on 30 different sheets perfectly? That's the part that would keep me from trying it.
No way! I can't believe you did this! This is awesome.
Prepare yourself–I have a feeling you've got some linky features coming up. You're going to get a lot of traffic with this. GREAT JOB!!!
That is the cutest thing!!! You could make so many different designs, too.
LOVE it! Can't wait to see the room when it's all finished!
WOW! That is fantastic! What a lucky boy, this is just wonderful! I'll be linking.
HO. LEE. COW. you have really outdone yourself here, or at least outdone me! lol. i am so impressed with not only your skill but your patience in completing all those steps to get your end result! what a cutie zack is, too!
-Gayla
That is so stinkin' cute! Great work, Lindsay!
It is so adorable!! You did an awesome job… now your son has probably wants to go to bed or naps more often! ha!
That came out really good.
I am starting a NEW Mr. Linky party. It will begin on Aug 10th so everyone will have a week and a half to think about their first post. I have a poll up for votes on which button should be the new button. The "party" is called The Knock Off Knock Out-where THRIFTY meets creative sensation. Go over and learn more about the new weekly event and I would appreciate if you would cast your vote and HELP pick the new button design and its the last week for the July GIVE-A-Way, if you would like to be a part of that event..
Cheri
WOW! Great job Linds!
This is adorable! I can't believe how well it turned out – you couldn't have purchased a nicer headboard! I can't wait to see the rest of the room 🙂
that was super cute!!! great idea.
This is darling and what a great job you did!! You should put real lights where the headlights are 🙂
Very cute! It looks great!
WOW, I'm super impressed. You did a fabulous job AND made it look easy! God's blessings, Sarah 😀
That looks great!! My 18 month old has the same bedding, your giving me ideas!
Oh this is adorable!!! Love it!! I bet he is just in heaven!
Completely fantastic!
Amazing! You are a COOL mama! I can imagine that he is just so thrilled.
Lindsey, that is amazing! He is so proud of his new headboard. You should be very proud too. 🙂
WOW now that is pure talent!!!
Popped over from Kimba's. You totally rock! That is a cool headboard and I can tell by your son's face he loves it too! Thanks for sharing how you made it. My kids are a lot older, but this will be a great idea to use when I have grandkids someday.
found you via my favorite "one pretty thing". i'm featuring your bed. You are one clever gal!! Love it.
Well done~ this is great! I am visiting via ASPTL.
Please drop by and enter my giveaway.
Have a blessed weekend!
This is so cute! I've got to ask: Does your husband roll his eyes at your projects, or is he used to it by now? Because mine used to roll his eyes…now he just gives a little smile, because he knows there's no stopping me. Once I get an idea into my head…here we go!!
Waaaay cool! Great job! I have my little guy's headboard on my "to do" list … this is encouraging me to get at it!!
SUPER CUTE!
That is soooo cute! Great job. You're awesome. Someday I want to utilize power tools in my crafting! I'm sure my husband would be stoked. My 3 year-old would LOVE a headboard like that (as would my 18 month-old, come to think of it). Thanks for sharing your how-to wisdom!
Love, Heather
Great Job! I think any little boy would love this.
So cute! I am impressed by your creativity!
You did an incredible job with this headboard! Love that it's a classic VW instead of a generic car 🙂
truly fantanstic!! oh my, I'm sure your son is just thrilled.
You made that look WAAAAAYYY too easy!
I absolutely LOVE the headboard! I have been talking to my husband for weeks about doing something like this for our 2 year old. I saw you post on Design Dazzle Friday and was like OMG this is it!! Thanks for the breakdown of how you did this, makes it easier than just trying to do it in my head!
WOW! That is awesome! I am alread thinkong of what to make for my daughter's/ What a fab idea! Smarty pants!
You are great
but a child can be so happy
your health
I think the figures may be used in other
Bye
WOW what a cute headboard! Ok now I am changing my mind for my son's big boy bed! no plastic toddler bed here… "honey go get your saw" I have a project 🙂
By the way,where did you get the bedding for his bed?
Thanks
Kari
Wow! That looks great! What a crafty one you are!
So, I’m trying to figure out my daughter’s headboards. How did your husband enlarge the picture exactly??
Love the car idea! Wish I had a boy to do it for! 🙂
I’ve just found this site holdenhistory.com, could I just borrow the technical
articles from the site or do I need some kind of permission?. I’m writing a project for school.
Olivia
Love this Car themed bed Headboard sooo cool !
Is it ok for children to breathe in MDF all night? Foam brushes? Acrylic paint? Not sure this is healthy. Sorry, just wondering.
I think my “HUSBAND” would love this… he used to refinish vw’s and take them to car shows…lol
Really cute, but might have been easier to just paint it on the wall!