Two weeks ago, Melissa at The Inspired Room challenged us to stop procrastinating and start creating. Being as that I always have some sort of transformation in mind, I had several different options to choose from.
I weighed my possibilities and ultimately decided that I would transform my son’s playroom in three areas:
- Add a window treatment to a bare window;
- Paint the armoire that holds his television and set up the TV/DVD/Cable box system properly;
- Add adult seating to the room.
I’m pretty sure some of you thought I was absolutely insane to tackle all of that at once. You were right. However, as the Queen of Biting Off More Than I Can Chew, I made it all happen within the two week time period Melissa gave us to complete our projects.
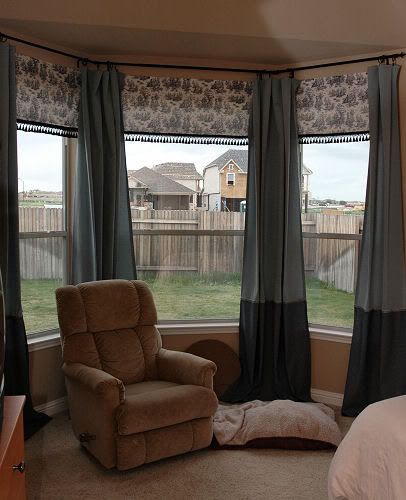
Let’s start by checking out the window. This is the before: Bare. Sterile. My neighbor’s roof.
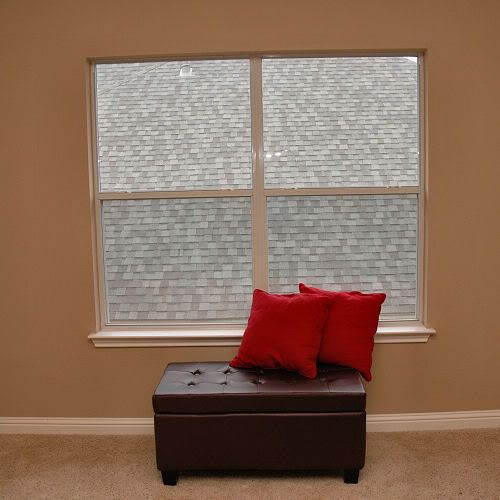
After about 6 yards of fabric, 6 yards of trim and two pre-made curtain panels, I bring you this:

Love it.
If you can’t tell, the valence has a dinosaur silhouette print on camo color blocks (Ick! to camo, but this totally works). The stripe at the bottom of the panels is a coordinating fabric. This is a totally different direction than I originally wanted to take this room, as I’m not into themed rooms. However, Zack saw this fabric at the store and loved it. He’s apparently got a good eye, because this is playful yet still classic and grown-up.
This window treatment was a very easy one to put together, and I’m planning to write a tutorial on it to post in the next few weeks. I love how rich and layered it looks.
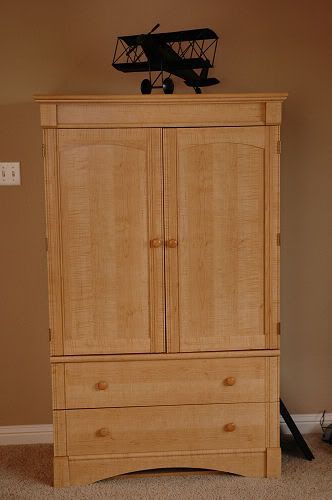
Next, let’s move on to the armoire. It is a substantial (read: very heavy) piece of laminate furniture that we bought for Zack before he was even born. I wanted to continue to use it because it’s very well made and has nice lines, but I’m just not into the light colored wood right now.
After searching and searching online for a tutorial on how to paint laminate furniture, I found nothing that thoroughly detailed the process. So, I just figured it out myself! Don’t worry, I’m going to share the steps with you next week because it is very easy – just time consuming. I added the striped fabric from the window treatments into the insets of the doors and installed new knobs. The paint color is Antique White from Behr and matches the dinosaur print perfectly.
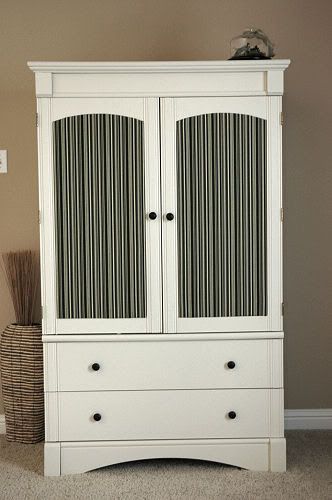
Shhh…listen closely. Doesn’t it scream Pottery Barn to you now? Love it, love it. You can even see the dinosaur diorama on top of the armoire.
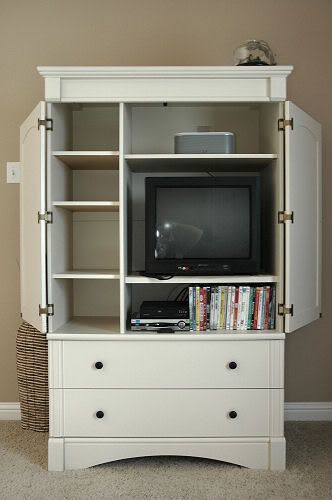
To create the insets, I laid a piece of butcher paper on top of the door and traced the shape of the insets. I cut out the tracing and used it as a template to cut a piece of foam board into the right shape. Then, I heated up my glue gun and glued the fabric onto the board (wrapping the edges around to the back) and glued the board to the door. Easy peasy.
DH even helped me hook up the DVD player and the cable box to the TV. We moved all of Zack’s movies upstairs, so now he can turn his on his own movies during TV time.
Lastly, we moved the ugly but comfy La-Z-Boy recliner out of the master bedroom…
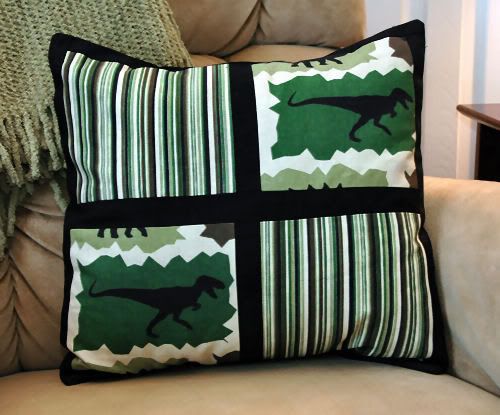
…and put it upstairs in the playroom to add some adult seating. Per some suggestions I received, I added a sage green throw blanket to the chair. I also made a pillow sham for the chair using the three fabrics I have used throughout the room. I’m planning a tutorial on that one, too.
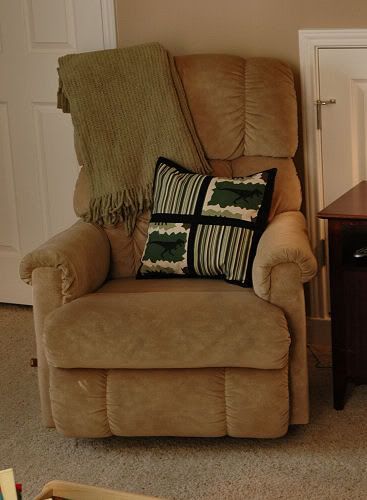
This is such a nice spot to sit now. I have to fight Zack over this space. Love it, love it, love it.
Let’s take a look at it all the whole room put together. Here’s the before:

And here’s the after (please remember I’ve added no accessories yet, so don’t look at my bare walls or the non-matching lamp):
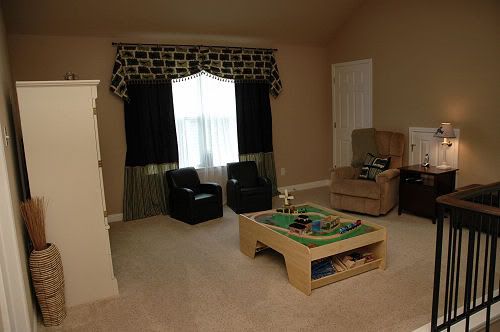
Quite the transformation! As my DH pointed out, “Gosh, it looks, like, put together now.”
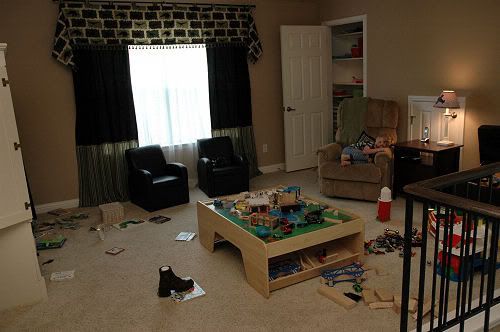
Just so you don’t think I’m always on top of everything, here’s a peak of what the room looked like just before I took pictures. See? Zack stole my chair!
Thanks so much, Melissa, for hosting this Procrastination Party! Otherwise, this room would still look bare and I would still be ignoring it. Now, we are enjoying it to the fullest!
You did great job there. I am amazed you tackled all you wanted to do. The window treatment is awesome. The last picture cracked me up. Too funny!!
You have been hard at work. Everything looks great. Love the fabrics you chose. The armoire doesn’t even look like the same one. Love how you used the stripes on the door.
Absolutely unbelievable. I’m amazed you did all that in two weeks. Those curtains and the armoire turned out beautiful! Can’t wait for the tutorials. It’s a wonderful room!
Shannon
You are INSANE. Flippin unbelievable!!!
what a transformation. absolutely amazing job
Great job! You could decorate my house anytime!!!
Holy cow girl- you are a machine! Fabulous- my projects seem so little now =)
Thanks for sharing.
OMG, I love it all, I too am not a camo fan but those curtains are AWESOME! My fave is the Armoire, I love the fabric panels, and it totally looks like pottery barn! Your Incredible!
I am totally impressed. I want to sit in that room and watch my sons play with their wooden trains…Guess that means it’s inviting huh?
Just a lil patience a some pepping up with some friends can make the whole house looks amazing. Just a lil brush and movements really make a BIG difference.
Great job & well done, indeed!
Great job! Looks awesome! I’m jealous… I went out of town this last weekend… and I have officially procrastinated my procrastination project. LOL.
Wow! I’d say that you do NOT have a procrastination problem. I get going on part of a big project (ie entire room) by say painting a piece of furniture or buying the fabric. Then I stop for a couple of… months! Great job.
Wow…it looks great! Nice job on the armoire and the window treatments are beautiful!
It turned out so beautifully! Wow! The transformation is terrific. My goodness, you are a dynamo!
AMAZING! Love the very last picture. True life.
Your armoire looks amazing – I love the fabric inserts! You are inspiring.
oh my stinkin heck you are such an overachiever!
nicely done. I need to borrow you.
Cute playroom!
How fun.. You made it look like a good place for an adult to hang out, but it still has that little boy playroom feel. I’d have a seat and read there!
Love the armoire. It looks amazing!
Wow! You have been working so hard! I love it all and what you did with the striped fabric is fabulous.
~Kim
That armoire is awesome! I love the curtains that you added to it! Too cute!
Very excellent job!
I’m so very impressed!
Wonderful job! Love your curtains! I am so behind on my project for that party!
Oh Lindsey I REALLY like it!!!! It doesn’t have primary colors, yet still manages to look like a play room! Wow. This has inspired me to think about how I re-do our playroom. I still want it to look like a grown-up space AND a kids’ space. YOu have managed that! And….one daughter loves dinosaurs so I can’t let her see this! 🙂
love it!! the colors are fab..
and obviously it works as a play room.. as they did exactly what was meant to be!!!
Wow! Love it all! Love those curtains and the colors you used are wonderful!
Manuela
I am currently wishing I had an armoire to try that trick on….
So cute! great job!
Lindsay, you did a great job with that room. My fave is the armoire,that looks fantastic!
I’m in love with those curtains,, great job! Didnt even notice the dinosaur until you pointed it out. Looks great
Amazing! It looks finished.
Dee
This is a wonderful transformation and so very frugal! Next time I won’t be doing a project that relies on good weather…in April…in Arkansas. *sigh*
Great job! It’s perfect for your little boy! I think your armoire turned out especially fabulous. Will be looking for the tutorial.
you did a great job!
nice job – i didn’t know you could paint laminate – what’s up with the little door behind your “non-matching” lamp? I’m very curious!
Oh my goodness! I might as well just quit now and retire under a rock. That room looks unbelievable. Exactly how much coffee do you drink every day? What is your secret? Seriously…. inquiring minds want to know!
Great job! I bet that armoire took forever. Love that you weren’t afraid to show us what it looks like when he’s been playing in there–that’s what our house looks like too. 🙂
I LOVE it!! you did a GREAT job!!
~TidyMom
Wow, Lindsay, I love this! I can’t wait for the window treatment tutorial–I am going to be doing more window treatments at our house, and I love the look.
Wow…this looks fantastic! I love the playful edge you gave it with the dinosaur fabric. And your armoire definitely screams PB 🙂
Everything turned out pretty fab. And yes, the armoire now screams Pottery Barn. I love it. I really love how you showed the room prior to cleaning up for the final photo. I love when bloggers admit they are human and the rooms are really lived in. Great job!!!
Wow~such great ideas. It looks like a whole new room. The armoire is my favorite. What a transformation.
Ruth
That armoire looks great! I love it! I’ll be back for the tutorial for sure!
Melissa 😀
Oh my goodness, that is amazing! I love, love, love the curtains. They make such a huge difference in the overall look of the room. Gorgeous!
I can’t wait for your tutorial on painting laminate!
I might have to fight you for the title of Queen that bites off more than she can chew! The makeover is incredible and my boys would go bananas over that dinosaur fabric. Such a great job!
Looks great, I LOVE the TV cabinet.
Wow wow wow!! You totally transformed everything!
Lindsay, the diny fabric is adorable! I love that you tied that in. What a transformation! 🙂 Adorable.
Really cute! Great job… that was a lot of work!
Where did you get your bay window curtain rod?
Adorable!!
Awesome transformation! Love that dinosaur fabric!
I love that dinosaur fabric. It looks so cute now! That’s also what my house looks like on a regular basis.
It does look totally put together now! I can’t believe how much work you put into that…good for you.
Your playroom looks great! Congratulations for getting it all done! I am in awe of your classy use of kid-themed fabric. And you have solved my dilemma of what to do with my cheap ikea dresser that has a hole in the front of one of the drawers. Fabric and foam board is a great idea!
The curtains turned out great – really changes the room. Good job.
That looks SO good! I just left you another comment on how you did the doors of the armoire, but I should have kept reading! Awesome!
Thanks for the link! I really like the pillow you made and might just do the same thing when I get around to making my boys some. I also have the coordinating strip and I liked your idea for adding it to the curtains.
Ahh, thanx so much for posting the steps to paint laminate furniture! My son has the exact same armoire in his room! I just LOVE the way you painted yours, and I’m so excited to tackle his! Great blog! I love that you included the picture of the ‘mess’ (it’s not messy, but I love that you show that everything is not picture perfect, all of the time.) I’m so happy I stumbled across your blog! Keep up the awesome work!