Two months ago, I showed you this desk I picked up at Goodwill for $25. I actually had to fight another lady off of it, which made me want it more. Yes, I’m totally that person.

My husband thought I was crazy. I told him that all he’d have to do is help me tighten up the screws in the legs because they were a little wobbly. He laughed.
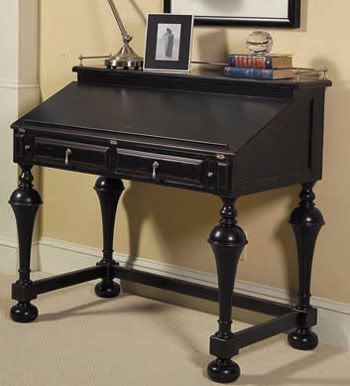
He laughed even harder when I told him that I wanted the finished project to look like a mix between this picture:
and this picture:

Okay, so maybe I had my work cut out for me.
It literally took me two months to finish this project. I wasn’t working on it every day, of course, but I sanded and primed and sanded and painted and painted and painted and sanded and painted …you get the picture. I made the mistake of choosing black glossy paint, which is pretty much the hardest paint to use since it shows EVERY drip and flaw.
Tom’s contribution grew and grew as the days went by. What began with his helping me take out and replace some stripped screws turned into completely replacing the legs and cutting a new skirt that I drew by hand. We also added some trim to hide some of the original flaws.
For two months, I heard Tom complain about how the desk was built by monkeys and that he should just throw it out and build me another one. Today, I heard him say, “Linds, I really like that.”
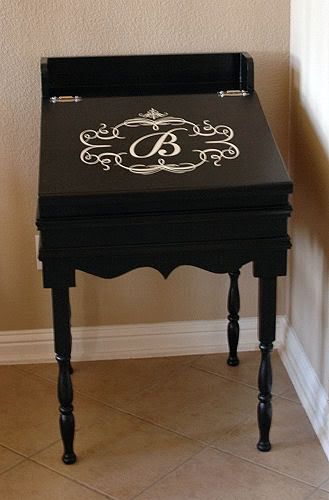
She cleaned up pretty nicely, didn’t she?
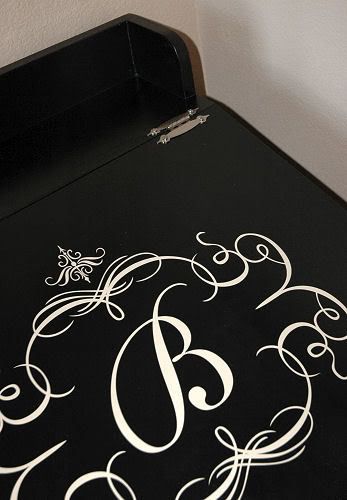
I ordered the vinyl decal from Say It With Style on Etsy. I needed it to be a bit smaller than what she offered in her store, so she custom-sized it for me. It arrived about 3 days after I ordered it, and I couldn’t be more pleased. It’s exactly what I wanted.
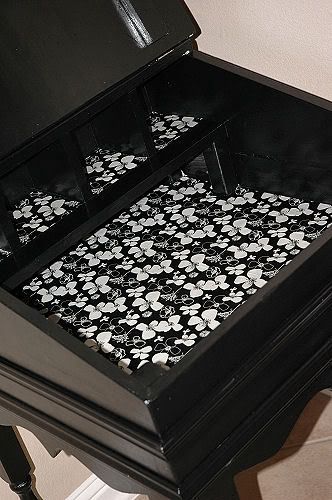
I lined the inside of the desk with a black and ivory floral wrapping paper I found at Target. I just used my Hard Coat Mod Podge so that the lining will be durable for storage.
We have a little nook set into our staircase, and that space will be her new home. I’m now on the search for a wooden chair to paint black and put next to the desk. After adding a chair, a lamp, and some accessories, I think this is going to be one of my favorite little areas.

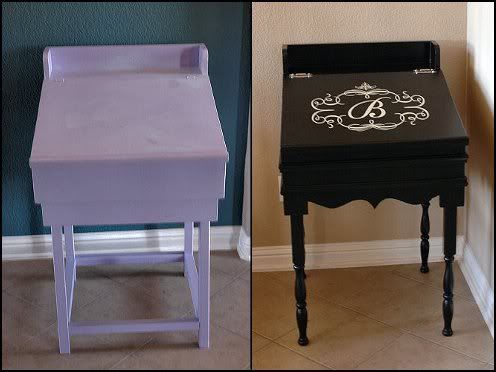
Just for fun, let’s see a before and after side-by-side:
WOW! That is so awesome! I wish I could redo furniture like that!
Wow! So cute!!! Fabulous job!
I seriously want that desk.
You ROCK!!!! This desk is freakin’ adorable!
absolutely adorable! You did an amazing job.
Whoa, what a transformation!! I soooo love that desk! You took a little frog and made a KING, not just a prince!! LOVE it!
Suzanne
great job!! i love seeing the before and after 🙂
What a transformation! Looks amazing! Great job. Jackie
Wow! Definitely a rags to riches story. Love, love, love it 🙂
Wow, that freaking looks AWESOME! I honestly think this is my favorite DIY before and after that I’ve ever seen in blogland!
Sounds very similar to my story. I found a little desk and Mr. Jones thought I was crazy. Check it out here: http://heatherjslife.blogspot.com/2008/07/my-little-desk.html
I think after seeing yours, I might paint a monogram on the drawer.
Great job!
~Heather
Fantastic! You really had quite the vision. I’m so glad it worked out.
That is so awesome! You are so inspiring! I loved the desk before but I would have probably just left it and never realized it could look so much better!
All the best,
Allison
Wow,, that looks great,, like a completley different piece of furniture.. love the decal.
Okay, I am totally, totally impressed. Lindsay, that is beautiful!! Great job!
I know you’re out of town so no pressure at all–but I’m asking for some decorating advice on my blog today. I’ve gotten tons of good ideas and would love to add yours to the mix if you have time!
Beautiful! (And great work wrestling the desk…I did that with an artificial Christmas tree a few years ago…hubby didn’t know I had that in me!)
Amazing transformation! I, too, am “that” lady in thrift stores…I just love finding a diamond in the rough!
What a wonderful job you did! Who would have thought this could have such a transformation? Obviously you did! What great insight you have!
~Sherrie
Lindsay,
That is amazing!!! I wish I were as creative to think of something like that when I go thrift shopping! What to go with me next time? 🙂 Great job!
Wow!!! Just wow!!! I have the perfect spot for something like that…I’ll definately be on the lookout.
OMG!! It is beautiful! I bet that lady would fight you even harder for it now!
Wow, that’s gorgeous! You need to post more details on how you added the scalloped edging and the legs!!!
Gorg!! And with so little effort!! (HA!) It really is beautiful!! The new skirt is what makes it.
Simply Amazing!! I love to see “trash” to treausure projects, they are soooo inspirational. Thanks for sharing.
Just found your blog from hopping through other craft blogs and I am so glad I found your blog. I love what you and your hubby did with that desk. You truly gave it a second life. You should both be proud of your work. 🙂
Wow. Great job, it’s just fabulous. I’ve been looking for a BIG “B” for above our bed, I’ll have to check out out your resource!
Wow this is GORGEOUS!!! You did a super job!
What a makeover!!! Great job, and how cool that you teamed up with the hubby?
This is adorable! I want to make one!
What vision!! That is fantastic! Love it inside and out!
That is gorgeous! I love Goodwill finds. And you have made that little storage desk an heirloom.
dang! good job. i couldn’t possibly do that!
Wow! Wow! Wow!!! That’s amazing! Such a beautiful job. Glad you fought for it! Thanks for sharing this wonderful project. That monogram is just the perfect finishing touch.
What a fantastic re-do!!! Love it! I would have picked it up too. Great vision.
Wow.
This has got to be one of my favorite furniture make-overs ever!
Great job!
Chrissie Grace
Wow, this is fabulous!
Mary
oooooh, gorgeous. Very, very pretty.
Oh gosh… love it. Wish my husband was this handy and that I’d find some great piece like that at Goodwill! My husband’s pretty great… maybe if I made room for him in the garage he’d build me something. 😉
Awesome re-do, and it is totally adorable. Your blog is awesome too. As soon as I have more than a couple minutes I’m going to explore it further. ♥
WOW. Thoroughly impressed!! I’m saving this in my files!! It’s awesome
Wow, that is crazy how gorgeous it turned out!
WOW! double WOW! that looks amazing! I am in love with black furniture. way to go! and kuddos to hubs for helping you out.
Totally amazing! Love how the monogram and the paper inside coordinate. What did you use for the legs?
Lindsay! That is just so cute, what a great transformation. I love the decal on the front, that totally takes it up a notch.
I can tell your husband had to do a bit more than he would have liked, but it looks great! I think I would have fought over it too! You had me with the first photo!
~Kim
OOOOOOOooooh I am green with envy over that little desk. I love everything about it – the liner, the decal, the black paint. Right up my alley, girl, great job.
you did such a great job!! it looks absolutely brilliant!
wow!!! you did a beautiful work! very chic!!
What an amazing job!!!! That little desk is beautiful!
Melissa
nice job!
Excellent job Lindsay but I have to ask what the B stands for… sorry if I missed the answer to this already. Thanks for the inspiration.
lovely!
This is wonderful! I’m an architect and when I moved into my own place I ended up building or fixing up old furniture for my place. I love what you have done with this desk! It turned out beautiful! I’m new to blogging so please check out my new blog http://ontherefrigeratordoor.blogspot.com/
Thanks
Just a beautiful Job! It is such a cute little desk!
Great desk! I love how you added the detail to the front, it looks amazing. Well worth fighting off the other person at the store!
~Michelle
A beautiful makeover! love it!
You did a great job!
As soon as I scrolled to the “after”, I had to go back up. I just couldn’t believe it was the same desk! It. is. perfect!! You must do a tutorial! I love it!!
Oooh La La Lindsey!!!! You GO girl! I heart that desk SO much. Funny thing is, I just painted a trash-picked old sewing table (you can see it on my blog) and have been searching for the perfect decal with my initial. So, thanks to you, I will now be ordering my very own custom-sized decal. Thanks so much for the info and it looks amazing Lindsey!
Visiting from a Soft Place to Land. What an AWESOME makeover!
I am also here from a Soft Place to Land. This is totally awesome. I love your desk and you did such a fabulous job of redoing it. Hugs, Marty
That. Is. GORGEOUS!
Simply adorable. Love the monogram!
It looks fantastic! I am collecting a garage full of items that I have hopes of giving a story like this. Thanks for the inspiration!
WOW! Very cool. I absolutely love. And I see you used Hard Coat Mod Podge. If you like Mod Podge, you might like my blog! Cheers,
Amy
http://www.modpodgerocks.blogspot.com
One of the best transformations I’ve ever seen!
Wow! That’s quite a transformation! Honestly, when I first saw the purple version I couldn’t believe you would pay $25 and fight over it. Obviously, you are a woman with vision. It’s beautiful! So classy!
Wow, this is absolutely lovely. What a nice husband you have to help you, they aren’t all like that, you must be quite special to him.
Great job!!!
http://www.TheOldPostRoadBLOG.blogspot.com
ohmygosh it looks fantastc! 2 months!!! Wow! I am impressed by your patience and endurance!!!
Ok so this is incredible! I cannot believe the difference. I love it!! You did such an Awesome job on this!
The desk is absolutely fantastic! You have a good eye, ’cause yes, that was definitely worth fighting over.
Love the desk! You did a great job! I had to laugh when I saw the wrapping paper you chose to line the desk because I just purchased the identical paper this week to put under some glass for these dressers for a client (It’s a little girls playroom makeover.)
Beautiful job!
Wow! That desk came out so awesome. I love the monogram on the front, so chic. You have a very pretty blog.
wow that looks so much better!! Great job~
Whoa! I can't believe it's the same desk! Amazing!
Curiosity: What do you finish the paint with? I've done numerous spray painting projects with great success, but the one time I brush painted (with glossy) it stained way too easily. And some things (like my cabinets, which were painted haphazardly by the people before us to sell the house) have paint that peels off.
Any suggestions?
Beautiful! Ok, now I see why you would want to hit up the Grande Dame of Goodwills. 🙂 Now you have me inspired, and I might just be the one you fight off for furniture there.
This is GORGEOUS! What vision you had!!
Wow! You have really inspired me. I inherited a desk that is similar and never knew what to do with it. It needs a little work (!)but now that I have seen yours…..I want to do it NOW! I love the initial on it as well.
A million thanks.
Naomi
Absolutly divine!
J’adore! Looks amazing and inspiring for future DIY projects! xx
This looks fantastic Lindsay! I love the way you revamped it with a new skirt and legs. You really did a fabulous job on this. I know what you mean about black paint. It is really hard to get a smooth seamless finish. If you get a chance, check out my blog, I just started it and would welcome any suggestions. 🙂 I do painted furniture, so your item was of particular interest to me. Thanks for sharing!